第一章:Redux Toolkit(⭐)
1.1 概述
- Redux Toolkit 包旨在成为编写 Redux 逻辑的标准方法。它最初是为了帮助解决有关 Redux 的
三个常见问题而创建的:- ① 配置 Redux store 太复杂了。
- ② 必须添加很多软件包才能让 Redux 做任何有用的事情。
- ③ Redux 需要太多样板代码。
注意⚠️:
- 很多人为了简化称呼,也将 Redux Toolkit 称为
RTK。- Redux Toolkit
仅涵盖了 Redux 逻辑 —— 仍然需要使用 React-Redux 使得 React 组件与 Redux store 进行交互。
- 在此,有必要将使用了
Redux Tookit工具包的项目和原生Reux的项目进行对比:
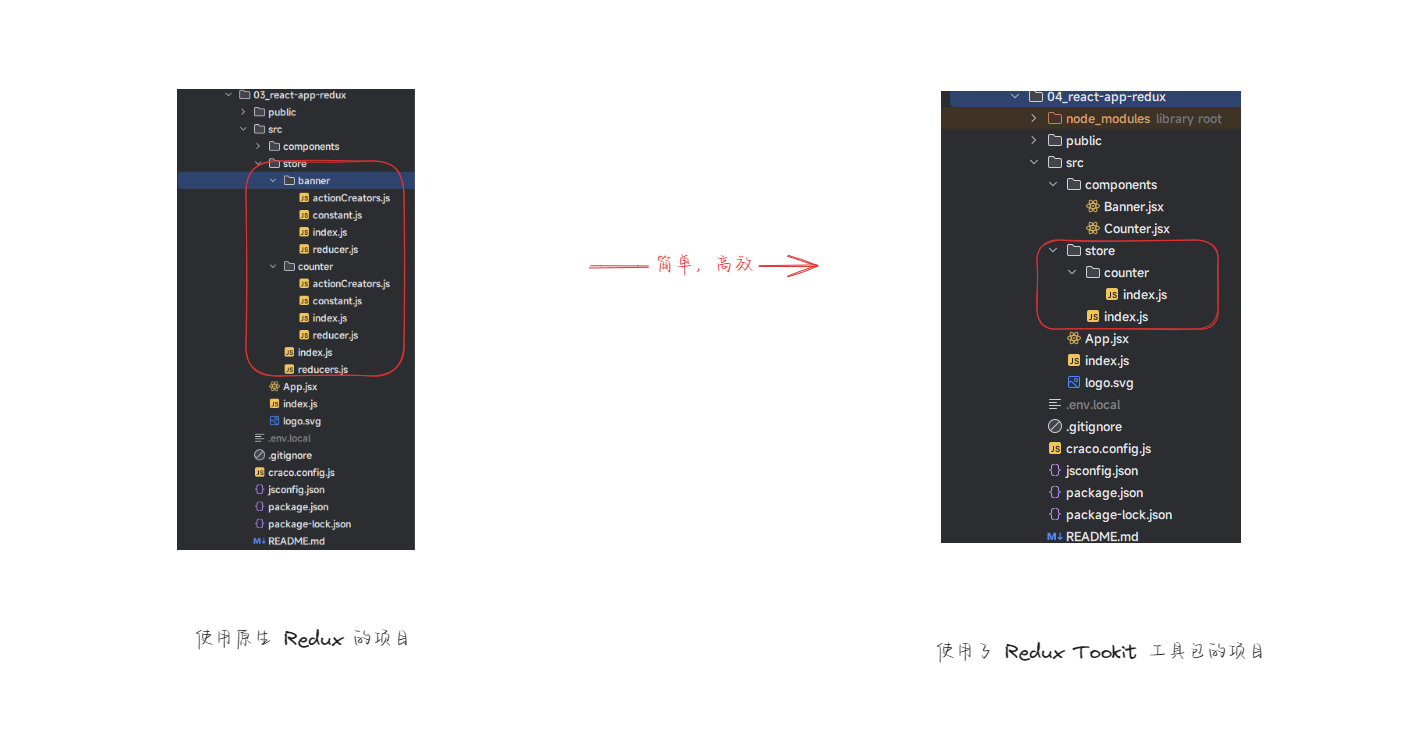
温馨提示:难道,没有觉得代码量少了很多吗?
- Redux Toolkit 还包括强大的数据获取和缓存功能,我们称之为
“RTK Query”。它作为一组单独的入口点包含在包中。它是可选的,但可以消除自己手动编写数据获取逻辑的需要。 - Redux Toolkit 建立在官方建议的最佳实践中,
简化了大多数 Redux 任务,防止了常见错误,并使编写 Redux 应用程序更加容易。 - Redux Toolkit 包含了有助于简化许多常见场景的工具,包括:
配置 Store,创建 reducer 并编写 immutable 更新逻辑, 甚至还包含一次性创建整个 State 的 “Slice”。
1.2 安装
- 安装:
npm install @reduxjs/toolkit react-redux- 当然,官方也提供了利用 Redux Toolkit 和 Redux 与 React 组件的集成:
npx create-react-app my-app --template reduxnpx create-react-app my-app --template redux-typescript注意⚠️:
my-app是项目名,随便命名。
Redux Toolkit 的核心 API,主要有如下的几个:
configureStore():包装createStore()以提供简化的配置选项和良好的默认值。它可以自动组合我们的 slice reducer,添加我们提供的任何 Redux 中间件,默认包含“redux-thunk”,并允许使用 Redux DevTools 扩展。createReducer():允许您向 case reducer 函数提供操作类型的查找表,而不是编写 switch 语句。此外,它会自动使用 immer 库,让您使用普通的可变代码编写更简单的不可变更新,例如'state.todos[3].completed = true'。createAction():生成给定 action type 字符串的 action creator 函数。该函数本身已定义了toString(),因此可以代替常量类型使用。createSlice():接收一组 reducer 函数的对象,一个 slice 切片名和初始状态 initial state,并自动生成具有相应 action creator 和 action type 的 slice reducer。combineSlices():将多个切片组合成一个缩减器,并允许在初始化后“延迟加载”切片。createAsyncThunk():接收一个 action type 字符串和一个返回值为 promise 的函数, 并生成一个 thunk 函数,这个 thunk 函数可以基于之前那个 promise ,dispatch 一组 type 为pending/fulfilled/rejected的 action。createEntityAdapter():生成一系列可复用的 reducer 和 selector,从而管理 store 中的规范化数据。createSelector来源于 Reselect 库,重新 export 出来以方便使用。
Redux Toolkit 更是提供一个新的 RTK Query 数据请求 API。RTK Query 是为 Redux 打造数据请求和缓存的强有力的工具。 它设计出来就是为了 web 应用中加载数据的通用用例,免得手动去写数据请求和缓存的逻辑。
1.3 扫清概念
1.3.1 action
- 我们知道,在 Redux 中,对于 action 的要求,就是普通的 JavaScript 对象,必须包含 type 属性,如:
{ type: 'ADD_TODO', text: 'Go to swimming pool' }
{ type: 'TOGGLE_TODO', index: 1 }
{ type: 'SET_VISIBILITY_FILTER', filter: 'SHOW_ALL' }2
3
- 甚至,你可能会看到以下的示意图:
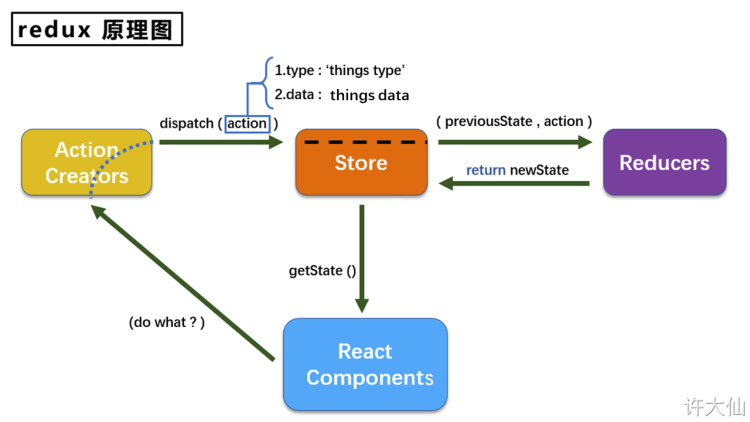
注意⚠️:上面的示意图,完全没毛病,就是根据官方对于 action 的定义;可以将 action 写成
{type: '',data: ''}、{type: '',text: ''}或{type: '',payload: ''}。
- 但是,对于
Redux Toolkit而言,action必须是包含 type 属性和 payload 属性的 JavaScript 对象,如:
const addTodoAction = {
  type: 'todos/todoAdded',
  payload: 'Buy milk'
}2
3
4
注意⚠️:
- 在普通的 redux 项目中,type 只要是字符串就可以了;
- 但是,在
Redux Toolkit中,type 必须写成"域/事件名称"的格式,其中第一部分是这个 action 所属的特征或类别,第二部分是发生的具体事情(了解即可,因为Redux Toolkit会在底层帮助我们生成)。
1.3.2 action creator
- 在普通的 redux 项目中,我们一般会通过 action creator (函数)来帮助我们生成一个 action 对象;目的是,让我们不必每次都手动编写 action 。
const INCREMENT = "counter/increment"

export const incrementAction = (payload) = {
    return {
    	type: INCREMENT,
        payload
	}
}2
3
4
5
6
7
8
// import 略

// 使用的时候
const action = incrementAction(10) // 相当于 {type: 'counter/increment',payload: 10}2
3
4
- 但是,在
Redux Toolkit中,觉得这样的代码实现过于繁琐,其内部提供了 createAction 的 API 来帮助我们生成 action creator 函数,即:
import {createAction} from "@reduxjs/toolkit"

const INCREMENT = "counter/increment"

const incrementAction = createAction(INCREMENT)2
3
4
5
// import 略

// 使用的时候
const action = incrementAction() // 相当于 {type: 'counter/increment'}2
3
4
// import 略

// 使用的时候
const action = incrementAction(10) // 相当于 {type: 'counter/increment',payload: 10}2
3
4
- 我们也看到了,默认的时候,生成的 action creator 只是接收单个参数,并且该参数是 action.payload ;但是,很多时候,我们需要自定义 payload 为其他类型的值,如:对象等;此时,就可以传入一个回调函数(也称为 prepare callback),用于构建自定义的 payload ,即:
import { createAction, nanoid } from '@reduxjs/toolkit'

const INCREMENT = "counter/increment"

const incrementAction = createAction(INCREMENT, text => {
  return {
    payload: {
      text,
      id: nanoid(),
      createdAt: new Date().toISOString(),
    }
  }
})2
3
4
5
6
7
8
9
10
11
12
13
// import 略

// 使用的时候
const action = incrementAction(10) // 相当于 {type: 'counter/increment',payload:{text: 10,id: '4AJvwMSWEHCchcWYga3dj',createdAt: '2019-10-03T07:53:36.581Z'}}2
3
4
注意⚠️:如果传入的是回调函数,那么必须返回一个带有 payload 字段的对象。
1.3.3 reducer
- 在 redux 项目中,reducer 是一个函数,接收当前的 state 和一个 action 对象,必要时决定如何更新状态,并返回新状态。函数签名是:
(state, action) => newState,即:
const initialState = { value: 0 }

const INCREMENT = "counter/increment"

function counterReducer(state = initialState, action) {
  // 检查 reducer 是否关心这个 action
  if (action.type === INCREMENT) {
    // 如果是,复制 `state`
    return {
      ...state,
      // 使用新值更新 state 副本
      value: action.payload + 1
    }
  }
  // 返回原来的 state 不变
  return state
}2
3
4
5
6
7
8
9
10
11
12
13
14
15
16
17
- 但是,在
Redux Toolkit中,提供了 createReducer() 来简化这样的操作,即:
import { createAction, createReducer } from '@reduxjs/toolkit'

const INCREMENT = "counter/increment"
const DECREMENT = "counter/decrement"

const increment = createAction('counter/increment')
const decrement = createAction('counter/decrement')

const counterReducer = createReducer(0 ,builder => {
  builder.addCase(increment, (state, action) => state + action.payload)
  builder.addCase(decrement, (state, action) => state - action.payload)
})2
3
4
5
6
7
8
9
10
11
12
1.3.4 store
- 之前,我们是通过 createStore() 函数来创建 store 对象的,即:
import {applyMiddleware, createStore} from "redux"
import {thunk} from "redux-thunk"
import {composeWithDevToolsDevelopmentOnly} from '@redux-devtools/extension'
import combination from "@/store/reducers"

const composeEnhancers = composeWithDevToolsDevelopmentOnly({
    trace: true // 跟踪源码
});

// 创建 Store 对象
const store = createStore(combination, composeEnhancers(applyMiddleware(thunk)))

export default store2
3
4
5
6
7
8
9
10
11
12
13
- 但是,在
Redux Toolkit中,通过configureStore()来进行简化,即:
import {configureStore} from "@reduxjs/toolkit"
import counterReducer from "./counter"
import bannerReducer from "./banner"

// 通过 configureStore 创建 store 对象
const store = configureStore({
  reducer: {
    counter: counterReducer,
    banner: bannerReducer
  },
  devTools: true // 开启 Redux DevTools ,默认为 true
})

export default store2
3
4
5
6
7
8
9
10
11
12
13
14
1.3.5 dispatch
- 在 redux 中,我们一般通过
store.dispath(action)来触发 redux 中 state 的更新,即:
store.dispatch({ type: 'counter/increment' })console.log(store.getState()) // 通过订阅,或者 connect() 函数来获取- 但是,我们通常会使用 action creator 来分发 action ,即:
const increment = (payload) => {
  return {
    type: 'counter/increment',
    payload
  }
}

store.dispatch(increment())2
3
4
5
6
7
8
console.log(store.getState()) // 通过订阅,或者 connect() 函数来获取- 在
Redux Toolkit中,也是通过 action creator 来分发 action,即:
import {createAction} from "@reduxjs/toolkit"

const INCREMENT = "counter/increment"

const increment = createAction(INCREMENT)2
3
4
5
store.dispatch(increment())1.3.6 selector 函数
- selector 函数可以从 store 状态树中提取指定的片段。随着应用变得越来越大,随着应用变得越来越大,会遇到应用程序的不同部分需要读取相同的数据,selector 可以避免重复这样的读取逻辑:
const selectCounterValue = state => state.value

const currentValue = selectCounterValue(store.getState())
console.log(currentValue)2
3
4
- Selector 函数通常定义在 Redux 应用程序的两个地方:
- ① 在 slice 文件中,与 reducer 逻辑一起。
- ② 在组件文件中,在组件外部,或在 useSelector 中直接定义。
注意⚠️:通常而言,selector 函数是和函数式组件配合使用的;对于类式组件而言,通常使用 connect() 高阶函数。
1.4 重构代码
1.4.1 概述
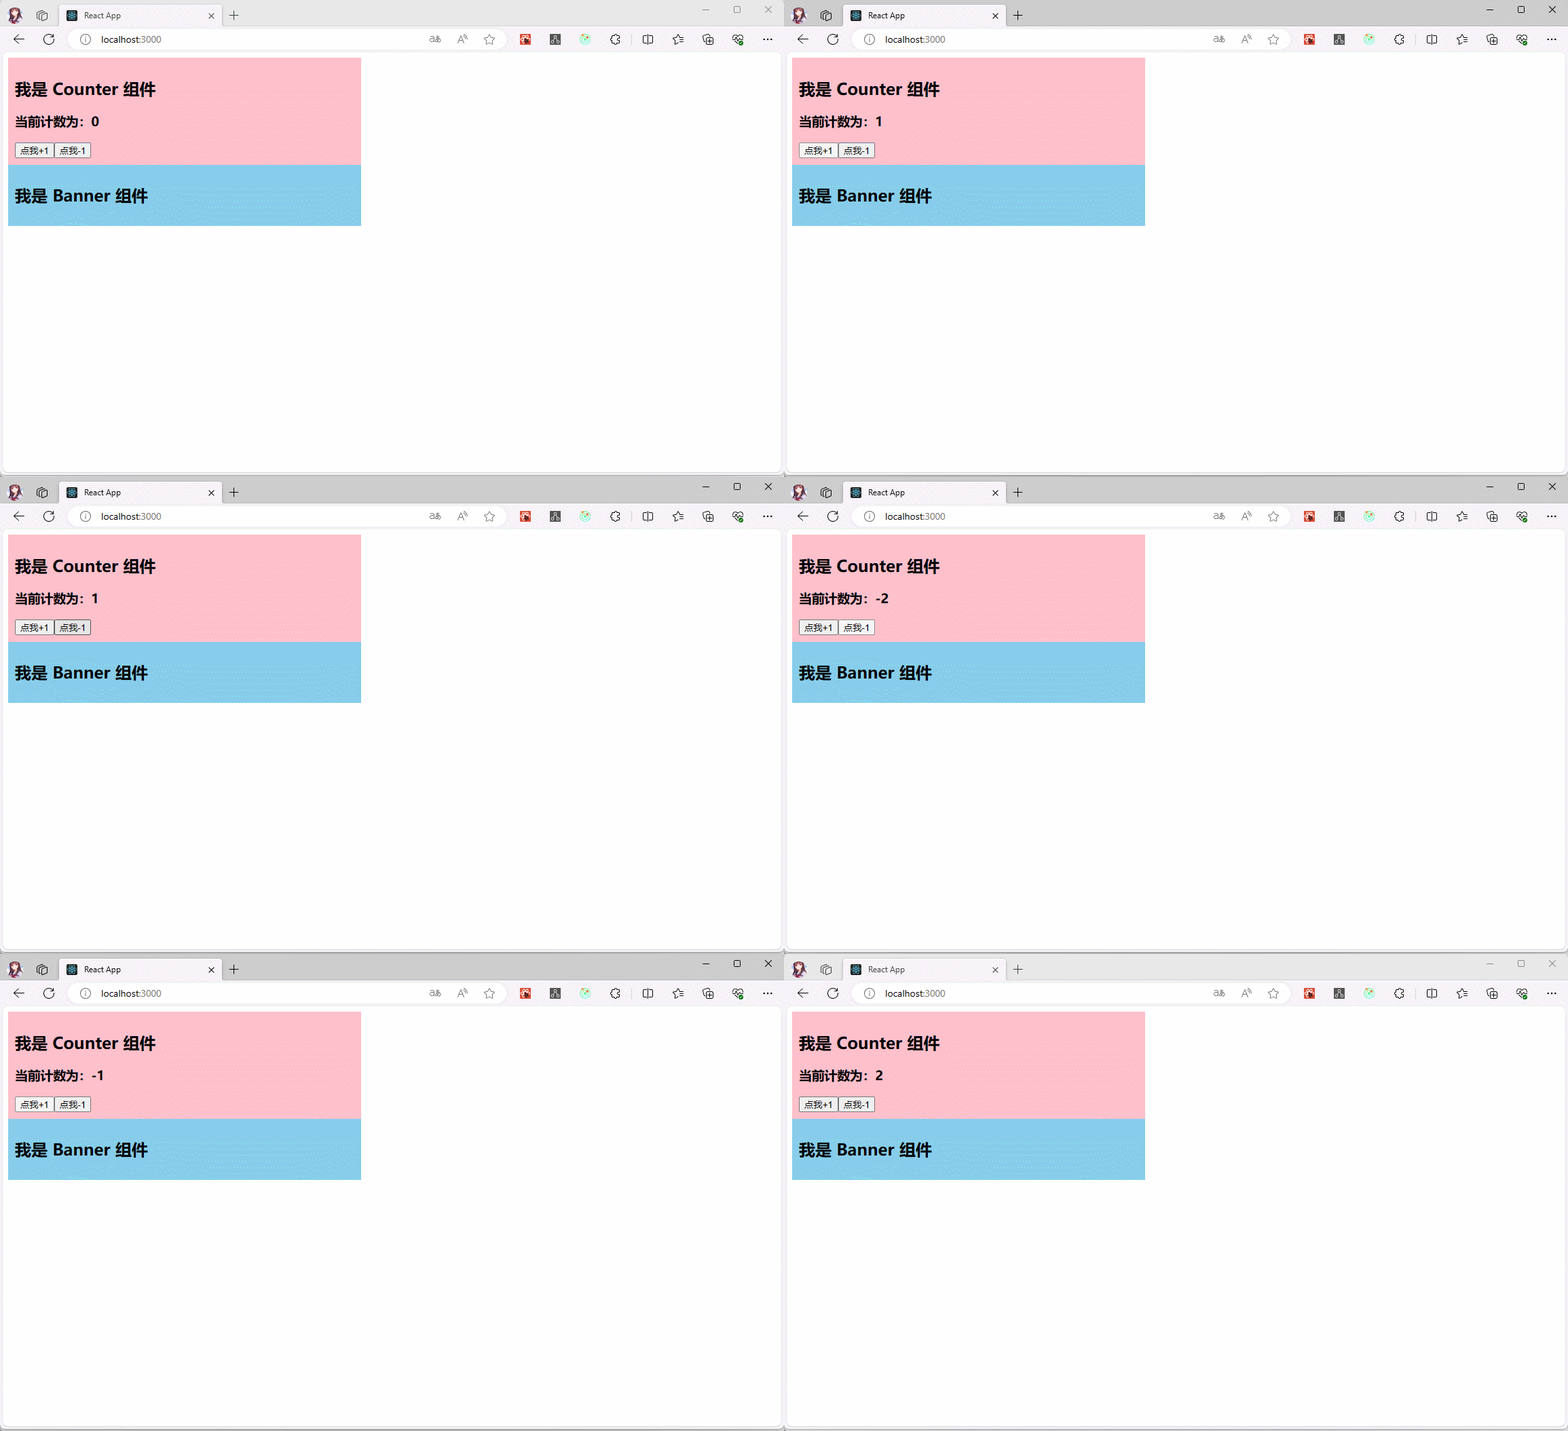
- 使用
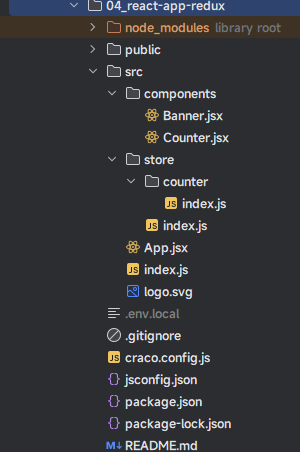
Redux Toolkit重构之前的案例,需要实现如下的效果。
- 其对应的项目结构如下:
1.4.2 创建 Redux Store
- 示例:store/index.js
import {configureStore} from "@reduxjs/toolkit"

// 通过 configureStore 创建 store 对象
const store = configureStore({
  reducer: {},
  devTools: true // 开启 Redux DevTools ,默认为 true
})

export default store2
3
4
5
6
7
8
9
- 需要
注意⚠️的是,上述代码中的 reducer 配置选项,就相当于 redux 中提供的 combineReducers() 函数,即:
import bannerReducer from "@/store/banner"
import counterReducer from "@/store/counter"
import {combineReducers} from "redux";

// 合并 reducer
const combination = combineReducers({
  counter: counterReducer,
  banner: bannerReducer
})

export default combination2
3
4
5
6
7
8
9
10
11
1.4.3 提供 Redux Store 到 React 项目中
- 示例:index.js
import React from 'react'
import ReactDOM from 'react-dom/client'
import App from '@/App'
import {Provider} from "react-redux"
import store from "@/store"

const root = ReactDOM.createRoot(document.getElementById('root'))
root.render(
  <Provider store={store}>
    <React.StrictMode>
      <App/>
    </React.StrictMode>
  </Provider>
)2
3
4
5
6
7
8
9
10
11
12
13
14
1.4.4 创建 Redux 切片
- 示例:store/counter/index.js
import {createSlice} from "@reduxjs/toolkit"

const counterSlice = createSlice({
  name: 'counter', // 用户标记的 slice 的名称
  initialState: { // 初始化值
    count: 0
  },
  reducers: { // 相当于之前的 reducer 函数,即 reducer(state=initialState,action) {};是对象类型,可以添加很多函数
    increment(state, action) { // 相当于之前的 case 语句
      state.count = state.count + action.payload
    },
    decrement: (state, action) => { // 相当于之前的 case 语句
      return {
        ...state,
        count: state.count - action.payload
      }
    }
  }
})

export const {increment, decrement} = counterSlice.actions // 导出 action
export default counterSlice.reducer // 导出 reducer2
3
4
5
6
7
8
9
10
11
12
13
14
15
16
17
18
19
20
21
22
注意⚠️:
createSlice()函数用来帮助我们生成 action 类型字符串、action creator 函数和 action 对象。- 上面之所以能使用
state.count = state.count + action.payload,是因为 Redux Toolkit 允许我们在 reducer 中编写“突变”逻辑。它实际上并没有改变状态,因为它使用了 Immer 库,检测对“草稿状态”的更改,并生成全新的基于这些更改的不可变状态。- name 属性:用来给 devtools 工具使用的,即用户标记的 slice 名称。
- initialState 属性:中配置的就是初始化 state 的值。
- reducers 属性:相当于之前的 reducer 函数,而其中的每个函数,都类似于之前的 case 语句;并且,action 的属性
必须是 type 和 action 。
1.4.5 将切片添加到 store 中
- 示例:store/index.js
import {configureStore} from "@reduxjs/toolkit"
import counterReducer from "./counter"

// 通过 configureStore 创建 store 对象
const store = configureStore({
  reducer: {
    counter: counterReducer
  },
  devTools: true // 开启 Redux DevTools ,默认为 true
})

export default store2
3
4
5
6
7
8
9
10
11
12
1.4.6 在 React 组件中使用 Redux 的状态和操作
- 示例:components/Counter.jsx
import React, {PureComponent} from 'react'
import {connect} from "react-redux"
import {decrement, increment} from "@/store/counter"

class Counter extends PureComponent {

  state = {
    message: '我是 Counter 组件',
  }

  render() {
    const {message} = this.state
    console.log('Counter', this.props)
    const {count, add, sub} = this.props
    return (
      <div>
        <h2>{message}</h2>
        <h3>当前计数为:{count}</h3>
        <button onClick={() => add(1)}>点我+1</button>
        <button onClick={() => sub(1)}>点我-1</button>
      </div>
    )
  }
}

const mapStateToProps = (state) => ({
  count: state.counter.count
})

const mapDispatchToProps = (dispatch) => ({
  add: (num) => dispatch(increment(num)),
  sub: (num) => dispatch(decrement(num))
})

export default connect(mapStateToProps, mapDispatchToProps)(Counter)2
3
4
5
6
7
8
9
10
11
12
13
14
15
16
17
18
19
20
21
22
23
24
25
26
27
28
29
30
31
32
33
34
35
1.4.7 其余的代码
- 示例:
- 其中,components/Banner.jsx
import React, {PureComponent} from 'react'

class Banner extends PureComponent {

  state = {
    message: '我是 Banner 组件',
  }

  render() {
    const {message} = this.state
    return (
      <div>
        <h2>{message}</h2>
      </div>
    )
  }
}

export default Banner2
3
4
5
6
7
8
9
10
11
12
13
14
15
16
17
18
19
- 其中,App.jsx
import React, {PureComponent} from 'react'
import Counter from "@/components/Counter"
import Banner from "@/components/Banner"

class App extends PureComponent {

  state = {}

  render() {
    return (
      <div>
        <div style={{background: "pink", padding: '10px', width: '500px'}}>
          <Counter/>
        </div>
        <div style={{background: "skyblue", padding: '10px', width: '500px'}}>
          <Banner/>
        </div>
      </div>
    )
  }
}

export default App2
3
4
5
6
7
8
9
10
11
12
13
14
15
16
17
18
19
20
21
22
23
1.5 重构代码
1.5.1 概述
- 我们知道,Redux 结合
redux-thunk,是可以 dispath (action) 的时候,action 也可以是函数,以便实现异步功能;当然,Redux Toolkit也必须支持。 - 需求:实现下面的功能。
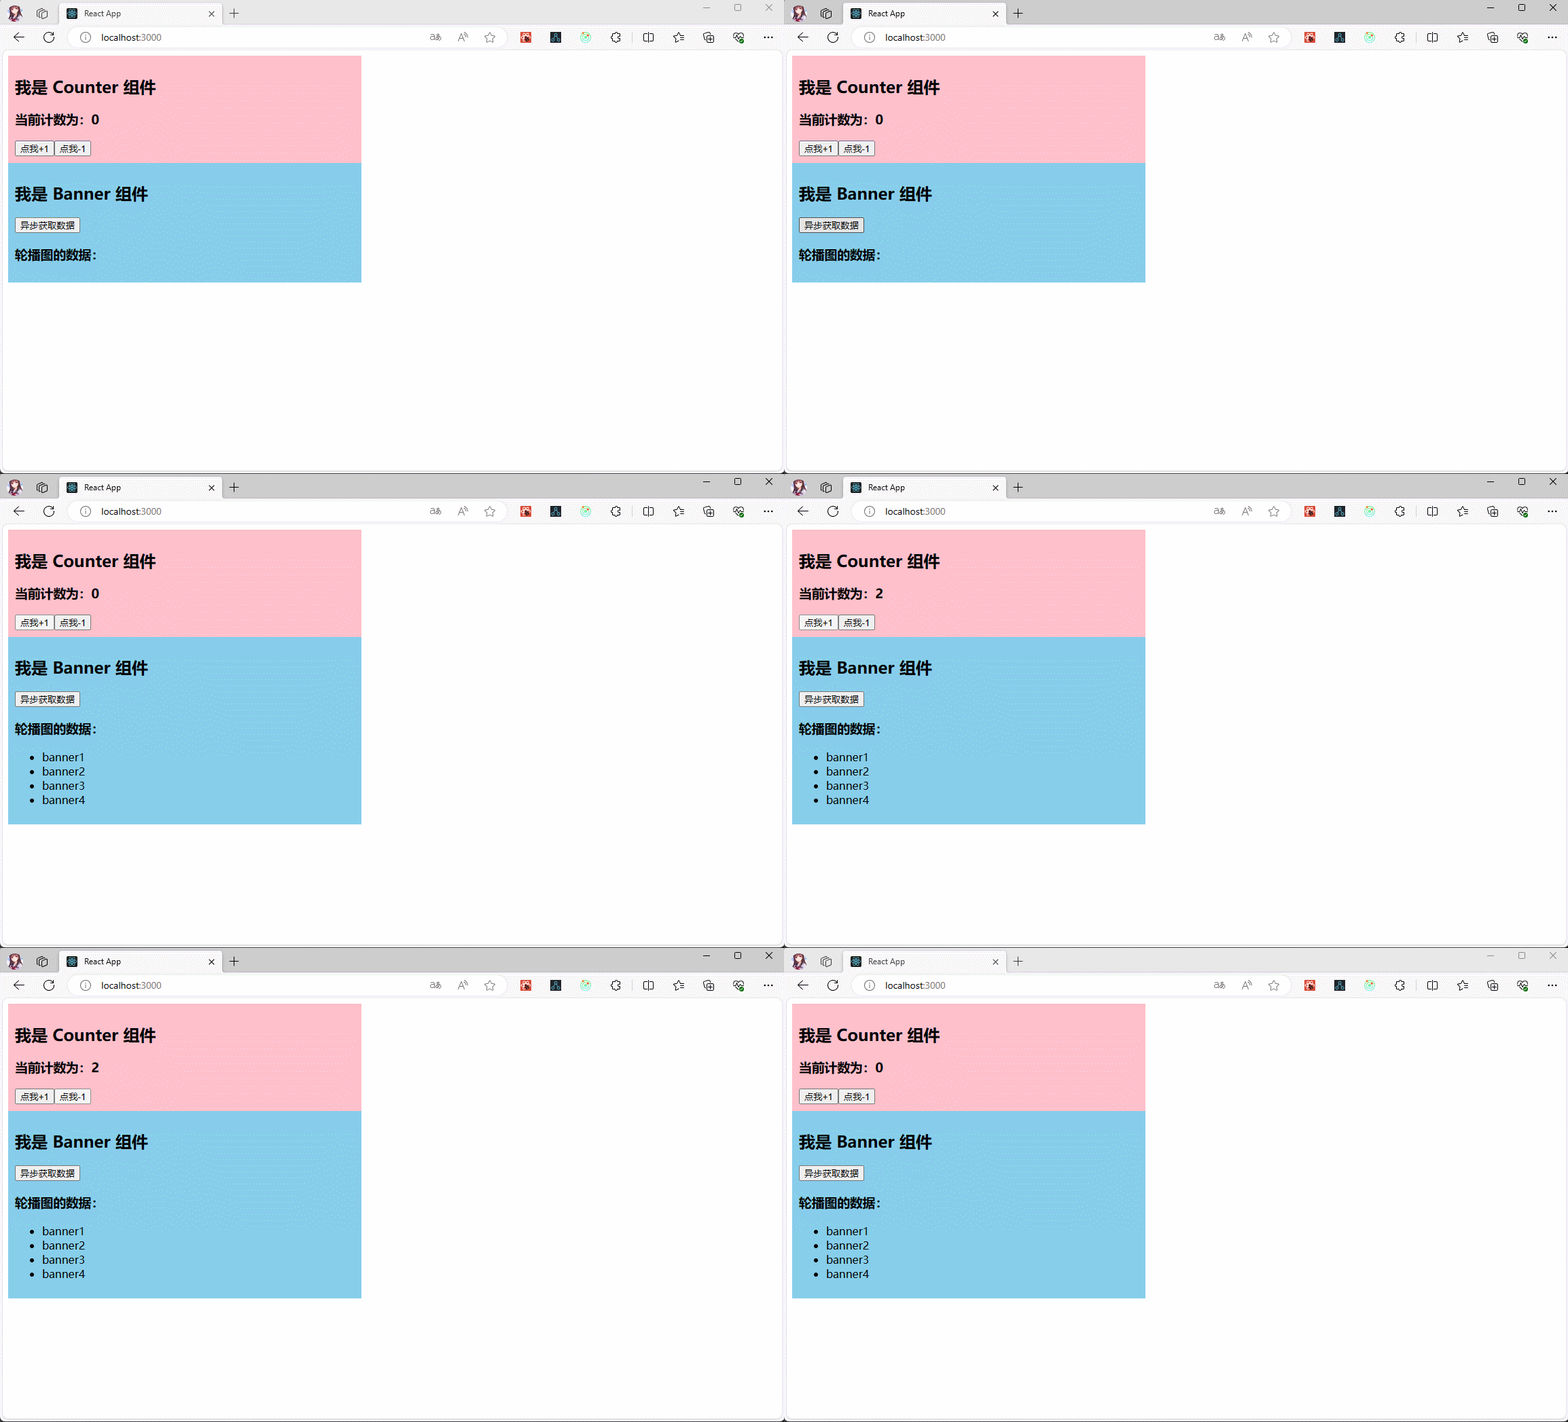
1.5.2 案例
- 示例:
- 其中,store/banner.js
import {createSlice} from "@reduxjs/toolkit"

export const addAsyncBanner = () => {
  return (dispatch, getState) => {
    // 执行异步逻辑操作
    console.log('addAsyncBannerAction', getState())
    setTimeout(() => {
      dispatch(addBanner(["banner1", "banner2", "banner3", "banner4"]))
    }, 2000)
  }
}

const bannerSlice = createSlice({
  name: 'banner',
  initialState: {
    banners: [],
  },
  reducers: { // 同步
    addBanner(state, action) {
      state.banners = action.payload
    }
  }
})


export const {addBanner} = bannerSlice.actions
export default bannerSlice.reducer2
3
4
5
6
7
8
9
10
11
12
13
14
15
16
17
18
19
20
21
22
23
24
25
26
27
注意⚠️:
- ① 和之前原生的 redux 逻辑一样,diapath(action) 中的 action 是一个函数,返回 action 可以是一个函数,并且该函数会被调用,并传递给这个函数一个 dispatch 函数和一个 getState 函数的参数,以便我们编写异步操作。
- ② createSlice() 中默认没有提供对异步的任何支持,所以我们应该将它们作为单独的函数编写在同一个 slice 文件中,这样我们就可以访问该 slice 中普通的 action 了。
- 其中,components/Banner.jsx
import React, {PureComponent} from 'react'
import {connect} from "react-redux";
import {addAsyncBanner} from "@/store/banner"

class Banner extends PureComponent {

  state = {
    message: '我是 Banner 组件',
  }

  render() {
    const {message} = this.state
    console.log('Banner', this.props)
    const {banners, addBanner} = this.props
    return (
      <div>
        <h2>{message}</h2>
        <button onClick={() => addBanner()}>异步获取数据</button>
        <h3>轮播图的数据:</h3>
        <ul>
          {
            banners && banners.map((item, index) => {
              return (<li key={index}>{item}</li>)
            })
          }
        </ul>
      </div>
    )
  }
}

const mapStateToProps = (state) => ({
  banners: state.banner.banners
})

const mapDispatchToProps = (dispatch) => ({
  addBanner: () => dispatch(addAsyncBanner()),
})
export default connect(mapStateToProps, mapDispatchToProps)(Banner)2
3
4
5
6
7
8
9
10
11
12
13
14
15
16
17
18
19
20
21
22
23
24
25
26
27
28
29
30
31
32
33
34
35
36
37
38
39
1.6 疑惑?
- 其实,上述的演示仅仅是 Redux Toolkit 中的
冰山一角而已,如:Ajax 的请求通常会使用 Promise (Pending、Fulfilled、Rejected)来进行开发,那么如何在 Redux 获取异步数据的时候,直接获取到请求的状态?
注意⚠️:对于 Redux Toolkit 的其它知识,将会在 React Hooks 之后,统一讲解!!!
第二章:Redux Toolkit 的数据不可变(了解)
- 在 React 开发中,我们总会强调数据的不可变:无论是类组件的中的 state ,还是 Redux 中管理的 state 。
- 之前,我们经常会使用浅拷贝来完成这些操作;但是,浅拷贝也会存在问题:
- ① 过大的对象,在进行浅拷贝的时候会造成性能的浪费。
- ② 浅拷贝后的对象,在深层改变的时候,依然会对之前的对象产生影响。
import * as ActionTypes from './constant'

// 初始化的 state
const initialState = {
  banners: []
}

/**
 * 定义 reducer 纯函数
 * @param state 当前的 state.js
 * @param action 本次需要更新的 action
 * @return store 中存储的 state.js
 */
const reducer = (state = initialState, action) => {
  switch (action.type) {
    case ActionTypes.ADD_BANNER:
      return {
        ...state,
        banners: action.payload
      }
    default: {
      return state
    }
  }
}

export default reducer2
3
4
5
6
7
8
9
10
11
12
13
14
15
16
17
18
19
20
21
22
23
24
25
26
27
- 为了解决这些问题,Redux Toolkit 在底层使用了 immerjs 的库,来保证数据的不可变。
注意⚠️:
- 我们只能在 Redux Toolkit 的
createSlice和createReducer中编写“mutation”逻辑,因为它们在内部使用 Immer!- 如果我们在没有 Immer 的 reducer 中编写 mutation 逻辑,它将
改变状态并导致错误!
第三章:自定义 connect 函数(了解)
3.1 概述
- 我们通过自定义 connect 函数来模拟 react-redux 中的 connect 函数。
3.2 案例
- 需求:新增一个 Home 组件,用来测试自定义的 connect 函数。
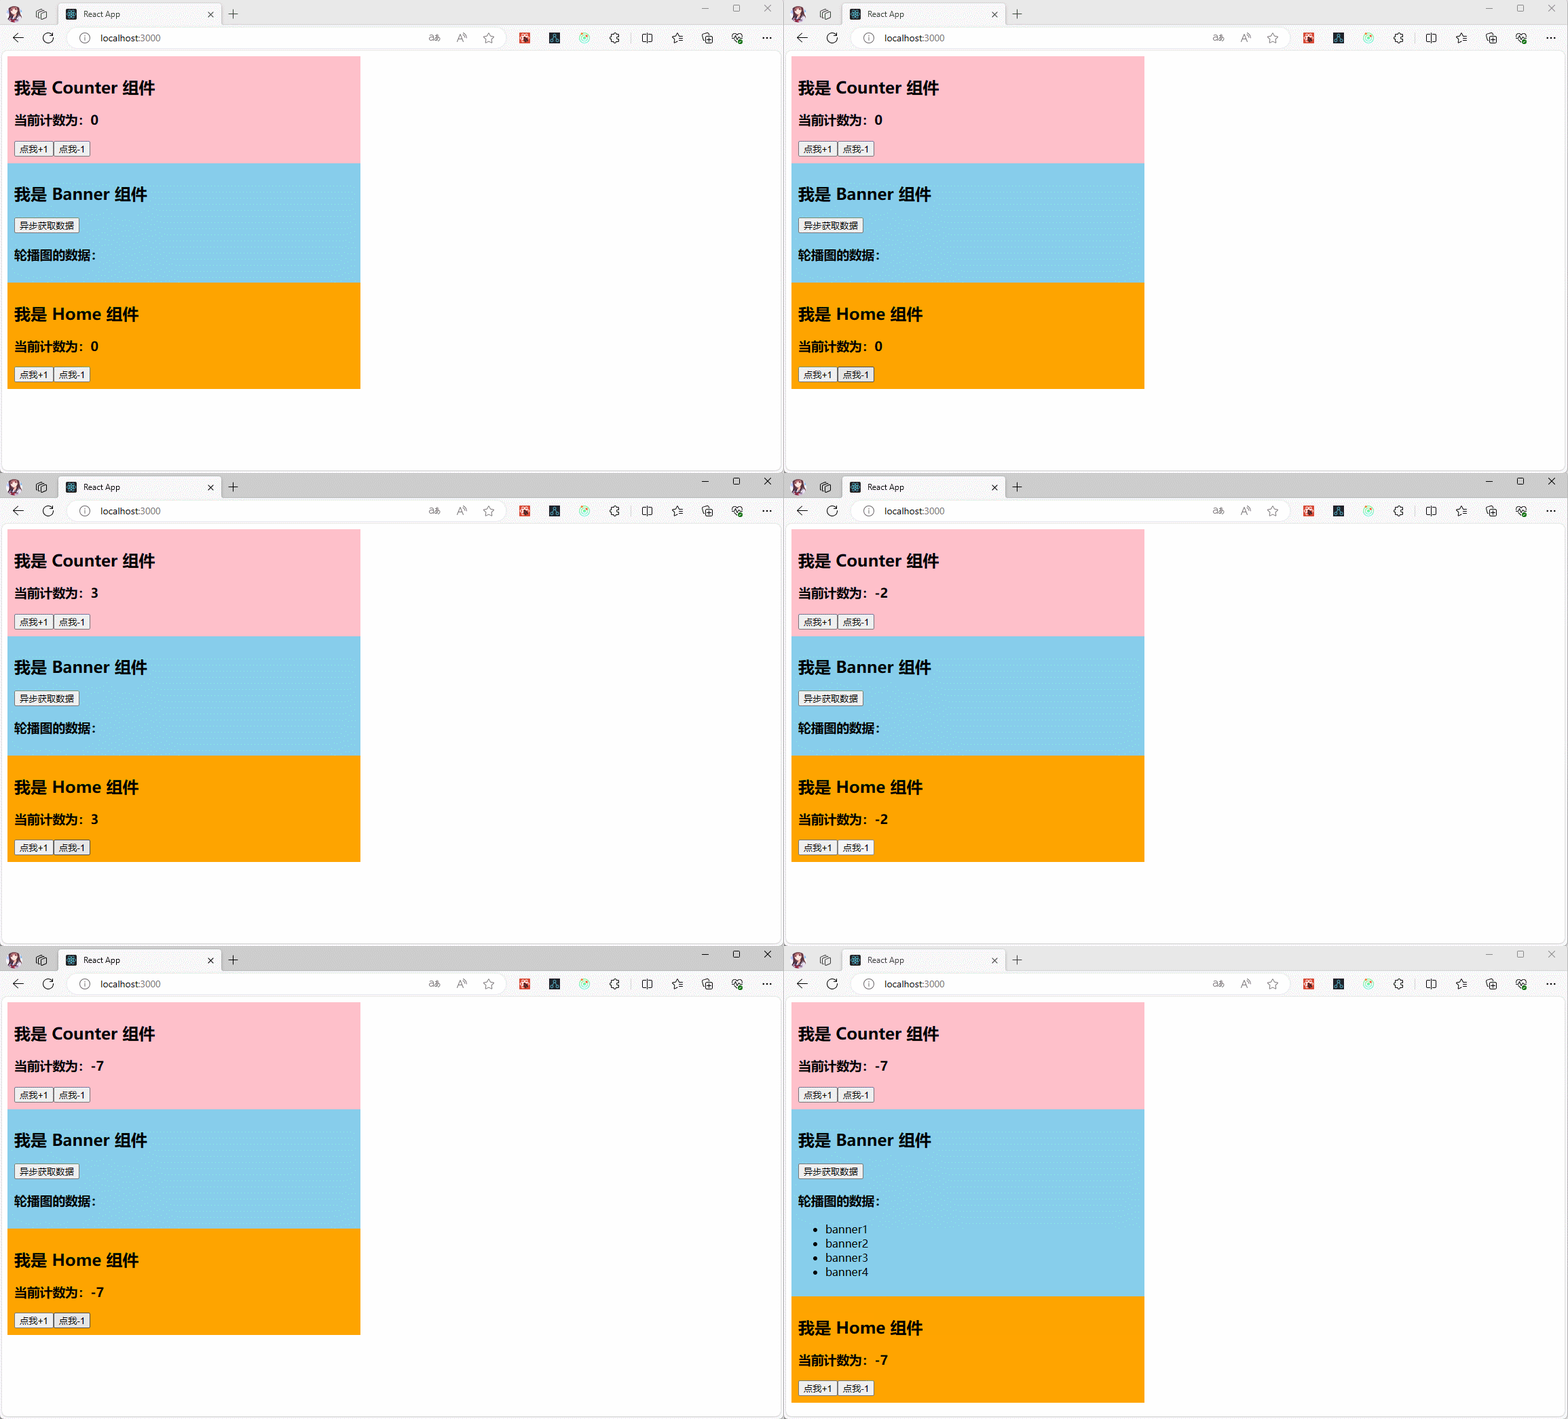
- 项目结构:
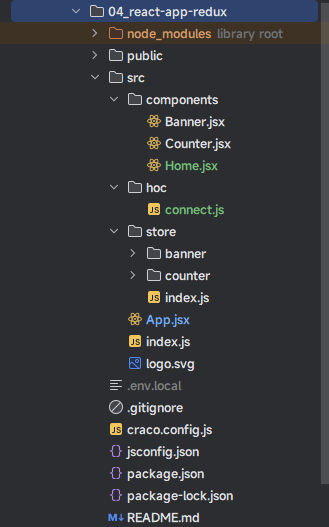
- 自定义 connect 函数:
import {PureComponent} from "react"
import store from "@/store"

/**
 * connect
 * @param mapStateToProps 函数
 * @param mapDispatchToProps 函数
 * @returns function(*): NewComponent
 */
export function connect(mapStateToProps, mapDispatchToProps) {
  // 高阶组件
  function fn(WrappedComponent) {
    class NewComponent extends PureComponent {

      componentDidMount() {
        store.subscribe(() => {
          this.forceUpdate()
        })
      }

      render() {
        const stateObj = mapStateToProps(store.getState())
        console.log('connect state', stateObj)
        const dispatchObj = mapDispatchToProps(store.dispatch);
        console.log('connect dispatchObj', dispatchObj)
        return (
          <WrappedComponent {...this.props} {...stateObj} {...dispatchObj}></WrappedComponent>
        )
      }
    }

    return NewComponent

  }

  return fn
}2
3
4
5
6
7
8
9
10
11
12
13
14
15
16
17
18
19
20
21
22
23
24
25
26
27
28
29
30
31
32
33
34
35
36
37
- Home 组件如下所示:
import {PureComponent} from "react"
import {connect} from "@/hoc/connect"
import {decrement, increment} from "@/store/counter"

class Home extends PureComponent {

  state = {
    message: '我是 Home 组件',
  }

  render() {
    const {message} = this.state
    console.log('Home', this.props)
    const {count, add, sub} = this.props
    return (
      <div>
        <h2>{message}</h2>
        <h3>当前计数为:{count}</h3>
        <button onClick={() => add(1)}>点我+1</button>
        <button onClick={() => sub(1)}>点我-1</button>
      </div>
    )
  }
}

const mapStateToProps = (state) => ({
  count: state.counter.count
})

const mapDispatchToProps = (dispatch) => ({
  add: (num) => dispatch(increment(num)),
  sub: (num) => dispatch(decrement(num))
})

export default connect(mapStateToProps, mapDispatchToProps)(Home)2
3
4
5
6
7
8
9
10
11
12
13
14
15
16
17
18
19
20
21
22
23
24
25
26
27
28
29
30
31
32
33
34
35
- 其内部原理,如下所示:
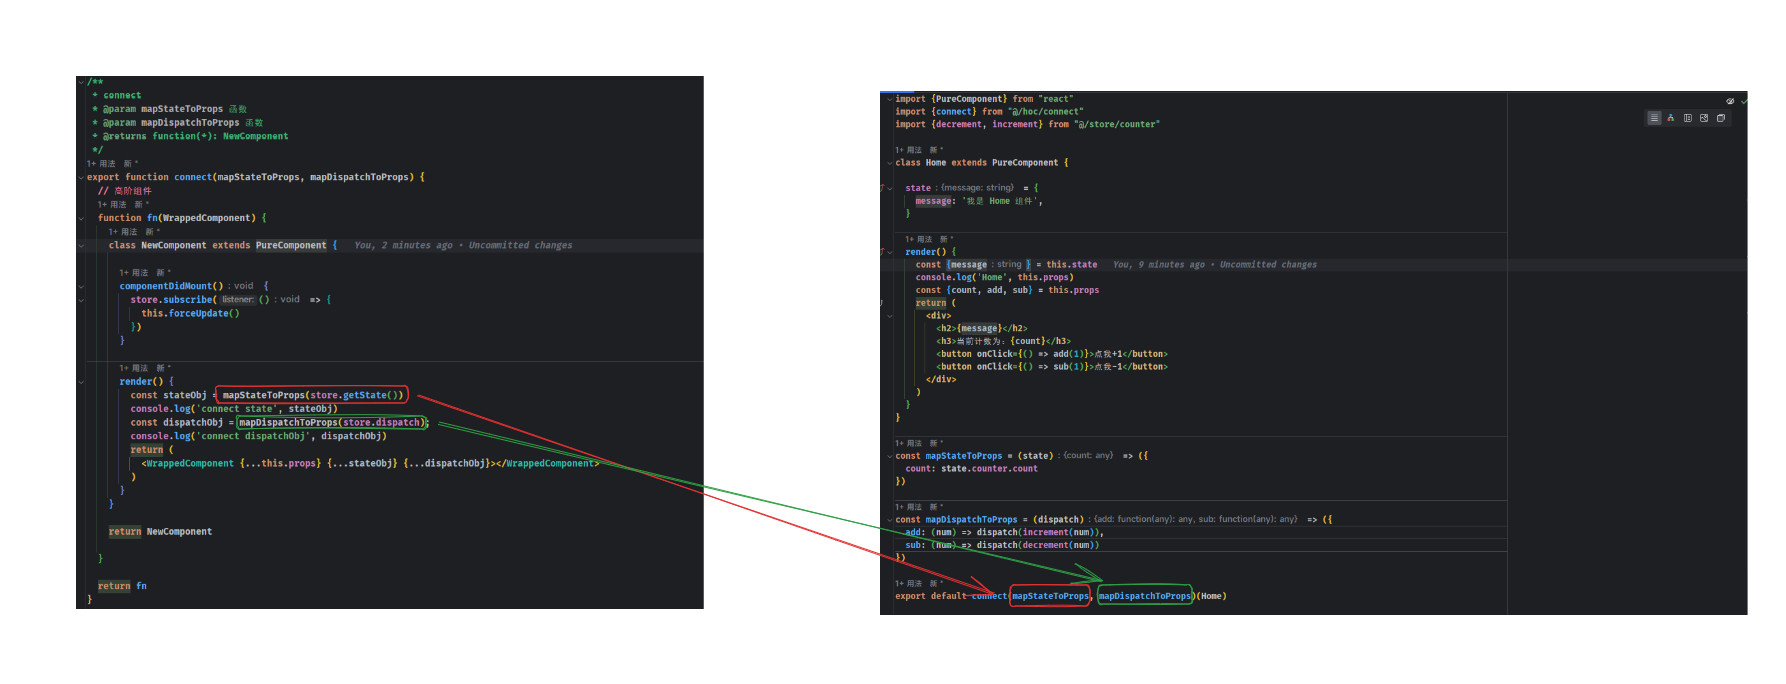
- 虽然,我们也实现了对应的效果;但是,每次数据更新的时候,都是强制刷新整个页面,不够优雅:
import {PureComponent} from "react"
import store from "@/store"

/**
 * connect
 * @param mapStateToProps 函数
 * @param mapDispatchToProps 函数
 * @returns function(*): NewComponent
 */
export function connect(mapStateToProps, mapDispatchToProps) {
  // 高阶组件
  function fn(WrappedComponent) {
    class NewComponent extends PureComponent {

      componentDidMount() {
        store.subscribe(() => {
          this.forceUpdate()
        })
      }

      render() {
        const stateObj = mapStateToProps(store.getState())
        console.log('connect state', stateObj)
        const dispatchObj = mapDispatchToProps(store.dispatch);
        console.log('connect dispatchObj', dispatchObj)
        return (
          <WrappedComponent {...this.props} {...stateObj} {...dispatchObj}></WrappedComponent>
        )
      }
    }

    return NewComponent

  }

  return fn
}2
3
4
5
6
7
8
9
10
11
12
13
14
15
16
17
18
19
20
21
22
23
24
25
26
27
28
29
30
31
32
33
34
35
36
37
- 解决方案就是:将 connect 函数的高阶组件中将
state设置为mapStateToProps(store.getState()),即:
import {PureComponent} from "react"
import store from "@/store"

/**
 * connect
 * @param mapStateToProps 函数
 * @param mapDispatchToProps 函数
 * @returns function(*): NewComponent
 */
export function connect(mapStateToProps, mapDispatchToProps) {
  // 高阶组件
  function fn(WrappedComponent) {
    class NewComponent extends PureComponent {

      state = mapStateToProps(store.getState())

      componentDidMount() {
        this.unSubscribe = store.subscribe(() => {
          this.setState(mapStateToProps(store.getState()))
        })
      }

      componentWillUnmount() {
      	this.unSubscribe()
      }

      render() {
        const stateObj = this.state
        console.log('connect state', stateObj)
        const dispatchObj = mapDispatchToProps(store.dispatch);
        console.log('connect dispatchObj', dispatchObj)
        return (
          <WrappedComponent {...this.props} {...stateObj} {...dispatchObj}></WrappedComponent>
        )
      }
    }

    return NewComponent

  }

  return fn
}2
3
4
5
6
7
8
9
10
11
12
13
14
15
16
17
18
19
20
21
22
23
24
25
26
27
28
29
30
31
32
33
34
35
36
37
38
39
40
41
42
43
3.3 分析缺点并进行解决
3.3.1 概述
- 在上面的自定义 connect 函数,会依赖导入的 store ,即:
import {PureComponent} from "react"
import store from "@/store"

/**
 * connect
 * @param mapStateToProps 函数
 * @param mapDispatchToProps 函数
 * @returns function(*): NewComponent
 */
export function connect(mapStateToProps, mapDispatchToProps) {
  // 高阶组件
  function fn(WrappedComponent) {
    class NewComponent extends PureComponent {

      state = mapStateToProps(store.getState())

      componentDidMount() {
        this.unSubscribe = store.subscribe(() => {
          this.setState(mapStateToProps(store.getState()))
        })
      }

      componentWillUnmount() {
      	this.unSubscribe()
      }

      render() {
        const stateObj = this.state
        console.log('connect state', stateObj)
        const dispatchObj = mapDispatchToProps(store.dispatch);
        console.log('connect dispatchObj', dispatchObj)
        return (
          <WrappedComponent {...this.props} {...stateObj} {...dispatchObj}></WrappedComponent>
        )
      }
    }

    return NewComponent

  }

  return fn
}2
3
4
5
6
7
8
9
10
11
12
13
14
15
16
17
18
19
20
21
22
23
24
25
26
27
28
29
30
31
32
33
34
35
36
37
38
39
40
41
42
43
- 难道,我们通过 npm 打包上传到 npm 中央仓库 之后,让用户 npm install 之后,手动修改源码;显然,不现实。最为正确的做法,就是应该提供一个 Provider ,并且该 Provider 就是通过 React 内部的 Context API 来实现的。
3.3.2 自定义 Provider
- 项目结构:
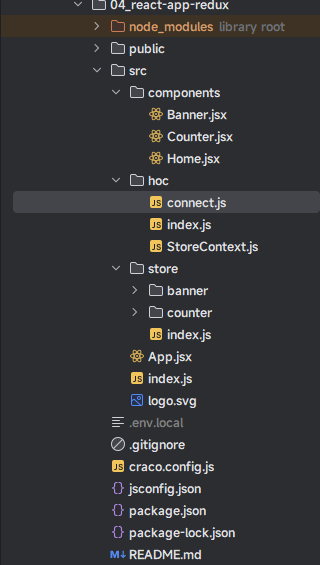
- ① 实现 connect 函数以及 Provider :
- 其中,hoc/createContext.js
import {createContext} from 'react'

// 创建 StoreContext 对象
const StoreContext = createContext({})

// 导出
export {
  StoreContext
}2
3
4
5
6
7
8
9
- 其中,hoc/connect.js
import {PureComponent} from "react"
import {StoreContext} from "./StoreContext"

/**
 * connect
 * @param mapStateToProps 函数
 * @param mapDispatchToProps 函数
 * @returns function(*): NewComponent
 */
export function connect(mapStateToProps, mapDispatchToProps) {
  // 高阶组件
  function fn(WrappedComponent) {
    class NewComponent extends PureComponent {

      static contextType = StoreContext

      constructor(props, context) {
        super(props, context);
        this.state = this.context.getState()
      }

      componentDidMount() {
        this.unSubscribe = this.context.subscribe(() => {
          this.setState(this.context.getState())
        })
      }

      componentWillUnmount() {
        this.unSubscribe()
      }

      render() {
        console.log('NewComponent', this)
        console.log('connect context', this.context)
        const stateObj = mapStateToProps(this.context.getState())
        console.log('connect state', stateObj)
        const dispatchObj = mapDispatchToProps(this.context.dispatch)
        console.log('connect dispatchObj', dispatchObj)
        return (
          <WrappedComponent {...this.props} {...stateObj} {...dispatchObj}></WrappedComponent>
        )
      }
    }

    return NewComponent

  }

  return fn
}2
3
4
5
6
7
8
9
10
11
12
13
14
15
16
17
18
19
20
21
22
23
24
25
26
27
28
29
30
31
32
33
34
35
36
37
38
39
40
41
42
43
44
45
46
47
48
49
50
- ② 在 index.js 中应用自己封装的 Provider :
import React from 'react'
import ReactDOM from 'react-dom/client'
import App from '@/App'
import store from "@/store"
import {StoreContext} from "@/hoc"

const root = ReactDOM.createRoot(document.getElementById('root'))
root.render(
  <StoreContext.Provider value={store}>
    <React.StrictMode>
      <App/>
    </React.StrictMode>
  </StoreContext.Provider>
)2
3
4
5
6
7
8
9
10
11
12
13
14
- ③ 在各个组件中使用自己封装的 connect 函数:
import {PureComponent} from "react"
import {connect} from "@/hoc"
import {decrement, increment} from "@/store/counter"

class Home extends PureComponent {

  state = {
    message: '我是 Home 组件',
  }

  render() {
    const {message} = this.state
    console.log('Home', this.props)
    const {count, add, sub} = this.props
    return (
      <div>
        <h2>{message}</h2>
        <h3>当前计数为:{count}</h3>
        <button onClick={() => add(1)}>点我+1</button>
        <button onClick={() => sub(1)}>点我-1</button>
      </div>
    )
  }
}

const mapStateToProps = (state) => ({
  count: state.counter.count
})

const mapDispatchToProps = (dispatch) => ({
  add: (num) => dispatch(increment(num)),
  sub: (num) => dispatch(decrement(num))
})

export default connect(mapStateToProps, mapDispatchToProps)(Home)2
3
4
5
6
7
8
9
10
11
12
13
14
15
16
17
18
19
20
21
22
23
24
25
26
27
28
29
30
31
32
33
34
35
import React, {PureComponent} from 'react'
import {connect} from "@/hoc"
import {decrement, increment} from "@/store/counter"

class Counter extends PureComponent {

  state = {
    message: '我是 Counter 组件',
  }

  render() {
    const {message} = this.state
    console.log('Counter', this.props)
    const {count, add, sub} = this.props
    return (
      <div>
        <h2>{message}</h2>
        <h3>当前计数为:{count}</h3>
        <button onClick={() => add(1)}>点我+1</button>
        <button onClick={() => sub(1)}>点我-1</button>
      </div>
    )
  }
}

const mapStateToProps = (state) => ({
  count: state.counter.count
})

const mapDispatchToProps = (dispatch) => ({
  add: (num) => dispatch(increment(num)),
  sub: (num) => dispatch(decrement(num))
})

export default connect(mapStateToProps, mapDispatchToProps)(Counter)2
3
4
5
6
7
8
9
10
11
12
13
14
15
16
17
18
19
20
21
22
23
24
25
26
27
28
29
30
31
32
33
34
35
import React, {PureComponent} from 'react'
import {connect} from "@/hoc"
import {addAsyncBanner} from "@/store/banner"

class Banner extends PureComponent {

  state = {
    message: '我是 Banner 组件',
  }

  render() {
    const {message} = this.state
    console.log('Banner', this.props)
    const {banners, addBanner} = this.props
    return (
      <div>
        <h2>{message}</h2>
        <button onClick={() => addBanner()}>异步获取数据</button>
        <h3>轮播图的数据:</h3>
        <ul>
          {
            banners && banners.map((item, index) => {
              return (<li key={index}>{item}</li>)
            })
          }
        </ul>
      </div>
    )
  }
}

const mapStateToProps = (state) => ({
  banners: state.banner.banners
})

const mapDispatchToProps = (dispatch) => ({
  addBanner: () => dispatch(addAsyncBanner()),
})
export default connect(mapStateToProps, mapDispatchToProps)(Banner)2
3
4
5
6
7
8
9
10
11
12
13
14
15
16
17
18
19
20
21
22
23
24
25
26
27
28
29
30
31
32
33
34
35
36
37
38
39
第四章:模拟 redux-thunk
4.1 概述
猴补丁(Monkey Patch)是一种在运行时修改或扩展现有代码的技术。它通常用于在不修改原始代码的情况下,动态地修改或增强现有的类、函数或对象的行为。
猴补丁的概念源自
动态语言的特性,特别是在像 Python 和JavaScript这样的语言中,可以在运行时修改对象的属性和方法。通过猴补丁,开发者可以在不改变原始代码的情况下,对现有的类、函数或对象进行修改,添加新的功能或改变其行为。猴补丁的应用场景包括但不限于:
- 修复第三方库或框架的 bug,而无需等待官方发布修复版本。
- 动态地修改现有的类或对象的行为,以满足特定需求。
- 在测试环境中模拟或替换某些功能,以方便测试。
注意⚠️:
- 猴补丁虽然可以灵活地修改现有代码,但也可能引入一些潜在的问题,如:不可预测的行为、代码可读性降低、与其他代码的兼容性问题等。
- 因此,在使用猴补丁时,需要谨慎考虑其影响,并确保代码的可维护性和稳定性。
4.2 案例
- 借用 此处 的案例,来实现 redux-thunk 的功能;其实很简单,就是在 store 中对 dispatch 进行拦截和增强:
import {applyMiddleware, createStore} from "redux"
import {thunk} from "redux-thunk"
import {composeWithDevToolsDevelopmentOnly} from '@redux-devtools/extension'
import combination from "@/store/reducers"

const composeEnhancers = composeWithDevToolsDevelopmentOnly({
  trace: true // 跟踪源码
});

// 创建 Store 对象
const store = createStore(combination, composeEnhancers(applyMiddleware(thunk)))

function thunkMiddleware(store) {
  const next = store.dispatch // 必须先提前存储起来

  function dispatchThunk(action) {
    if (typeof action === 'function') {
      action(store.dispatch, store.getState)
    } else {
      next(action)
    }
  }

  store.dispatch = dispatchThunk // 修改 dispatch 函数对应的内存地址,这就是 猴补丁(Monkey Patch)
}

thunkMiddleware(store)

export default store2
3
4
5
6
7
8
9
10
11
12
13
14
15
16
17
18
19
20
21
22
23
24
25
26
27
28
29
- 其实,代码很简单,就是通过调用
thunkMiddleware(store)函数,对 store 中的 dispatch 进行拦截;并判断 action 是函数还是对象,如果是函数,调用函数,并将 dispatch 和 getState 函数传递进去;如果是对象,直接调用即可。
第五章:状态组件库如何选择(⭐)
- Redux Toolkit 等并不是唯一的选择,目前也有很多其他的状态管理方案:
注意⚠️:在实际开发中,看团队和个人喜欢,选择对应的组件状态库即可;换言之,你熟悉那个就用那个。