第一章:React 中的过渡动画
1.1 概述
- 在开发中,我们有的时候,需要给一个组件的显示和隐藏添加某种过渡动画,以便增加用户的体验。
- Vue 中是内置了两个组件,可以帮助我们制作基于状态变化的
过渡或动画,其中:<Transition>会在一个元素或组件进入或离开 DOM 时应用动画。<TransitionGroup>会在一个v-for列表中的元素或组件被插入、移动或移除的时候应用动画。
- 但是,React 中并没有提供;我们可以使用
react-transition-group这个第三方库,来实现类似 Vue 中过渡动画的效果。
# 安装
npm install react-transition-group2
- 并且,由于
react-transition-group相当小,因此在应用程序中包含库的开销可以忽略不计。
1.2 react-transition-group 的主要组件
react-transition-group 主要包括四个组件:
Transition:
- 该组件是一个和平台无关的组件。
- 在前端开发中,我们一般结合 CSS 来完成样式,所以比较常用的是
CSSTransition。
CSSTransition:在前端开发中,通常使用 CSSTransition 来完成过渡动画效果。SwitchTransition:两个组件显示和隐藏切换的时候,使用该组件。TransitionGroup:将多个动画组件包裹在其中,通常用于列表中元素的动画。
1.3 CSSTransition
1.3.1 概述
CSSTransition是基于Transition组件构建的,其在执行过程中,有三个状态:appear、enter 和 exit 。它的三种状态,需要定义对应的 CSS 样式:
- 第一类:
开始状态,对应的类是-apper、-enter、-exit。 - 第二类:
执行动画,对应的类是-appear-active、-enter-active、-exit-active。 - 第三类:
执行结束,对应的类是-appear-done、-enter-done、-exit-done。
- 第一类:
CSSTransition中常见的属性:in:通过in属性触发进入或退出的状态;换言之,和 React 中的 state 对应。- 如果 in 为
true时,则触发进入状态,会添加-enter、-enter-active的 class 开始执行动画,当动画执行结束后,会移除两个 class, 并且添加-enter-done的class; - 当 in 为
false时,则触发退出状态,会添加-exit、-exit-active的 class 开始执行动画,当动画执行结束后,会移除两个 class,并 且添加-enter-done的 class;
- 如果 in 为
unmountOnExit:退出后卸载组件。classNames:动画 class 的名称。timeout:过渡动画的事件。appear:是否在初次进入添加动画,需要和in同时为 true。
CSSTransition对应的钩子函数:主要为了检测动画的执行过程,来完成一些 JavaScript 的操作onEnter:在进入动画之前被触发。onEntering:在应用进入动画时被触发。onEntered:在应用进入动画结束后被触发。
1.3.2 案例
- 需求:实现下面的效果。
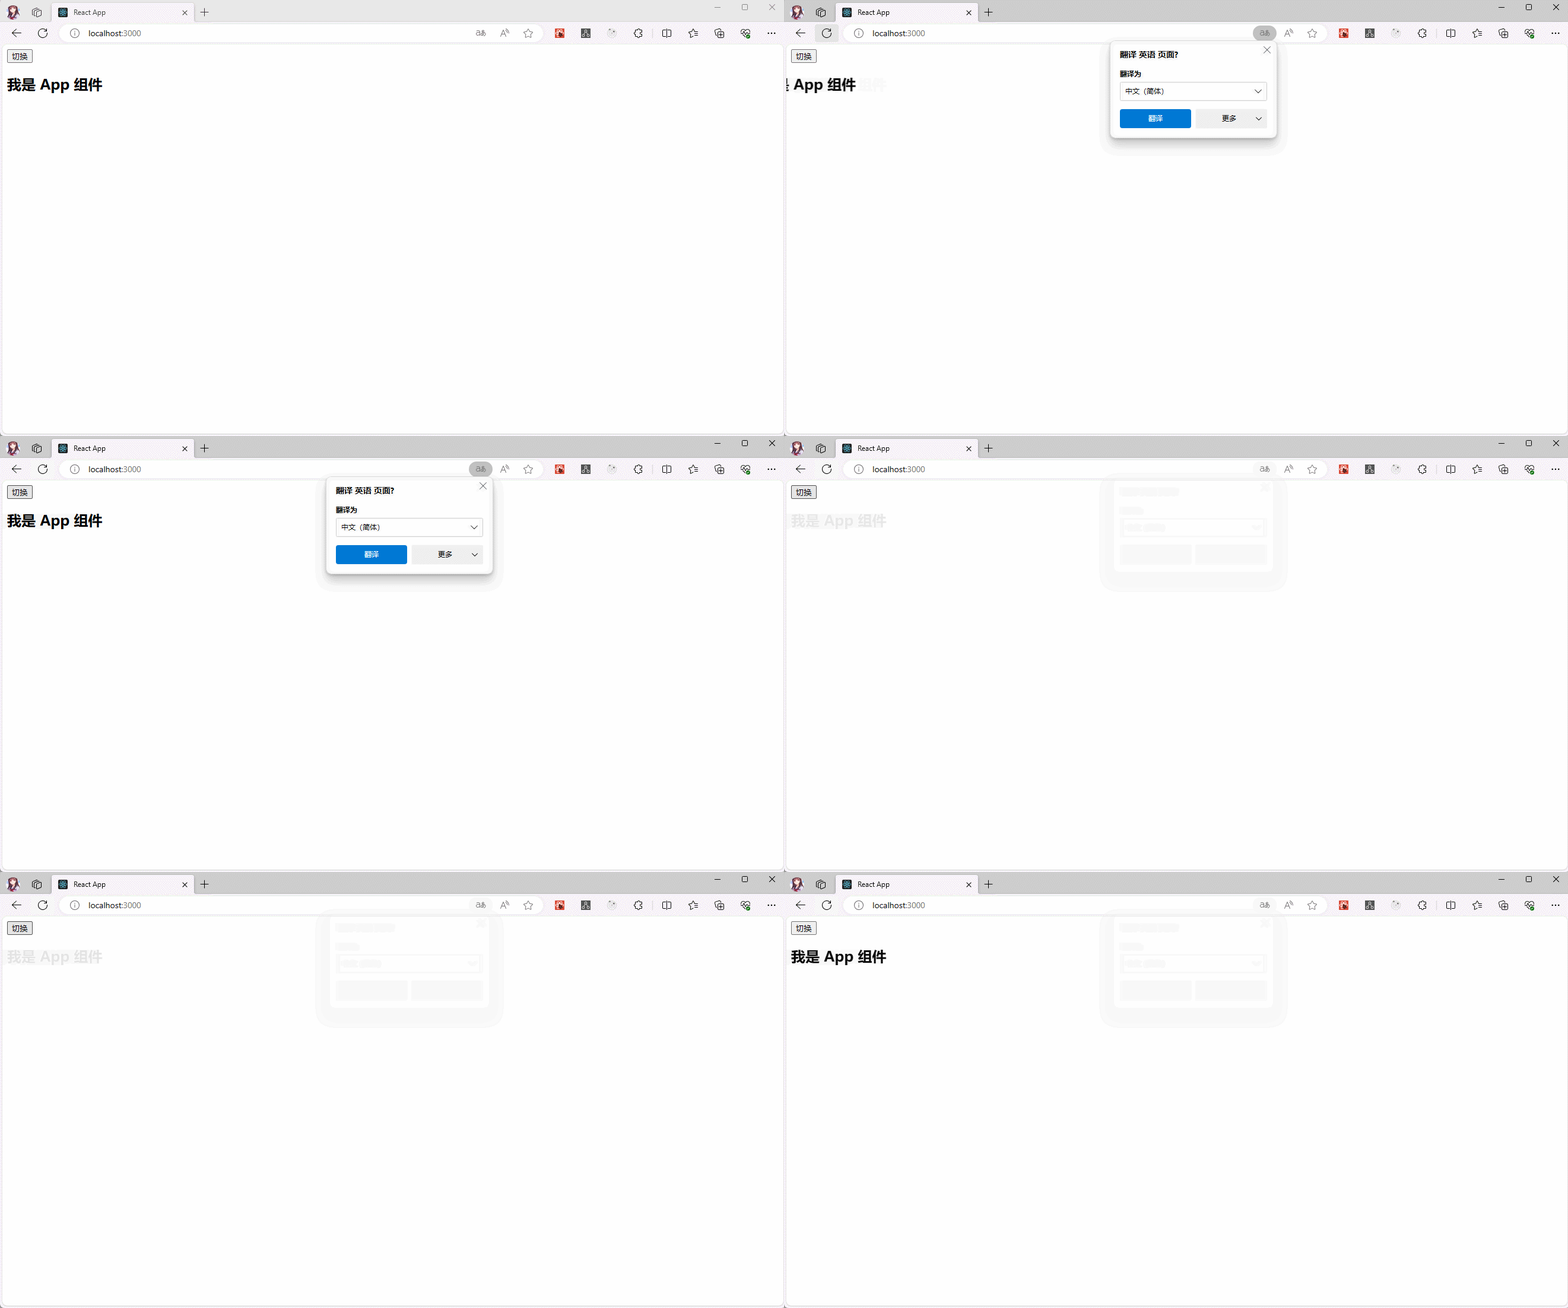
- 项目结构:
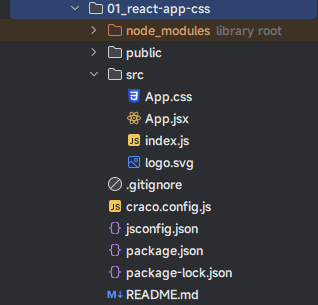
- 示例:
- 其中,App.jsx
import React from 'react'
import '@/App.css'
import {CSSTransition} from "react-transition-group"

class App extends React.PureComponent{

  state = {
    message: '我是 App 组件',
    isShow: true
  }

  h2Ref = React.createRef()

  change(){
    this.setState({
      isShow:!this.state.isShow
    })
  }

  render() {
    const {isShow} = this.state
    console.log(this.h2Ref.current)
    return (
      <div>
        <button onClick={() => this.change()}>切换</button>
        {/*
          `in`:通过 `in` 属性触发进入或退出的状态;换言之,和 React 中的 state 对应。
            如果 in 为 `true` 时,则触发进入状态,会添加 `-enter`、`-enter-active` 的 class 开始执行动画,当动画执行结束后,会移除两个 class, 并且添加 `-enter-done` 的class;
            当 in 为 `false`时,则触发退出状态,会添加 `-exit`、`-exit-active` 的 class 开始执行动画,当动画执行结束后,会移除两个 class,并 且添加 `-enter-done` 的 class;
          `unmountOnExit`:退出后卸载组件。
          `classNames`:动画 class 的名称。
          `timeout`:过渡动画的事件。
          `appear`:是否在初次进入添加动画,需要和 `in` 同时为 true。
        */}
        <CSSTransition in={isShow} nodeRef={this.h2Ref} classNames="h2" timeout={2000} unmountOnExit appear>
          <h2 ref={this.h2Ref}>{this.state.message}</h2>
        </CSSTransition>
      </div>
    )
  }
}

export default App2
3
4
5
6
7
8
9
10
11
12
13
14
15
16
17
18
19
20
21
22
23
24
25
26
27
28
29
30
31
32
33
34
35
36
37
38
39
40
41
42
43
- 其中,App.css
.h2-appear {
    transform: translateX(-150px);
}
.h2-appear-active {
    transform: translateX(0);
    transition: transform 2000ms ease;
}
.h2-enter {
    opacity: 0;
}
.h2-enter-active {
    opacity: 1;
    transition: opacity 2000ms ease;
}
.h2-exit {
    opacity: 1;
}
.h2-exit-active {
    opacity: 0;
    transition: opacity 2000ms ease;
}2
3
4
5
6
7
8
9
10
11
12
13
14
15
16
17
18
19
20
21
1.4 SwitchTransition
1.4.1 概述
- SwitchTransition 可以完成两个组件之间切换的炫酷动画。
- 我们有一个按钮需要在 on 和 off 之间切换,我们希望看到 on 先从左侧退出,off 再从右侧进入。
- 这个动画在 Vue 中被称之为 Vue transition modes 。
- react-transition-group 中使用
SwitchTransition来实现该动画。
SwitchTransition中主要有一个属性:mode,有两个值- in-out:表示新组件先进入,旧组件再移除;
out-in:表示就组件先移除,新组建再进入
注意⚠️:通常使用
out-in模式,并且该模式也是默认模式。
SwitchTransition组件的使用方式:- 在
SwitchTransition组件中包裹CSSTransition组件。 SwitchTransition组件中的的CSSTransition组件不再通过 in 属性来判断元素何种状态,而是通过key属性。
- 在
1.4.2 案例
- 需求:实现下面的效果。
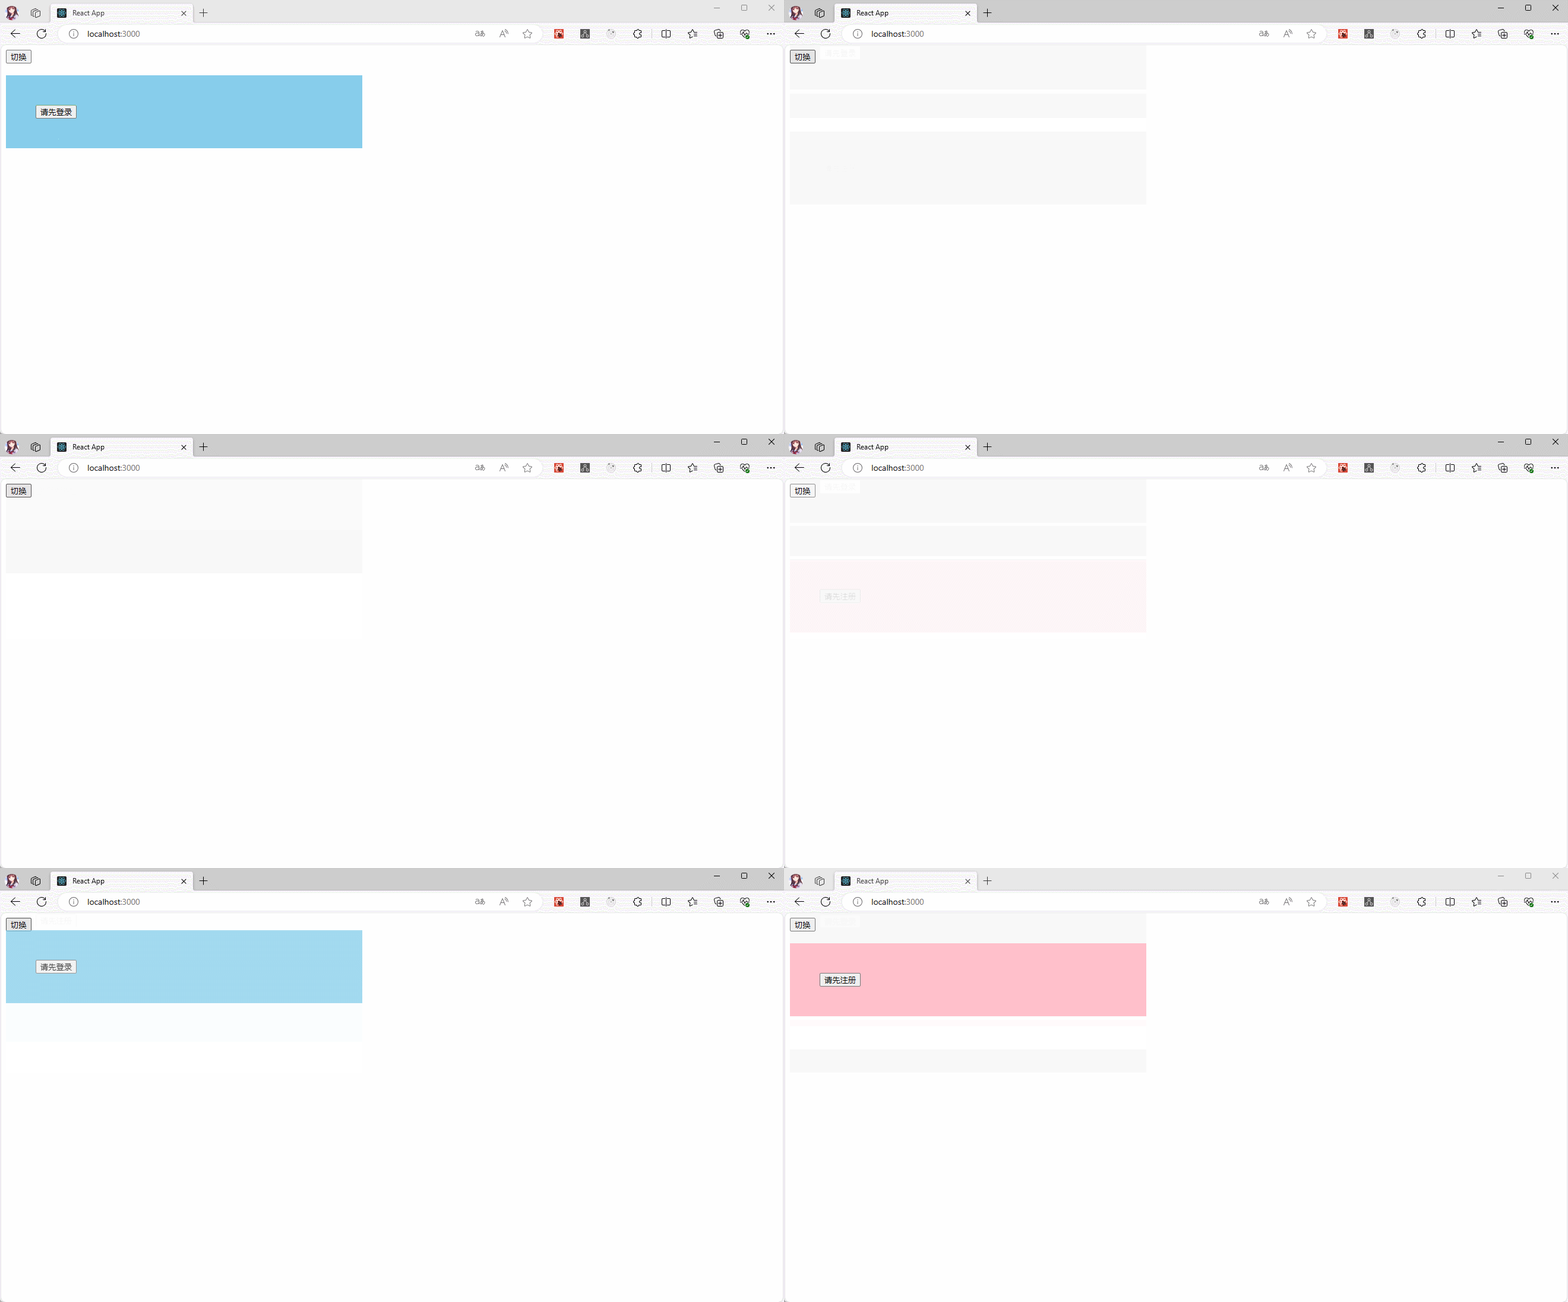
- 项目结构:
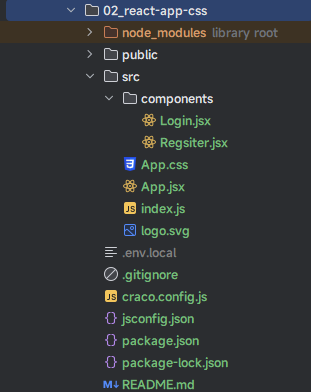
- 示例:
- 其中,App.jsx
import React, {createRef, PureComponent} from 'react'
import Register from "@/components/Regsiter"
import Login from "@/components/Login"
import {CSSTransition, SwitchTransition} from "react-transition-group"
import '@/App.css'

class App extends PureComponent {

  state = {
    isLogin: true
  }

  login2RegisterRef = createRef()

  render() {
    const {isLogin} = this.state
    return (
      <div>
        <button onClick={() => this.setState({isLogin: !isLogin})}>切换</button>
        <SwitchTransition mode="out-in">
          <CSSTransition key={isLogin} timeout={500} classNames={"fade"} nodeRef={this.login2RegisterRef}>
              <div style={{marginTop: '20px'}} ref={this.login2RegisterRef}>
                {isLogin ? <Login/> : <Register/>}
              </div>
          </CSSTransition>
        </SwitchTransition>
      </div>
    )
  }
}

export default App2
3
4
5
6
7
8
9
10
11
12
13
14
15
16
17
18
19
20
21
22
23
24
25
26
27
28
29
30
31
32
- 其中,App.css
.fade-enter{
    opacity: 0;
    transform: translateY(100px);
}
.fade-enter-active  {
    opacity: 1;
    transform: translateY(0);
}
.fade-exit  {
    opacity: 1;
    transform: translateY(0);
}
.fade-exit-active  {
    opacity: 0;
    transform: translateY(-100px);
}
.fade-enter-active ,
.fade-exit-active  {
    transition: all 500ms ease;
}2
3
4
5
6
7
8
9
10
11
12
13
14
15
16
17
18
19
20
- 其中,Login.jsx
function Login() {
  return (
    <div style={{background: 'skyblue', width: '500px',padding: '50px'}}>
      <button>请先登录</button>
    </div>
  )
}

export default Login2
3
4
5
6
7
8
9
- 其中,Register.jsx
function Register() {
  return (
    <div style={{background: 'pink',width:'500px',padding: '50px'}}>
      <button>请先注册</button>
    </div>
  )
}

export default Register2
3
4
5
6
7
8
9
1.5 TransitionGroup
1.5.1 概述
- TransitionGroup 的用法和 SwitchTransition 差不多。
1.5.2 案例
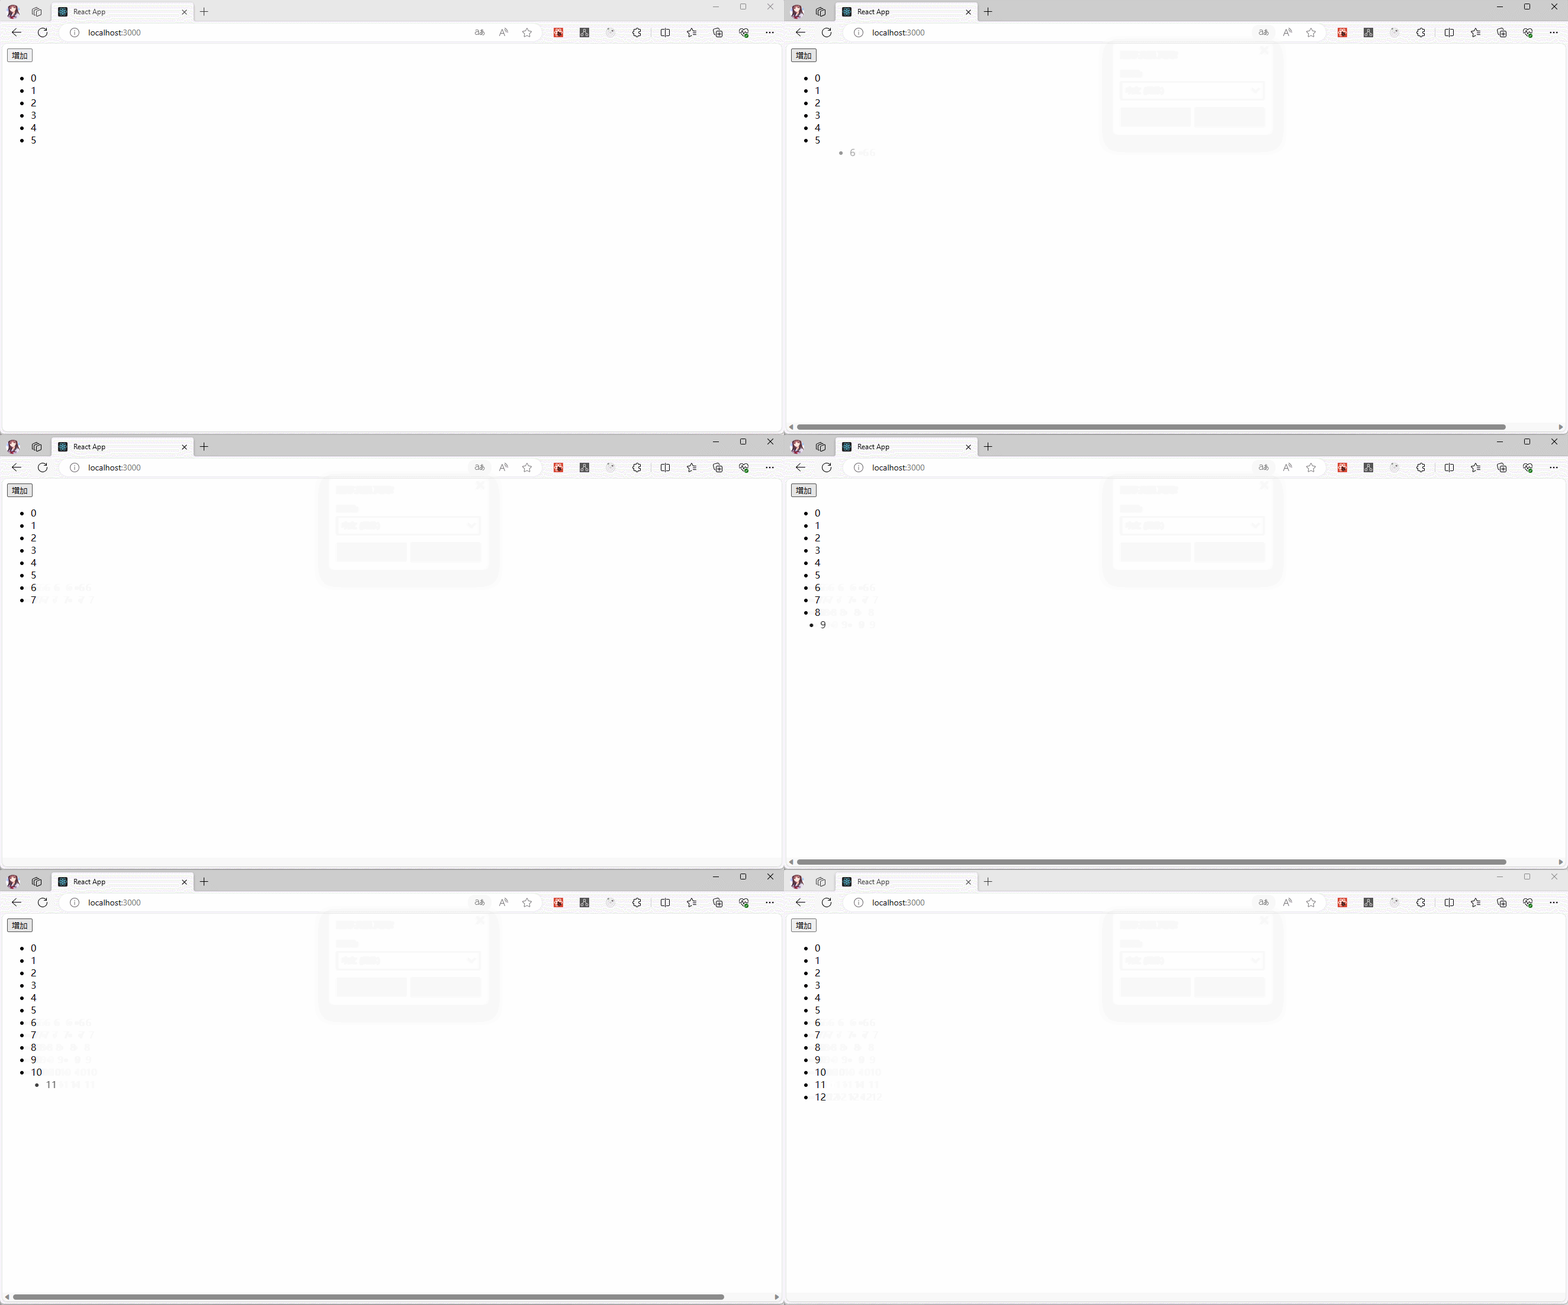
- 需求:实现下面的效果。
- 项目结构:
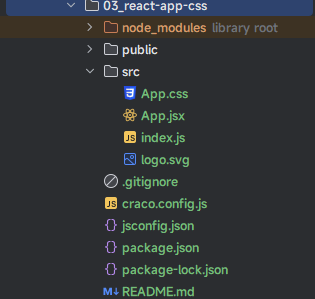
- 示例:
- 其中,App.jsx
import React, {createRef, PureComponent} from 'react'
import './App.css'
import {CSSTransition, TransitionGroup} from "react-transition-group"

class App extends PureComponent {

  state = {
    nums: [
      {id: 0, num: 0, nodeRef: createRef()},
      {id: 1, num: 1, nodeRef: createRef()},
      {id: 2, num: 2, nodeRef: createRef()},
      {id: 3, num: 3, nodeRef: createRef()},
      {id: 4, num: 4, nodeRef: createRef()},
      {id: 5, num: 5, nodeRef: createRef()},
    ]
  }

  add() {
    const nums = [...this.state.nums]
    nums.push({
      id: this.state.nums.length,
      num: this.state.nums.length,
      nodeRef: createRef()
    })
    this.setState({nums})
  }

  render() {
    const {nums} = this.state
    return (
      <div>
        <button onClick={() => this.add()}>增加</button>
        <TransitionGroup component="ul">
          {
            nums.map(({id,num,nodeRef}) => {
              return (
                <CSSTransition key={id} timeout={1000} classNames="item" nodeRef={nodeRef}>
                  <li key={id} ref={nodeRef}>{num}</li>
                </CSSTransition>
              )
            })
          }
        </TransitionGroup>

      </div>
    )
  }
}

export default App2
3
4
5
6
7
8
9
10
11
12
13
14
15
16
17
18
19
20
21
22
23
24
25
26
27
28
29
30
31
32
33
34
35
36
37
38
39
40
41
42
43
44
45
46
47
48
49
50
- 其中,App.css
.item-enter {
    opacity: 0;
    transform: translateX(100px);
}
.item-enter-active {
    opacity: 1;
    transform: translateX(0);
    transition: all 1s ease;
}2
3
4
5
6
7
8
9
第二章:React 中 CSS 的方案(⭐)
2.1 概述
- 目前,整个前端已经是
组件化开发的时代了;但是,CSS 的设计就不是为组件化而生的;所以,我们需要在目前组件化的框架中寻找一种合适的 CSS 解决方案。 - 组件化中选择合适的 CSS 解决方案,需要符合以下的特征:
- ① 可以编写局部 CSS:CSS 具备自己的局部作用域,不会随意污染其他组件内的元素。
- ② 可以编写动态的 CSS:可以获取当前组件的一些状态,根据状态的变化生成不同的 CSS 样式。
- ③ 支持所有的 CSS 特性:必须能支持伪类、动画、媒体查询等。
- ④ 编写简单,最好符合 CSS 的风格。
- ⑤ ……
2.2 React 中的 CSS
- 一直以来,CSS 都是 React 的痛点,一直被很多开发者吐槽、诟病。
- 因为,Vue 给出了解决方案:
- Vue 通过在
.vue文件中的style标签来编写 CSS 样式。 - 可以通过
scoped属性来决定样式,是否全局有效,还是局部有效。 - 可以通过
lang属性来设置我们熟悉的 CSS 预处理器,如:Less、Sass 等。 - 可以通过内联样式的风格来根据最新状态设置和改变 CSS 。
- ……
- Vue 通过在
注意⚠️:Vue 给出的 CSS 解决方案虽然不是最完美,但是简洁、统一,非常方便协调开发。
- 但是,React 官方一直没有给出在 React 中统一的 CSS 风格;导致,在 React 中就 CSS 方案就有太多太多种。
2.3 解决方案
2.3.1 内联样式
2.3.1.1 概述
内联样式是官方内置的一种 CSS 解决方案:style属性接收一个采用小驼峰命名属性的 JavaScript 对象,而不是 CSS 字符串。- 可以在
style属性中引用state中的状态来设置相关的样式。
- 内联样式的
优点:- ① 内联样式,不会产生冲突。
- ② 可以动态获取当前 state 中的状态。
- 内联样式的
缺点:- ① 写法上都需要使用驼峰标识。
- ② 大量的样式,会造成代码混乱。
- ③ 某些样式无法编写,如:伪类、伪元素等。
2.3.1.2 案例
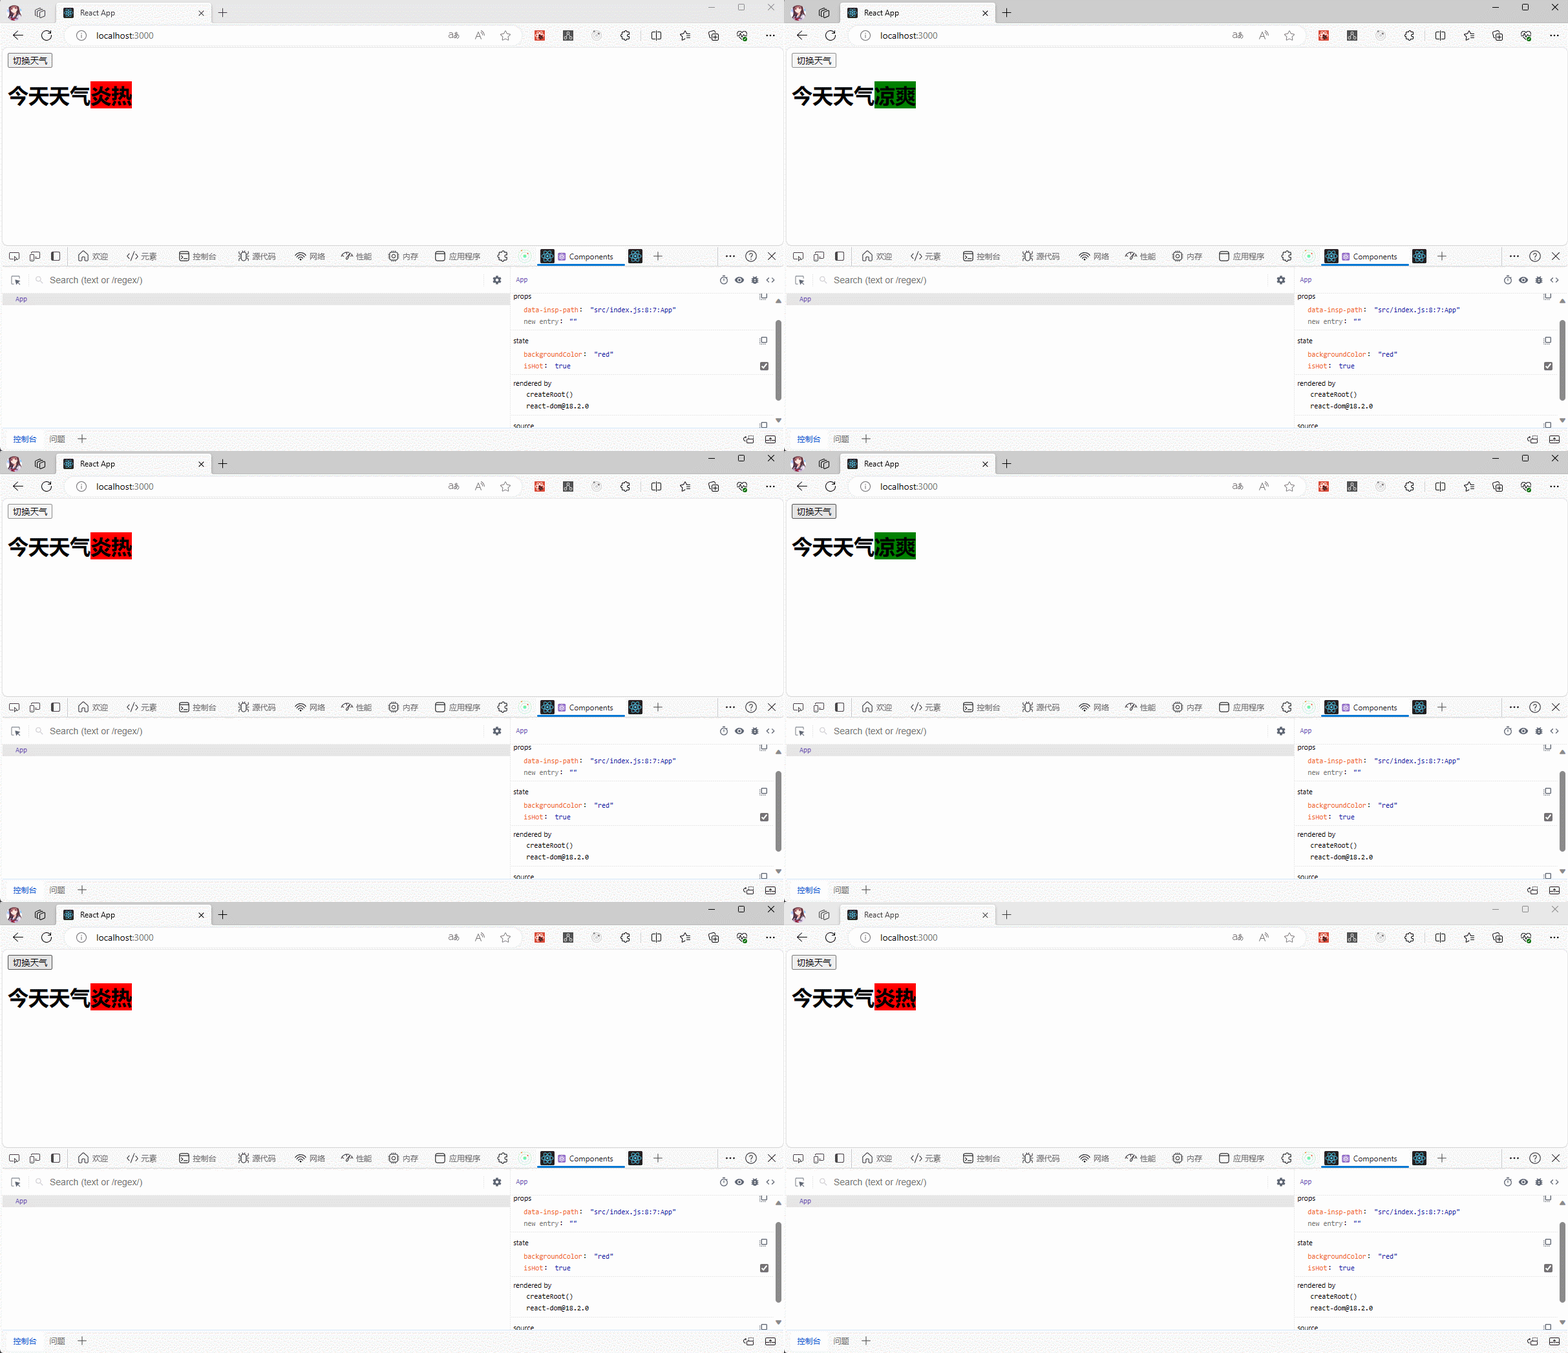
- 需求:实现下面的效果。
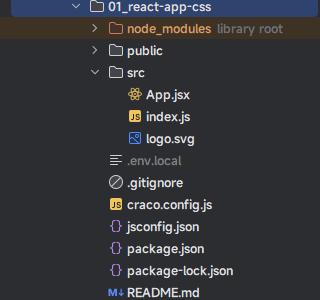
- 项目结构:
- 示例:
import React, {PureComponent} from 'react'

class App extends PureComponent {

  state = {
    isHot: true,
    backgroundColor: 'red'
  }

  change() {
    this.setState({
      isHot: !this.state.isHot,
      backgroundColor: this.state.isHot ? 'green' : 'red'
    })
  }

  render() {
    const {isHot, backgroundColor} = this.state
    return (
      <div>
        <button onClick={() => this.change()}>
          切换天气
        </button>
        <h1>今天天气{isHot ? <span style={{backgroundColor}}>炎热</span> :
          <span style={{backgroundColor}}>凉爽</span>}</h1>
      </div>
    )
  }
}

export default App2
3
4
5
6
7
8
9
10
11
12
13
14
15
16
17
18
19
20
21
22
23
24
25
26
27
28
29
30
31
2.3.2 普通的 CSS
2.3.2.1 概述
- 有的时候,我们会将 css 代码写到 CSS 文件中,然后再导入。
注意⚠️:React 中是通过 className 属性来实现。
- 这种的编写方法和在普通的网页开发中没什么区别:
- 但是,在组件化开发中,我们希望组件是一个独立的模块,即样式只能在组件内部生效,不会相互影响。
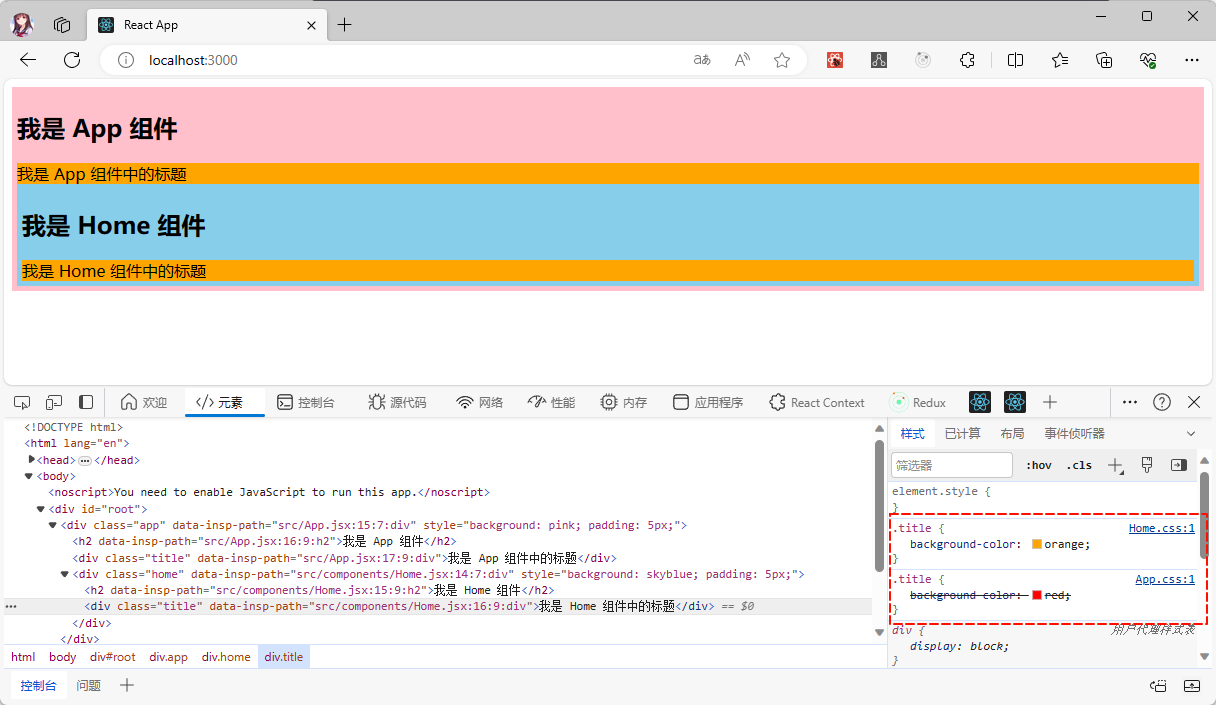
- 但是,普通的 CSS 都属于全局 CSS,样式之间会相互影响。
- 最大的
问题就是:样式之间会互相影响。
2.3.2.2 案例
- 示例:演示样式冲突
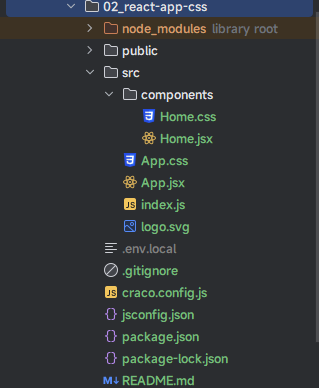
- 项目结构:
- 示例:
- 其中,App.jsx
import React, {PureComponent} from 'react'
import '@/App.css'
import Home from "@/components/Home"

class App extends PureComponent {

  state = {
    message: '我是 App 组件'
  }


  render() {
    const {message} = this.state
    return (
      <div className={"app"} style={{background: 'pink',padding:'5px'}}>
        <h2>{message}</h2>
        <div className="title">我是 App 组件中的标题</div>
        <Home/>
      </div>
    )
  }
}

export default App2
3
4
5
6
7
8
9
10
11
12
13
14
15
16
17
18
19
20
21
22
23
24
- 其中,App.css
.title {
    background-color: red;
}2
3
- 其中,Home.jsx
import React, {PureComponent} from 'react'
import '@/components/Home.css'

class Home extends PureComponent {

  state = {
    message: '我是 Home 组件'
  }


  render() {
    const {message} = this.state
    return (
      <div className={"home"} style={{background: 'skyblue',padding:'5px'}}>
        <h2>{message}</h2>
        <div className={"title"}>我是 Home 组件中的标题</div>
      </div>
    )
  }
}

export default Home2
3
4
5
6
7
8
9
10
11
12
13
14
15
16
17
18
19
20
21
22
- 其中,Home.css
.title{
    background-color: orange;
}2
3
2.3.3 CSS modules
2.3.3.1 概述
- CSS modules 不是 React 的特有解决方案;我们知道,webpack 就默认支持 css 的 module,只需要在 webpack.config.js 中配置即可:
module.exports = {
  module: {
    rules: [
      {
        test: /\.css$/i,
        loader: "css-loader",
        options: {
          modules: true,
        },
      },
    ],
  },
};2
3
4
5
6
7
8
9
10
11
12
13
- React 的脚手架 Create React App 就是基于 Webpack 而搭建的,所以也内置了 css modules 的配置,使用方式如下:
- ① 将
*.less、*.css或*.scss等文件修改为*.module.less、*.module.css、*.module.scss等。 - ② 在
*.jsx文件中通过默认导入即可。
- ① 将
注意⚠️:React 脚手架中的 css modules ,将
*.less、*.css或*.scss导出的是默认导出,所以在导入的时候需要使用默认导入。
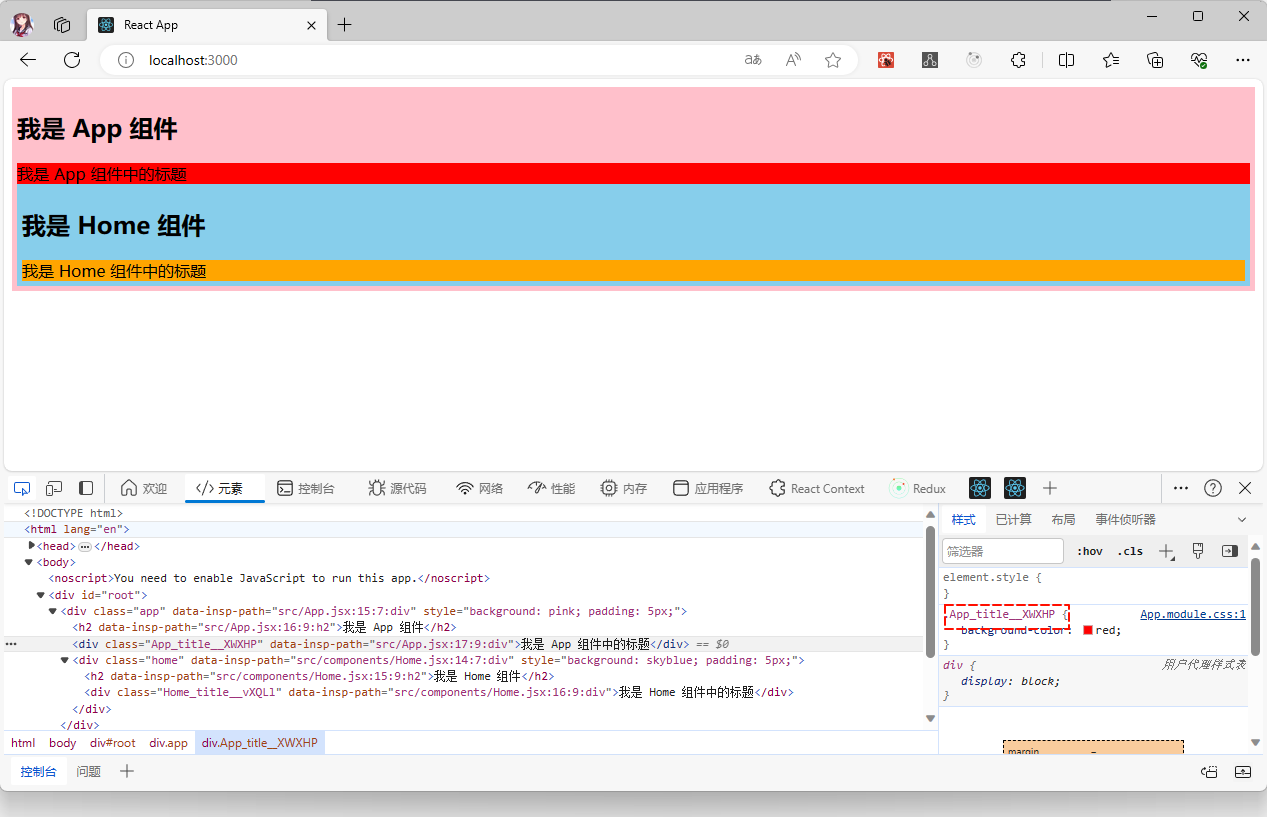
- React 脚手架中的 css modules 确实解决了 css 模块化的问题,也是很多人喜欢在 React 中使用的一种解决方案。
- 但是,该方案也有自己的缺陷:
- ① 如果将来使用 Vite 来搭建 React 项目,该方法能够优雅的迁移到 Vite 中,很难讲!!!
- ② 如果类名中包含
-,如:.home-title,需要使用app["home-tilte"]来解决在 JavaScript 属性名不支持-的写法。 - ③ 不方便动态的根据
state来修改某些样式,依然需要使用内联样式。 - ④ 所有的
className都需要使用{xxx.className}或{xxx["className"]}的形式来编写。 - ⑤ ……
2.3.3.2 案例
- 示例:解决样式冲突
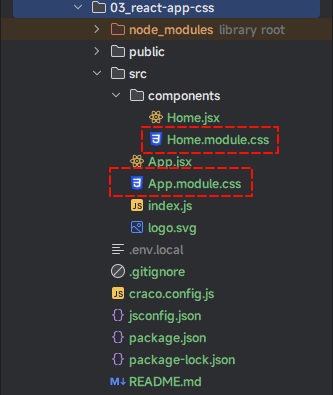
- 项目结构:
- 示例:
- 其中,App.jsx
import React, {PureComponent} from 'react'
import AppStyle from  '@/App.module.css'
import Home from "@/components/Home"

class App extends PureComponent {

  state = {
    message: '我是 App 组件'
  }


  render() {
    const {message} = this.state
    return (
      <div className={"app"} style={{background: 'pink',padding:'5px'}}>
        <h2>{message}</h2>
        <div className={AppStyle["title"]}>我是 App 组件中的标题</div>
        <Home/>
      </div>
    )
  }
}

export default App2
3
4
5
6
7
8
9
10
11
12
13
14
15
16
17
18
19
20
21
22
23
24
- 其中,App.module.css
.title {
    background-color: red;
}2
3
- 其中,Home.jsx
import React, {PureComponent} from 'react'
import HomeStyle from '@/components/Home.module.css'

class Home extends PureComponent {

  state = {
    message: '我是 Home 组件'
  }


  render() {
    const {message} = this.state
    return (
      <div className={"home"} style={{background: 'skyblue',padding:'5px'}}>
        <h2>{message}</h2>
        <div className={HomeStyle.title}>我是 Home 组件中的标题</div>
      </div>
    )
  }
}

export default Home2
3
4
5
6
7
8
9
10
11
12
13
14
15
16
17
18
19
20
21
22
- 其中,Home.module.css
.title{
    background-color: orange;
}2
3
2.4 CSS In JS
2.4.1 概述
- 在传统的前端开发中,我们通常会将
结构(HTML)、表现(CSS)、行为(JavaScript)进行分离。并且,Vue 也是这么做的。 - 但是,React 认为
逻辑本身和 UI 是无法分离的,所以才有了 JSX 语法。并且,样式也是 UI 的一部分,所以也有将 CSS 写入到 JavaScript 中的方式,并且可以很方便的使用 JavaScript 的状态。
注意⚠️:React 也被人称为
All In JS,是因为HTML、CSS、JS都可以写到JavaScript中。
2.4.2 CSS In JS 方案的实现
- CSS In JS 的优点:
- ① 这种方案可以
通过 JavaScript 为 CSS 赋予一些能力,包括类似于 CSS 预处理器一样的样式嵌套、函数定义、逻辑复用、动态修改状态等等; - ② 虽然 CSS 预处理器也具备这些能力,但是
获取动态 state 依然不是很好处理。
- ① 这种方案可以
注意⚠️:也有人认为 CSS In JS 有缺点,不可否认;但是,在 React 中,CSS In JS 不失为一种解决方案。
- 目前,比较流行的 CSS In JS 的库有:
- styled-components。
- emotion。
- ……
- 本次以
styled-components为例,进行讲解,其安装命令如下:
npm install styled-components2.4.3 补充概念
- ES6 推出了
模板字面量和模板字符串;但是,很多时候,很多人还是喜欢将模板字面量和模板字符串混为一谈,这边做一个区分。 - MDN 对
模板字面量的定义:模板字面量是用反引号分隔的字面量,允许多行字符串、带嵌入表达式的字符串插值和一种带标签的模板的特殊结构。
从上面的定义中,我们可以得出结论:
模板字面量=带嵌入表达式的字符串插值+带标签的模板的特殊结构。
- 但是,MDN 也说了,很多场合下,
模板字面量被有些人称为模板字符串,因为它们通常被用作字符串插值。因为,带标签的模板字面量可能不会产生字符串(其可以和自定义的标签函数一起使用,来对模板字面量中的不同部分执行任何操作)。 - 为了下文的讲解,我们可以将模板字面量划分为如下的两类:
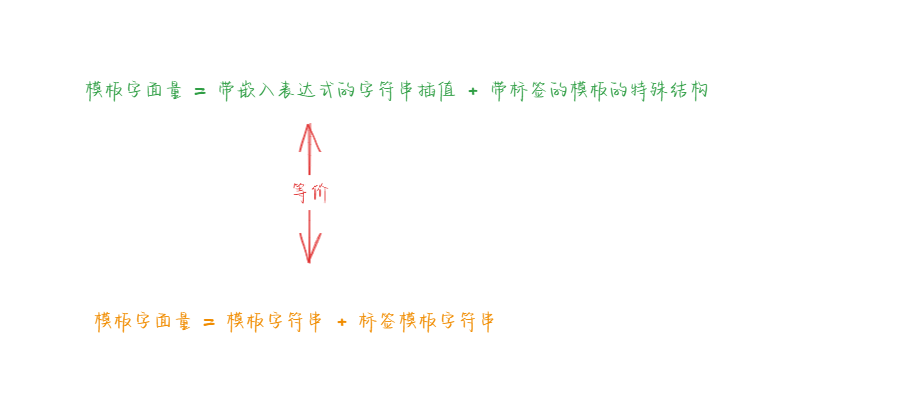
- 常见的
模板字符串的使用方式:
const name = "许大仙"
const age = 18
const str = `我的名字是 ${name},我今年 ${age} 岁`
console.log(`我的信息是:${str}`)2
3
4
- 常见的
函数的使用方式:
function foo(name,age){
    console.log(name,age)
}

foo("许大仙",18)2
3
4
5
function foo(...args){
    console.log(args)
}
foo("许大仙",18)2
3
4
- 但是,我们也可以使用
标签模板字符串来调用函数:
const name = "许大仙"
const age = 18
function foo(...args){
    console.log(args)
}

const str = foo`我的名字是 ${name},我今年 ${age} 岁`
console.log(str)2
3
4
5
6
7
8
注意⚠️:
- 此时的
foo函数也称为标签,而str的值就是标签模板字符串了。标签模板字符串是模板字面量的一种高级使用方式,它允许我们使用函数解析模板字面量。标签函数的第一个参数包含一个字符串数组,其余的参数和表达式(如:${name})相关。- 我们可以使用
标签函数来对这些参数执行任何操作,并返回被操作过的字符串;当然,也可以不返回。styled-components库就使用了类似的原理,只不过其返回的是 React 中的组件而已。- WebStorm 内置了
styled-components插件;如果使用 VSCode ,需要手动安装vscode-styled-components插件。
2.5 解决方案 --- styled-components
2.5.0 前言
- 因为需要演示效果,所以需要安装生成随机颜色的库。
npm install randomcolor2.5.1 概述
styled-components的本质是通过函数的调用,最终创建出一个组件:- 该组件会被自动添加一个不重复的 class 。
- 然后由
styled-components给该 class 添加相关的样式。
- 当然,
styled-components也支持类似于 CSS 预处理器一样的样式嵌套:- ① 支持
直接子代选择器或后代选择器,并且可以直接编写样式。 - ② 可以通过
&符号获取当前元素。 - ③ 可以写
伪类选择器或伪元素等。 - ④ ……
- ① 支持
2.5.2 快速入门
2.5.2.1 概述
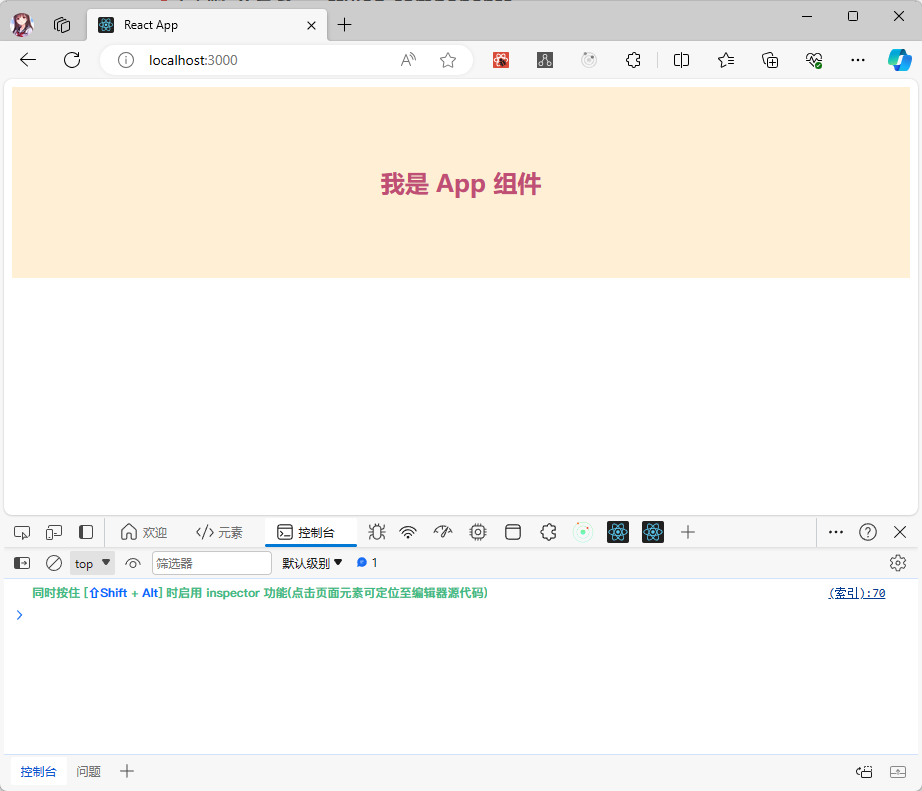
- 需求:实现下面的效果。
2.5.2.2 原生 React 实现
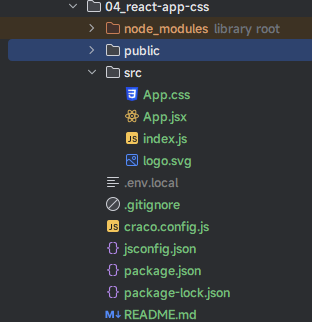
- 项目结构:
- 示例:
- 其中,App.jsx
import React, {PureComponent} from 'react'
import '@/App.css'

class App extends PureComponent {

  state = {
    message: '我是 App 组件',

  }

  render() {
    const {message} = this.state
    return (
      <div className="wrapper">
        <h1>{message}</h1>
      </div>
    )
  }
}

export default App2
3
4
5
6
7
8
9
10
11
12
13
14
15
16
17
18
19
20
21
- 其中,App.css
.wrapper {
    padding: 4em;
    background: papayawhip;
}

.wrapper h1 {
    font-size: 1.5em;
    text-align: center;
    color: #BF4F74;
}2
3
4
5
6
7
8
9
10
2.5.2.3 styled-components 实现
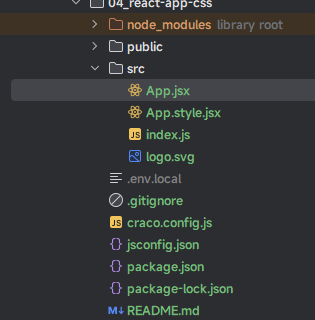
- 项目结构:
- 示例:
- 其中,App.jsx
import React, {PureComponent} from 'react'
import {AppWrapper, Title} from "@/App.style"

class App extends PureComponent {

  state = {
    message: '我是 App 组件',

  }

  render() {
    const {message} = this.state
    return (
      <AppWrapper>
        <Title>{message}</Title>
      </AppWrapper>
    )
  }
}

export default App2
3
4
5
6
7
8
9
10
11
12
13
14
15
16
17
18
19
20
21
- 其中,App.style.jsx
import styled from "styled-components";

export const AppWrapper = styled.div`
    padding: 4em;
    background: papayawhip;
`

export const Title = styled.h1`
    font-size: 1.5em;
    text-align: center;
    color: #BF4F74;
`2
3
4
5
6
7
8
9
10
11
12
2.5.2.4 解析 styled-components 实现
- App.style.jsx 的代码如下:
import styled from "styled-components";

export const AppWrapper = styled.div`
    padding: 4em;
    background: papayawhip;
`

export const Title = styled.h1`
    font-size: 1.5em;
    text-align: center;
    color: #BF4F74;
`2
3
4
5
6
7
8
9
10
11
12
- 我们可以知道,styled-components 提供了一个
styled对象,并且该对象中包含了很多函数,如:div、h1 等函数。 - 之前,学习过标签模板字符串的用法,那么下面的代码也就不难理解:
// 本质上就是调用标签模板字符串,并且该函数返回的是 React 组件
export const AppWrapper = styled.div`
    padding: 4em;
    background: papayawhip;
`2
3
4
5
- 之后,我们就可以在 App.jsx 中导入组件了:
import React, {PureComponent} from 'react'
import {AppWrapper, Title} from "@/App.style"

class App extends PureComponent {

  state = {
    message: '我是 App 组件',

  }

  render() {
    const {message} = this.state
    return (
      <AppWrapper>
        <Title>{message}</Title>
      </AppWrapper>
    )
  }
}

export default App2
3
4
5
6
7
8
9
10
11
12
13
14
15
16
17
18
19
20
21
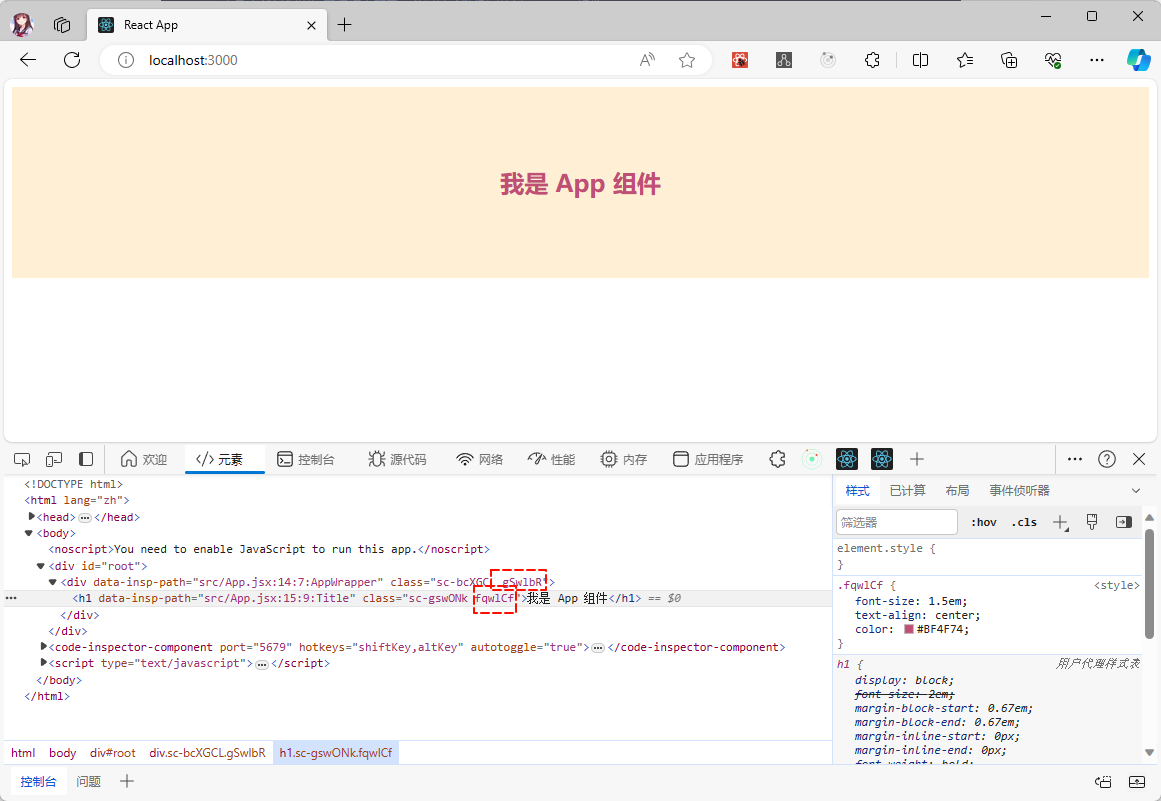
- 通过
浏览器的控制台,我们知道,该库会为每个组件生成一个唯一的 class 类名,这也是该库解决 React 样式组件化的本质:
2.5.3 props 属性
2.5.3.1 概述
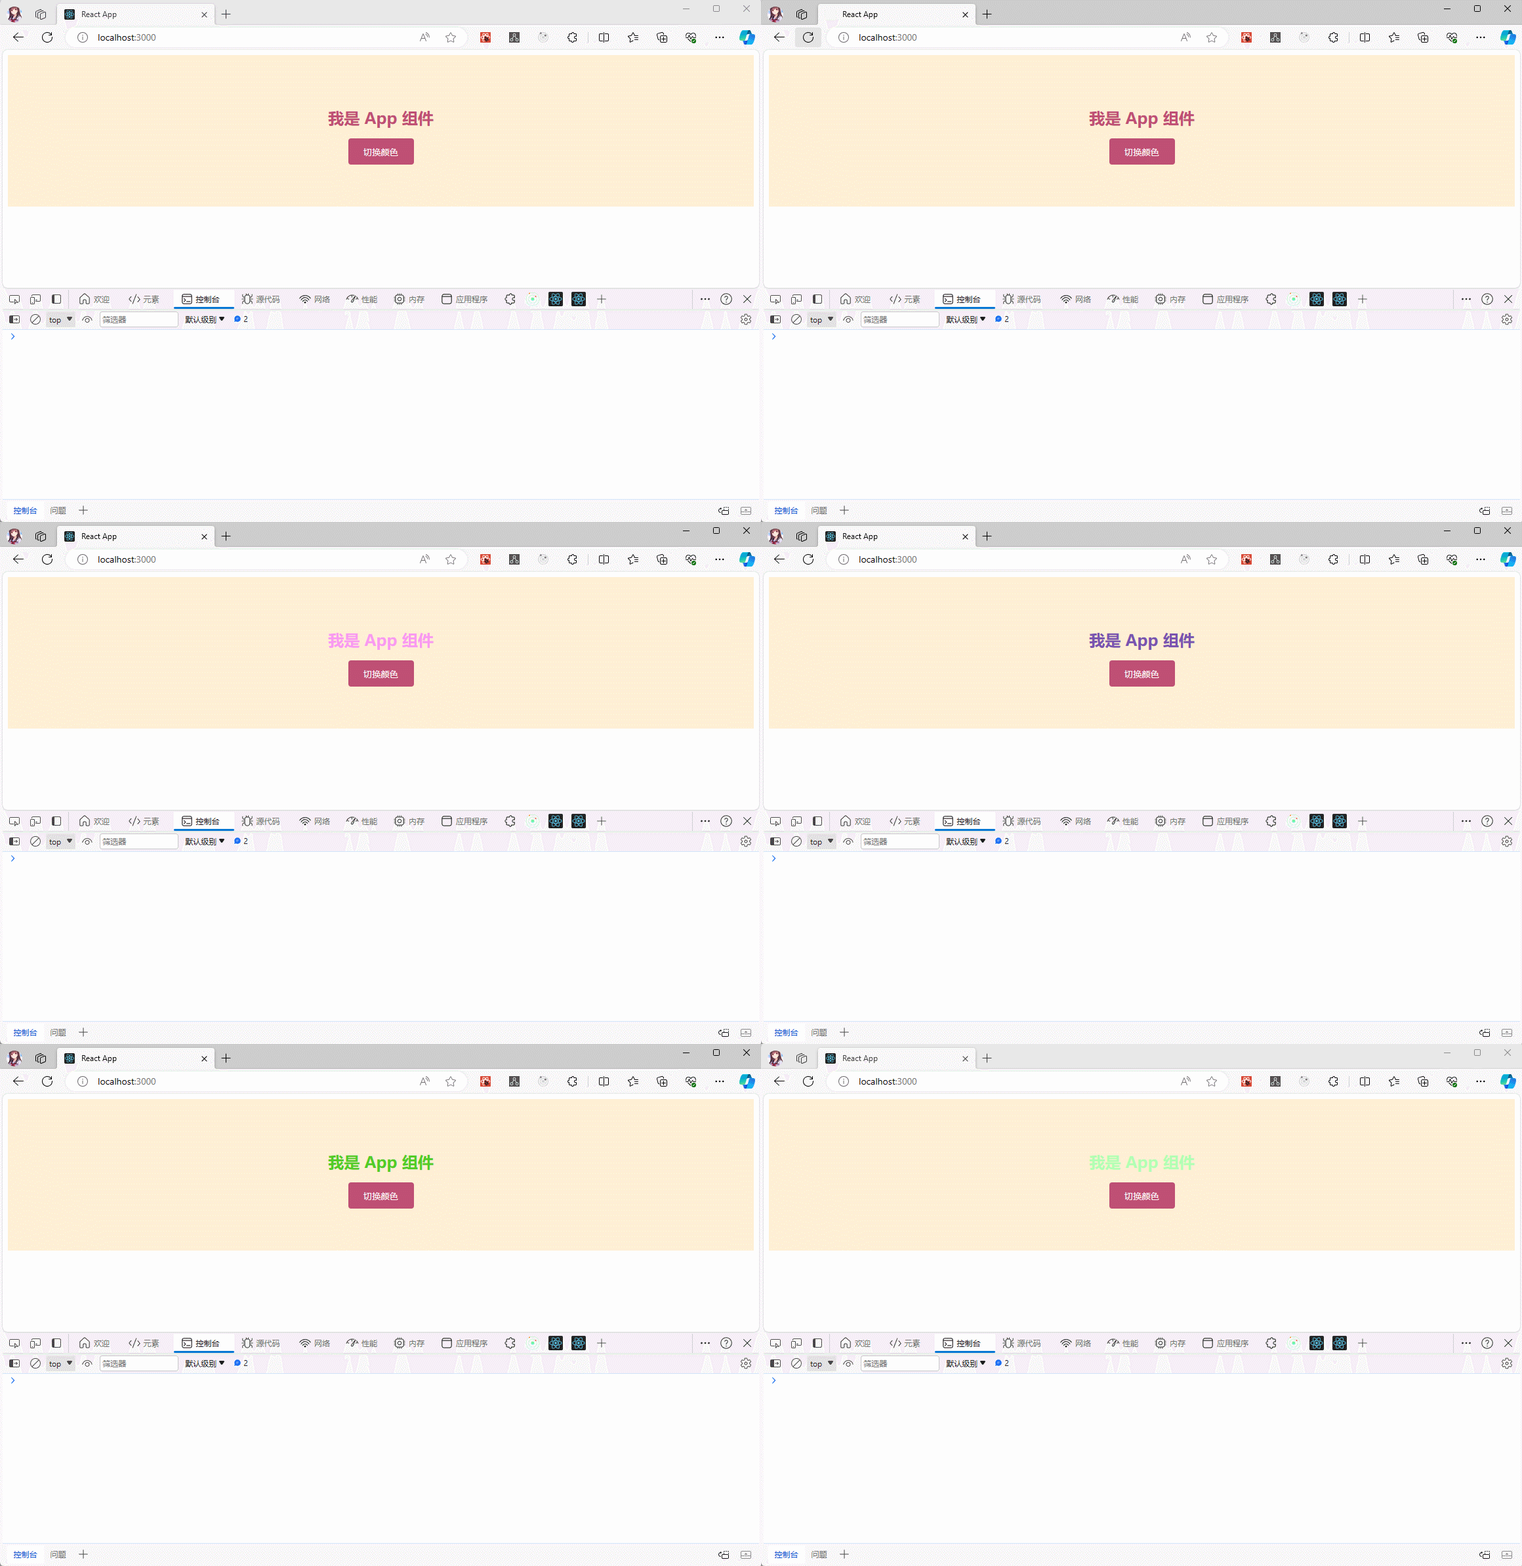
- 有的时候,我们需要根据 React 中 state 的状态,来动态改变样式,该库的使用方式:
- ① 在组件上,通过 props 传递 state 中的状态。
- ② 在该库创建的组件中,通过 props 获取,并通过
${xxx}传入一个插值函数,props 会作为该函数的参数。
2.5.3.2 案例
- 需求:实现下面的效果。
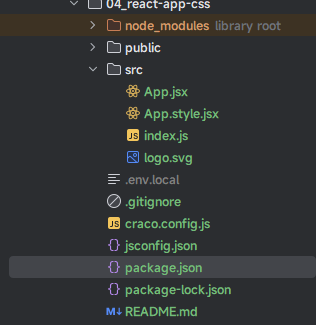
- 项目结构:
- 示例:
- 其中,App.jsx
import React, {PureComponent} from 'react'
import randomColor from 'randomcolor'
import {AppWrapper, Button, Title} from "@/App.style"


class App extends PureComponent {

  state = {
    message: '我是 App 组件',
    color: '#BF4F74'
  }

  change() {
    this.setState({
      color: randomColor()
    })
  }

  render() {
    const {message, color} = this.state
    return (
      <AppWrapper>
        <Title $color={color}>{message}</Title>
        <Button onClick={() => this.change()}>切换颜色</Button>
      </AppWrapper>
    )
  }
}

export default App2
3
4
5
6
7
8
9
10
11
12
13
14
15
16
17
18
19
20
21
22
23
24
25
26
27
28
29
30
- 其中,App.style.jsx
import styled from "styled-components";

export const AppWrapper = styled.div`
    padding: 4em;
    background: papayawhip;
`

export const Title = styled.h1`
    font-size: 1.5em;
    text-align: center;
    color: ${props => props.$color};
`

export const Button = styled.button`
    display: block;
    margin: 0 auto;
    width: 100px;
    height: 40px;
    background: #BF4F74;
    color: #fff;
    border: 0;
    cursor: pointer;
    border-radius: 4px;
`2
3
4
5
6
7
8
9
10
11
12
13
14
15
16
17
18
19
20
21
22
23
24
2.5.3.3 案例
- 需求:实现下面的效果。
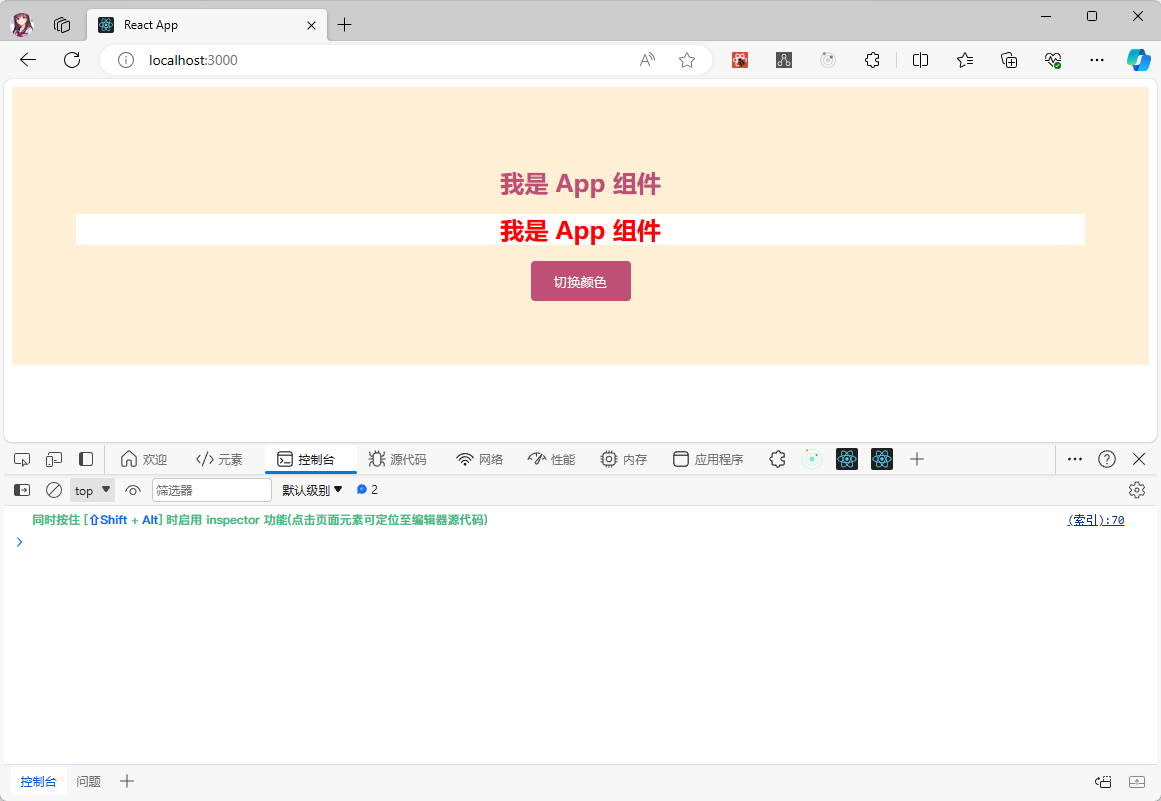
注意⚠️:如果没有传递 props ,就使用默认值。
- 项目结构:
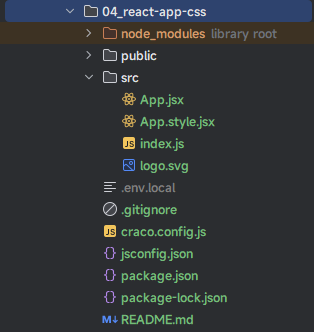
- 示例:
- 其中,App.jsx
import React, {PureComponent} from 'react'
import randomColor from 'randomcolor'
import {AppWrapper, Button, Title} from "@/App.style"


class App extends PureComponent {

  state = {
    message: '我是 App 组件',
    color: '#BF4F74'
  }

  change() {
    this.setState({
      color: randomColor()
    })
  }

  render() {
    const {message, color} = this.state
    return (
      <AppWrapper>
        <Title $color={color}>{message}</Title>
        <Title $background>{message}</Title>
        <Button onClick={() => this.change()}>切换颜色</Button>
      </AppWrapper>
    )
  }
}

export default App2
3
4
5
6
7
8
9
10
11
12
13
14
15
16
17
18
19
20
21
22
23
24
25
26
27
28
29
30
31
- 其中,App.style.jsx
import styled from "styled-components";

export const AppWrapper = styled.div`
    padding: 4em;
    background: papayawhip;
`

export const Title = styled.h1`
    font-size: 1.5em;
    text-align: center;
    color: ${props => props.$color || 'red'};
    background: ${props => props.$background ? "white" : 'BF4F74'};
`

export const Button = styled.button`
    display: block;
    margin: 0 auto;
    width: 100px;
    height: 40px;
    background: #BF4F74;
    color: #fff;
    border: 0;
    cursor: pointer;
    border-radius: 4px;
`2
3
4
5
6
7
8
9
10
11
12
13
14
15
16
17
18
19
20
21
22
23
24
25
2.5.4 样式继承
2.5.4.1 概述
- 有的时候,我们已经定义好了一个组件,但是需要根据单个情况,进行修改。此时,就可以使用
styled(xxx)构造函数了,其中xxx就是之前的组件。
2.5.4.2 案例
- 需求:实现下面的效果。
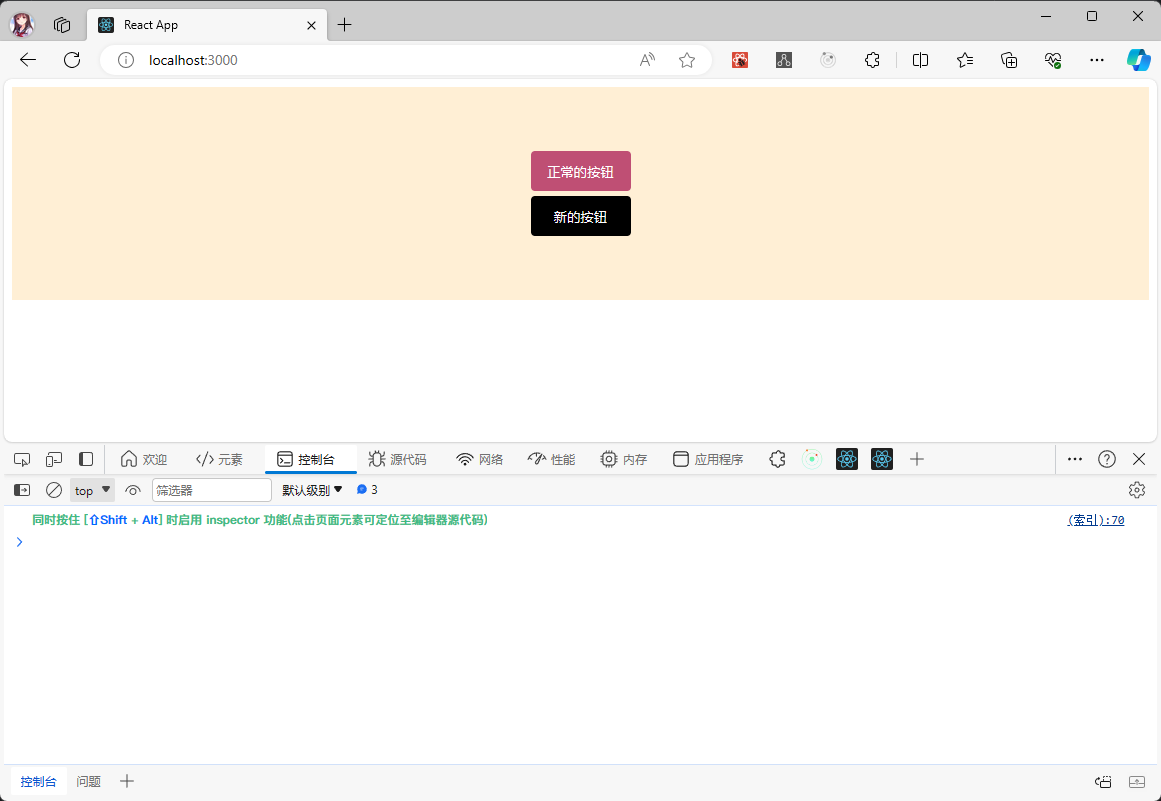
- 项目结构:
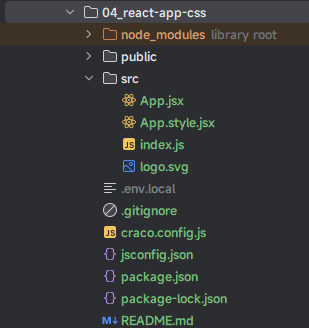
- 示例:
- 其中,App.jsx
import React, {PureComponent} from 'react'
import {AppWrapper, Button, NewButton} from "@/App.style"


class App extends PureComponent {

  state = {
    message: '我是 App 组件',
  }

  c

  render() {
    return (
      <AppWrapper>
        <Button>正常的按钮</Button>
        <NewButton>新的按钮</NewButton>
      </AppWrapper>
    )
  }
}

export default App2
3
4
5
6
7
8
9
10
11
12
13
14
15
16
17
18
19
20
21
22
23
- 其中,App.style.jsx
import styled from "styled-components";

export const AppWrapper = styled.div`
    padding: 4em;
    background: papayawhip;
`
export const Button = styled.button`
    display: block;
    margin: 0 auto;
    width: 100px;
    height: 40px;
    background: #BF4F74;
    color: #fff;
    border: 0;
    cursor: pointer;
    border-radius: 4px;
`

export const NewButton = styled(Button)`
    margin-top: 5px;
    background: #000;
`2
3
4
5
6
7
8
9
10
11
12
13
14
15
16
17
18
19
20
21
22
2.5.5 锚链接和按钮
2.5.5.1 概述
- 有的时候,我们希望更改样式化组件呈现的标记或组件。如:在构建导航栏的时候,就混合了锚链接和按钮,此时就可以使用
as这个 props 来动态定义接收样式的元素。
2.5.5.2 案例
- 需求:实现如下的效果。
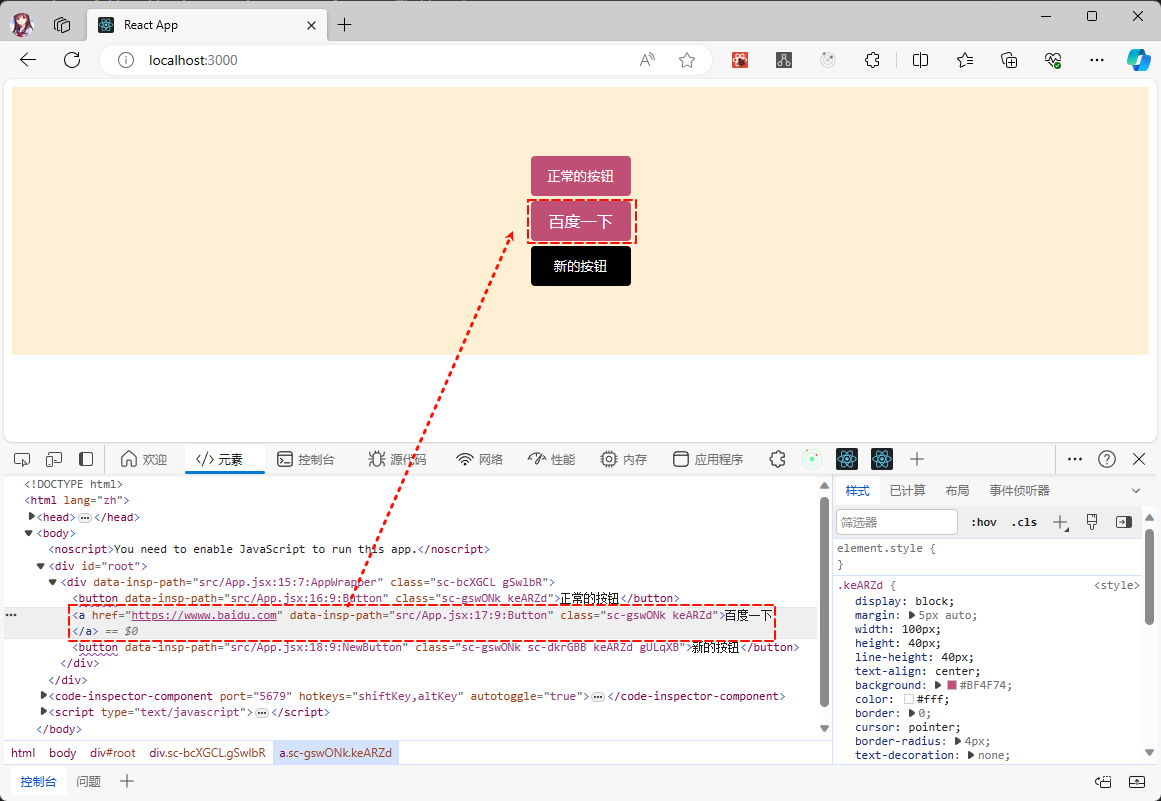
- 项目结构:
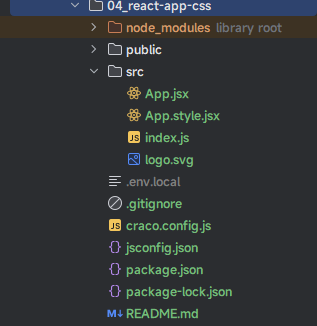
- 示例:
- 其中,App.jsx
import React, {PureComponent} from 'react'
import {AppWrapper, Button, NewButton} from "@/App.style"


class App extends PureComponent {

  state = {
    message: '我是 App 组件',
  }

  c

  render() {
    return (
      <AppWrapper>
        <Button>正常的按钮</Button>
        <Button as={"a"} href={"https://wwww.baidu.com"}>百度一下</Button>
        <NewButton>新的按钮</NewButton>
      </AppWrapper>
    )
  }
}

export default App2
3
4
5
6
7
8
9
10
11
12
13
14
15
16
17
18
19
20
21
22
23
24
- 其中,App.style.jsx
import styled from "styled-components";

export const AppWrapper = styled.div`
    padding: 4em;
    background: papayawhip;
`
export const Button = styled.button`
    display: block;
    margin: 5px auto;
    width: 100px;
    height: 40px;
    line-height: 40px;
    text-align: center;
    background: #BF4F74;
    color: #fff;
    border: 0;
    cursor: pointer;
    border-radius: 4px;
    text-decoration: none;
`

export const NewButton = styled(Button)`
    background: #000;
`2
3
4
5
6
7
8
9
10
11
12
13
14
15
16
17
18
19
20
21
22
23
24
2.5.6 伪类或伪元素
2.5.6.1 概述
- 该库也支持伪类和伪元素。
2.5.6.2 案例
- 需求:实现如下的效果。
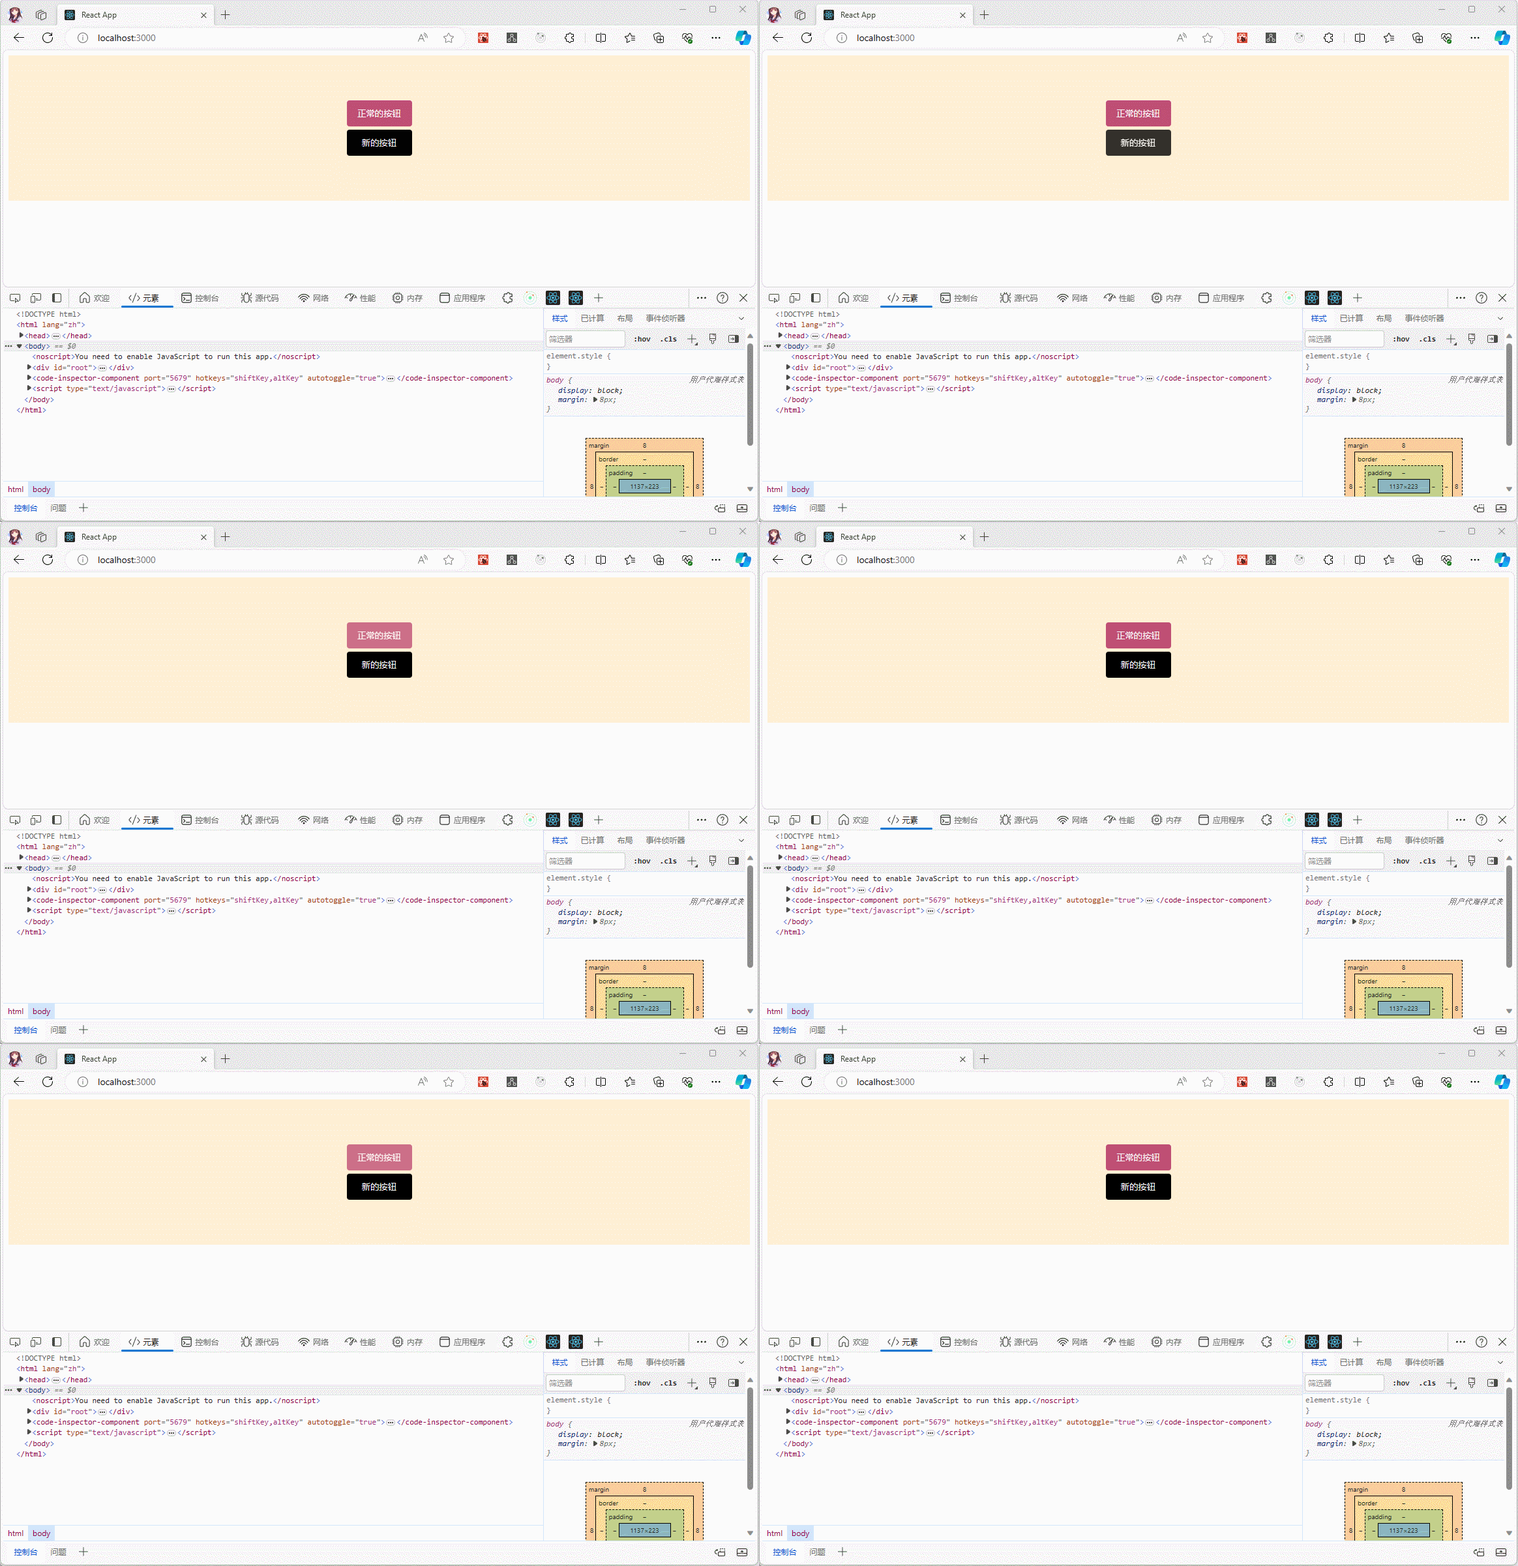
- 项目结构:
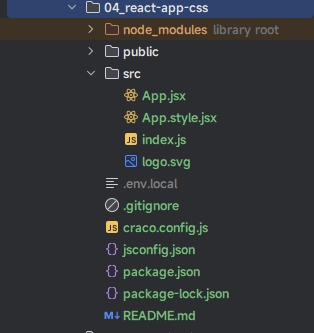
- 示例:
- 其中,App.jsx
import React, {PureComponent} from 'react'
import {AppWrapper, Button, NewButton} from "@/App.style"


class App extends PureComponent {

  state = {
    message: '我是 App 组件',
  }

  render() {
    return (
      <AppWrapper>
        <Button>正常的按钮</Button>
        <NewButton>新的按钮</NewButton>
      </AppWrapper>
    )
  }
}

export default App2
3
4
5
6
7
8
9
10
11
12
13
14
15
16
17
18
19
20
21
- 其中,App.style.jsx
import styled from "styled-components";

export const AppWrapper = styled.div`
    padding: 4em;
    background: papayawhip;
`
export const Button = styled.button`
    display: block;
    margin: 5px auto;
    width: 100px;
    height: 40px;
    line-height: 40px;
    text-align: center;
    background: #BF4F74;
    color: #fff;
    border: 0;
    cursor: pointer;
    border-radius: 4px;
    text-decoration: none;

    &:hover {
        opacity: 0.8;
    }
`

export const NewButton = styled(Button)`
    background: #000;
`2
3
4
5
6
7
8
9
10
11
12
13
14
15
16
17
18
19
20
21
22
23
24
25
26
27
28
2.5.7 attrs() 函数
2.5.7.1 概述
- attrs() 是一个函数,用于给组件添加额外属性,如:HTML 属性、自定义属性或其它属性,并且该函数要求传入回调函数,且返回对象。
const PasswordInput = styled.input.attrs(props => ({
  type: "password"
}))``2
3
2.5.7.2 案例
- 需求:实现如下的效果。
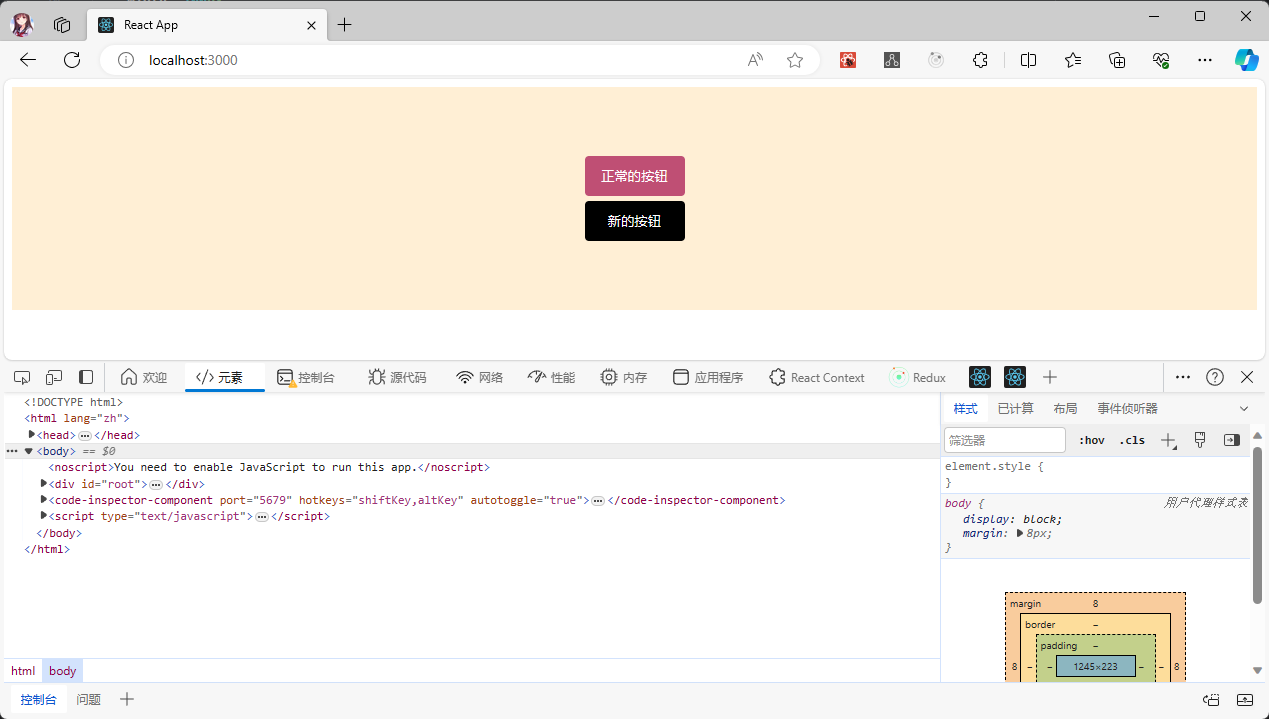
注意⚠️:如果没有传递
background,就使用默认值。
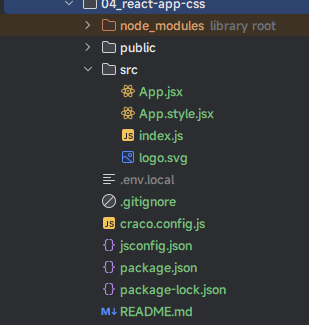
- 项目结构:
- 示例:
- 其中,App.jsx
import React, {PureComponent} from 'react'
import {AppWrapper, Button, NewButton} from "@/App.style"


class App extends PureComponent {

  state = {
    message: '我是 App 组件',
  }

  render() {
    return (
      <AppWrapper>
        <Button>正常的按钮</Button>
        <NewButton>新的按钮</NewButton>
      </AppWrapper>
    )
  }
}

export default App2
3
4
5
6
7
8
9
10
11
12
13
14
15
16
17
18
19
20
21
- 其中,App.style.jsx
import styled from "styled-components";

export const AppWrapper = styled.div`
    padding: 4em;
    background: papayawhip;
`
export const Button = styled.button`
    display: block;
    margin: 5px auto;
    width: 100px;
    height: 40px;
    line-height: 40px;
    text-align: center;
    background: #BF4F74;
    color: #fff;
    border: 0;
    cursor: pointer;
    border-radius: 4px;
    text-decoration: none;

    &:hover {
        opacity: 0.8;
    }
`

export const NewButton = styled(Button).attrs(props => ({
  background: props.background || '#000'
}))`
    background: ${props => props.background};
`2
3
4
5
6
7
8
9
10
11
12
13
14
15
16
17
18
19
20
21
22
23
24
25
26
27
28
29
30
2.5.8 主题
2.5.8.1 概述
- 之前,我们通过 React 中的 Context 实现过主题;现在,
styled-components库已经内置支持了。
2.5.8.2 案例
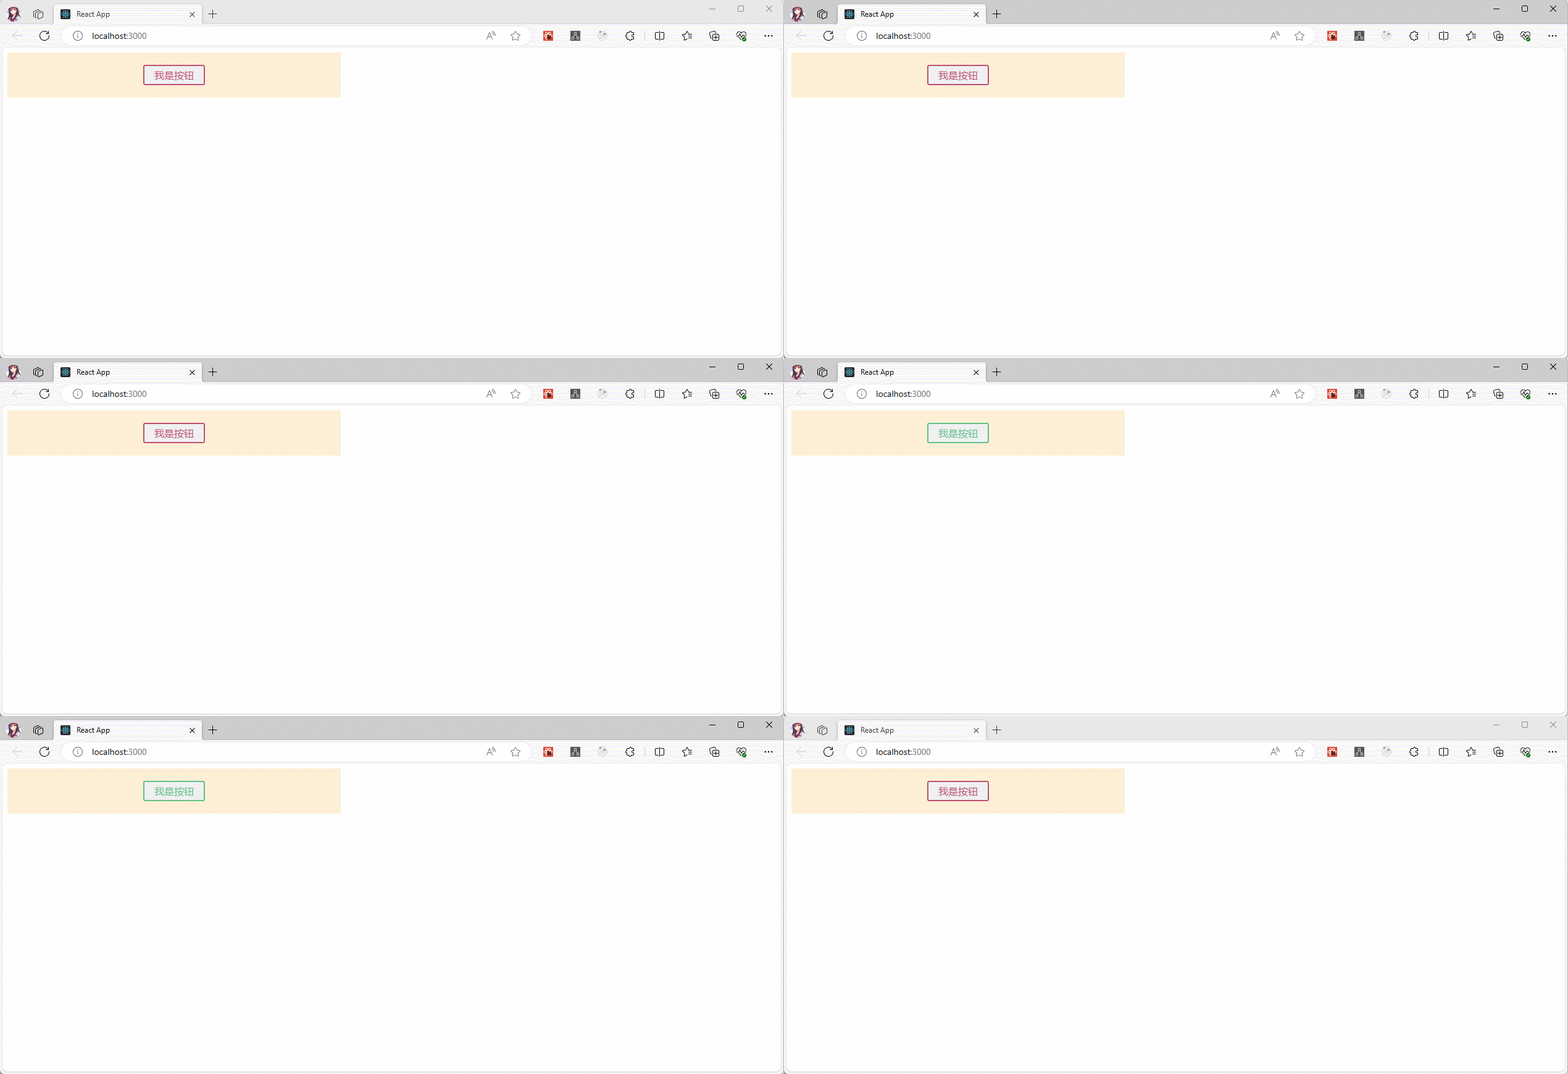
- 需求:实现如下的效果。
- 项目结构:
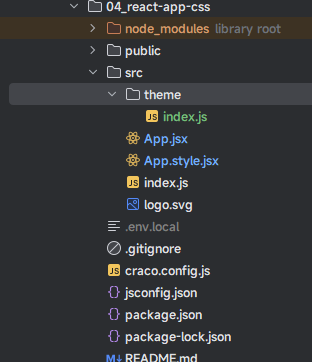
- 示例:
- 其中,App.jsx
import React, {PureComponent} from 'react'
import {AppWrapper, Button} from "@/App.style"
import {ThemeProvider} from "styled-components"
import {themes} from "@/theme"


class App extends PureComponent {

  state = {
    currentTheme: 'light'
  }

  changeTheme() {
    this.setState({
      currentTheme: this.state.currentTheme === 'light' ? 'dark' : 'light'
    })
  }

  render() {
    const {currentTheme} = this.state
    console.log(themes[currentTheme])
    return (
      <AppWrapper>
        <ThemeProvider theme={themes[currentTheme]}>
          <Button onClick={() => this.changeTheme()}>我是按钮</Button>
        </ThemeProvider>
      </AppWrapper>
    )
  }
}

export default App2
3
4
5
6
7
8
9
10
11
12
13
14
15
16
17
18
19
20
21
22
23
24
25
26
27
28
29
30
31
32
- 其中,App.style.jsx
import styled from "styled-components";

export const AppWrapper = styled.div.attrs(props => ({
  className: 'appWrapper'
}))`
    padding: 20px;
    width: 500px;
    background: papayawhip;
`

export const Button = styled.button`
    display: block;
    font-size: 1em;
    margin: 0 auto;
    padding: 0.25em 1em;
    border-radius: 3px;
    color: ${props => props.theme.color};
    border: 2px solid ${props => props.theme.color};
`2
3
4
5
6
7
8
9
10
11
12
13
14
15
16
17
18
19
- 其中,theme/index.js
// 主题相关
export const themes = {
  light: {
    color: '#BF4F74',
  },
  dark: {
    color: '#60c18b',
  }
}2
3
4
5
6
7
8
9
2.8 React 中添加 class
2.8.1 概述
- 在 Vue 中添加 class 是一件非常简单的事情,可以传入一个对象:
<div :class="{ active: isActive }"></div>- 在 Vue 中添加 class 也可以传入数组:
<div :class="[activeClass, errorClass]"></div>- 在 Vue 中添加 class 还可以对象和数组混合使用:
<div :class="[{ active: isActive }, errorClass]"></div>- 但是,React 在 JSX 中给了我们足够多的灵活,我们可以通过逻辑来决定是否添加某些 class :
<div className={"title " + (isActive ? "active" : "") }></div><div className={ ["title", (isActive ? "active" : "").join(" ")] }></div>- 当然,和 Vue 相比,感觉很麻烦,我们可以使用第三方库
classnames来实现类似 Vue 中的效果,其安装命令如下:
npm install classnames- 官方给出的示例如下:
classNames('foo', 'bar'); // => 'foo bar'
classNames('foo', { bar: true }); // => 'foo bar'
classNames({ 'foo-bar': true }); // => 'foo-bar'
classNames({ 'foo-bar': false }); // => ''
classNames({ foo: true }, { bar: true }); // => 'foo bar'
classNames({ foo: true, bar: true }); // => 'foo bar'

// lots of arguments of various types
classNames('foo', { bar: true, duck: false }, 'baz', { quux: true }); // => 'foo bar baz quux'

// other falsy values are just ignored
classNames(null, false, 'bar', undefined, 0, 1, { baz: null }, ''); // => 'bar 1'2
3
4
5
6
7
8
9
10
11
12
const arr = ['b', { c: true, d: false }];
classNames('a', arr); // => 'a b c'2
2.8.2 案例
- 示例:
import React, {PureComponent} from 'react'
import classNames from "classnames";


class App extends PureComponent {

  state = {}

  render() {
    return (
      <div>
        <div className={classNames('foo', 'bar')}>'foo bar'</div>
        <div className={classNames('foo', {bar: true})}>'foo bar'</div>
        <div className={classNames({'foo-bar': true})}>'foo-bar'</div>
        <div className={classNames({'foo-bar': false})}>''</div>
        <div className={classNames({foo: true}, {bar: true})}>'foo bar'</div>
        <div className={classNames({foo: true, bar: true})}>'foo bar'</div>
        <div className={classNames('foo', {bar: true, duck: false}, 'baz', {qux: true})}>'foo bar baz qux'</div>
        <div className={classNames(null, false, 'bar', undefined, 0, 1, {baz: null}, '')}>'bar 1'</div>
        <div className={classNames('a', ['b', {c: true, d: false}])}>'a b c'</div>
      </div>
    )
  }
}

export default App2
3
4
5
6
7
8
9
10
11
12
13
14
15
16
17
18
19
20
21
22
23
24
25
26