第一章:React 性能优化 SCU
1.1 React 的更新机制
1.1.1 概述
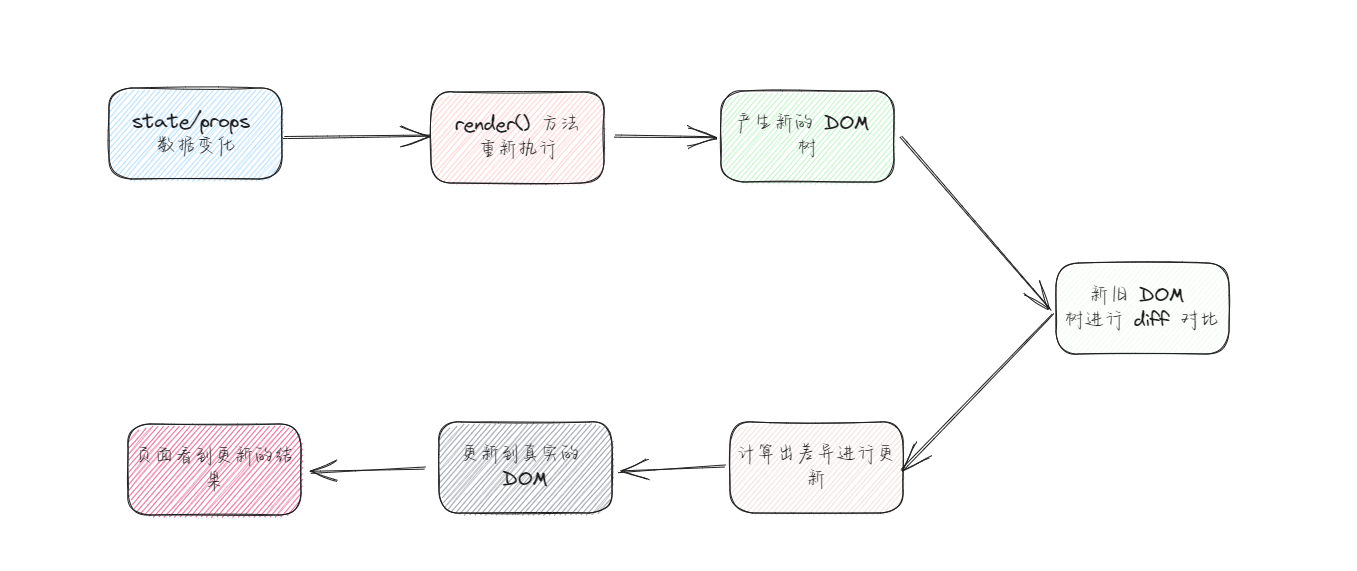
- 之前,我们已经学习过 React 的渲染机制:

- 那么,React 的更新流程,是怎么样的?
1.1.2 React 的 Diff 算法优化
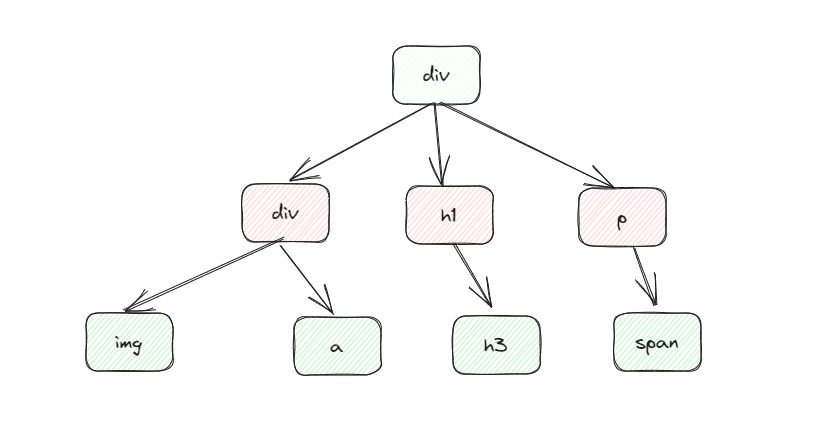
- 我们知道,DOM 树就是一颗树,如下图所示:
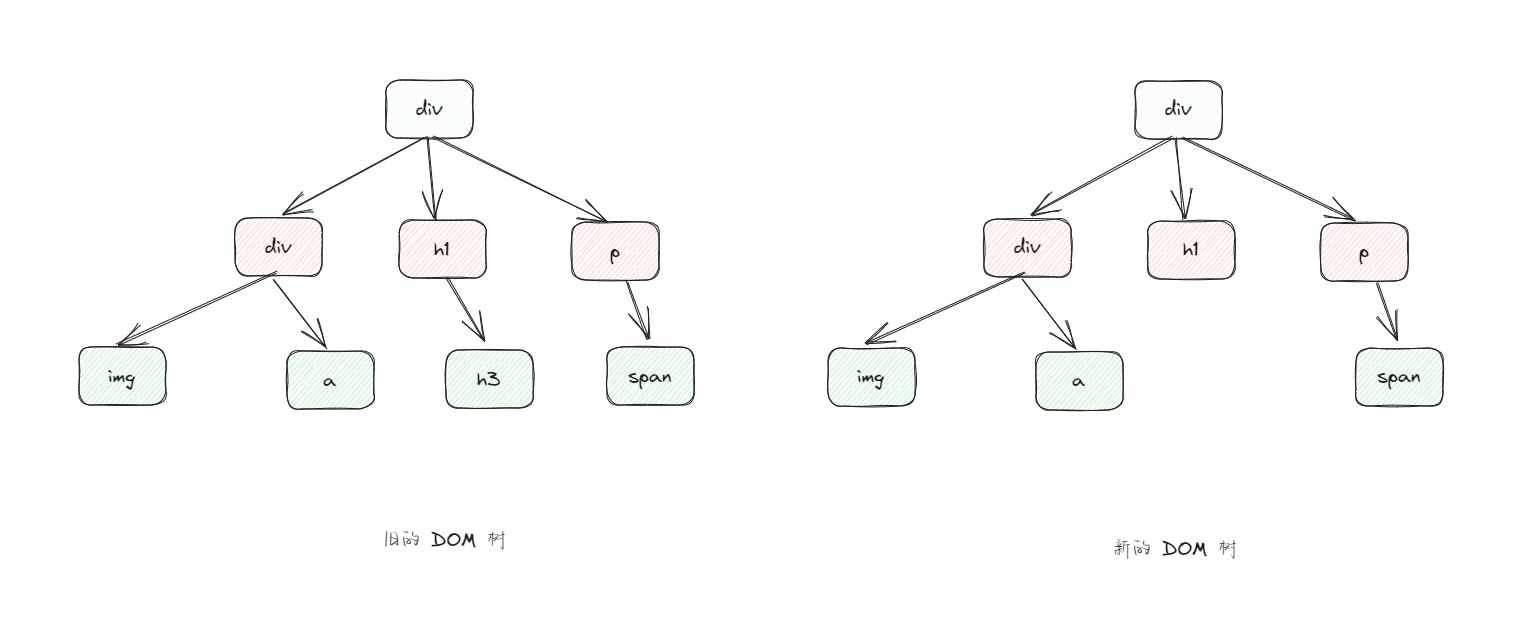
- 传统的 DOM diff 算法的时间复杂度是 O(n^3) ,如下图所示:
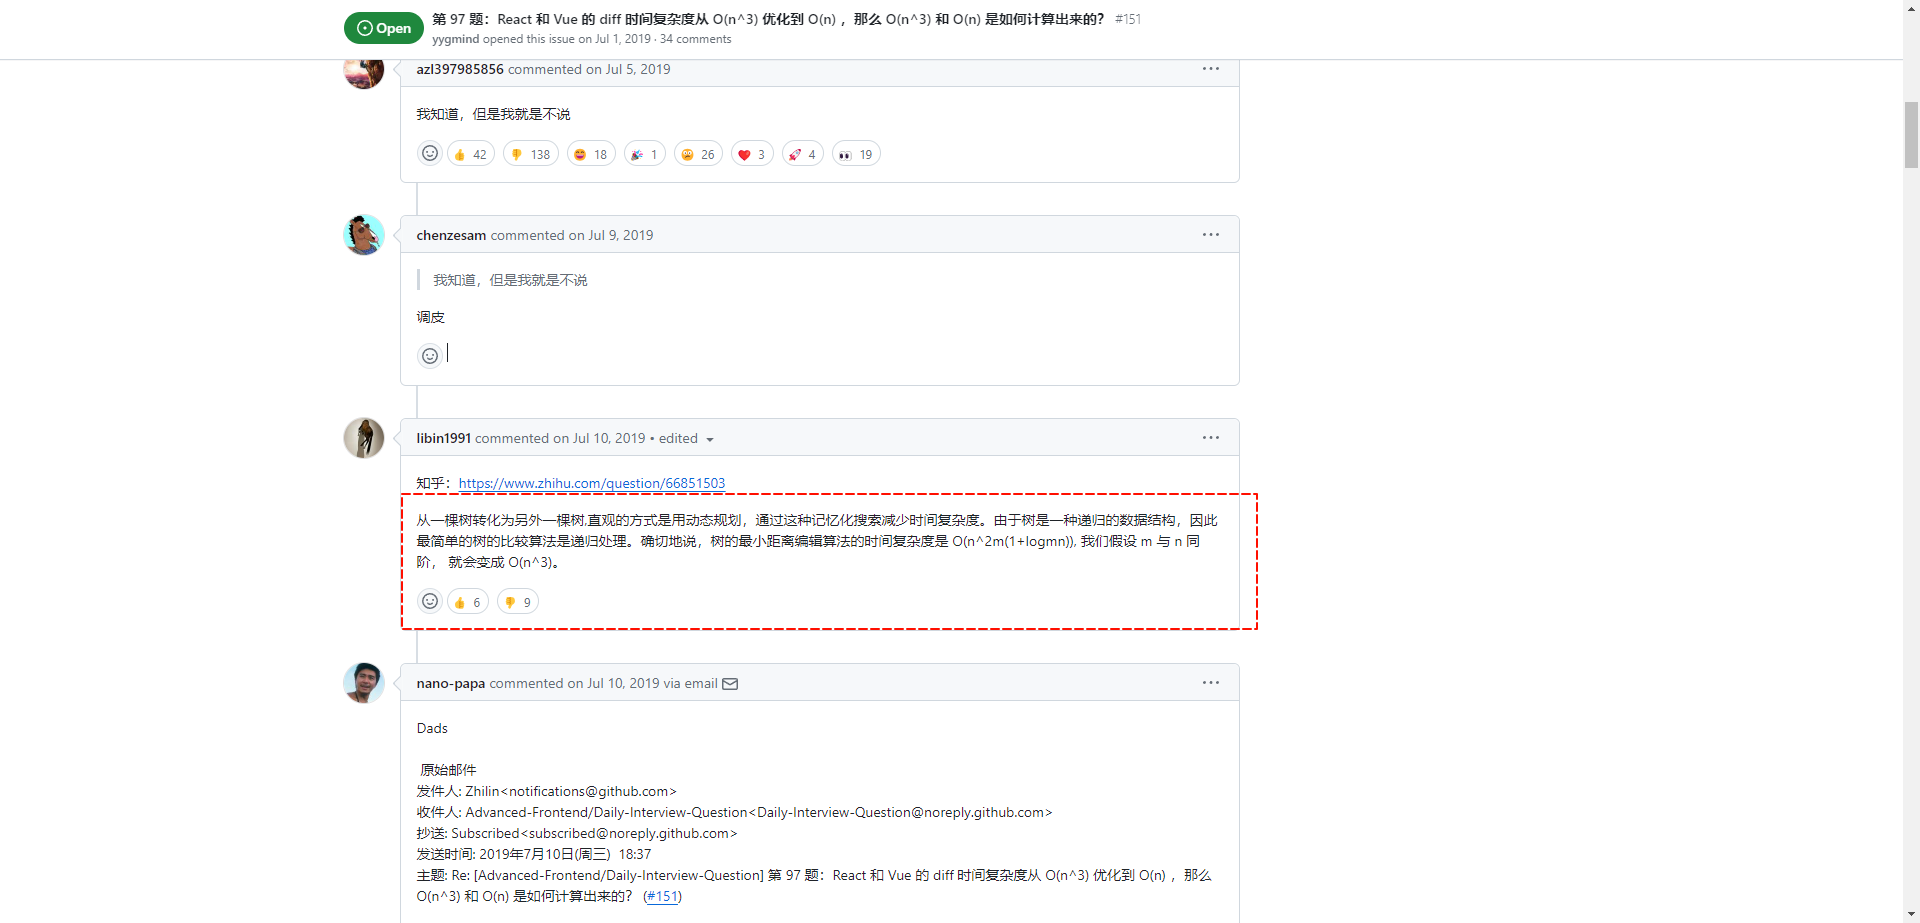
- 如何计算的?如下所示:
- 不管怎么样,如果 React 采取这样的算法,那么 React 的更新性能将会变得非常的低下。
- 于是,React 就对这种算法进行了优化,将其优化成 O(n),优化如下:
- ① 同层节点之间相互比较,不会跨节点比较。
- ② 不同类型的节点,产生不同的树结构。
- ③ ……
- 所以,在开发中,我们可以通过 key 来指定节点,以便 React 在不同的渲染下能保持稳定。
1.1.3 key 的优化
- 我们在遍历数据的时候,需要指定 key 属性,要求如下:
- ① key 需要是唯一的。
- ② key 不能使用随机数。
- ③ 是一个 index 作为 key ,对性能没有什么优化。
1.2 render 函数的调用
借用组件嵌套案例,如果我们在 App 组件中,增加计数器的功能,render 函数会调用几次?
示例:
import React from 'react'
import Header from "@/components/Header"
import Main from "@/components/Main"
import Footer from "@/components/Footer"

class App extends React.Component {

  constructor(props) {
    super(props);
    this.state = {
      message: "我是 App 组件",
      count: 1
    }
  }

  add(){
    this.setState({count: this.state.count + 1})
  }

  render() {
    const {message,count} = this.state
    console.log('App render')
    return (
      <div style={{backgroundColor: 'pink', width: "500px", padding: '5px', border: "1px solid black"}}>
        <h2>{message}</h2>
        <h2>当前计数为:{count}</h2>
        <button onClick={() => this.add()}>+1</button>
        <Header/>
        <Main/>
        <Footer/>
      </div>
    )
  }
}

export default App2
3
4
5
6
7
8
9
10
11
12
13
14
15
16
17
18
19
20
21
22
23
24
25
26
27
28
29
30
31
32
33
34
35
36
import React from 'react'

class Header extends React.Component {

  constructor(props) {
    super(props);
    this.state = {
      message: "我是 Header 组件"
    }
  }

  render() {
    const {message} = this.state
    console.log('Header render')
    return (
      <div style={{backgroundColor: 'skyblue', padding: '5px', border: "1px solid black"}}>
        <h2>{message}</h2>
      </div>
    )
  }
}

export default Header2
3
4
5
6
7
8
9
10
11
12
13
14
15
16
17
18
19
20
21
22
23
import React from 'react'
import Banner from "@/components/Banner"
import ProductList from "@/components/ProductList"

class Main extends React.Component {

  constructor(props) {
    super(props);
    this.state = {
      message: "我是 Main 组件"
    }
  }

  render() {
    const {message} = this.state
    console.log('Main render')
    return (
      <div style={{backgroundColor: 'orange', padding: '5px',marginTop: '20px',marginBottom: '20px', border: "1px solid black"}}>
        <h2>{message}</h2>
        <Banner/>
        <ProductList/>
      </div>
    )
  }
}

export default Main2
3
4
5
6
7
8
9
10
11
12
13
14
15
16
17
18
19
20
21
22
23
24
25
26
27
import React from 'react'

class Footer extends React.Component {

  constructor(props) {
    super(props);
    this.state = {
      message: "我是 Footer 组件"
    }
  }

  render() {
    const {message} = this.state
    console.log('Footer render')
    return (
      <div style={{backgroundColor: 'sienna', padding: '5px', border: "1px solid black"}}>
        <h2>{message}</h2>
      </div>
    )
  }
}

export default Footer2
3
4
5
6
7
8
9
10
11
12
13
14
15
16
17
18
19
20
21
22
23
import React from 'react'

class Banner extends React.Component {

  constructor(props) {
    super(props);
    this.state = {
      message: "我是 Banner 组件"
    }
  }

  render() {
    const {message} = this.state
    console.log('Banner render')
    return (
      <div style={{backgroundColor: 'mediumseagreen',  padding: '5px',marginBottom: '20px', border: "1px solid black"}}>
        <h2>{message}</h2>
      </div>
    )
  }
}

export default Banner2
3
4
5
6
7
8
9
10
11
12
13
14
15
16
17
18
19
20
21
22
23
import React from 'react'

class ProductList extends React.Component {

  constructor(props) {
    super(props);
    this.state = {
      message: "我是 ProductList 组件"
    }
  }

  render() {
    const {message} = this.state
    console.log('ProductList render')
    return (
      <div style={{backgroundColor: 'lightsalmon',  padding: '5px', border: "1px solid black"}}>
        <h2>{message}</h2>
      </div>
    )
  }
}

export default ProductList2
3
4
5
6
7
8
9
10
11
12
13
14
15
16
17
18
19
20
21
22
23
- 通过
浏览器上的点击按钮,查看控制台显示效果:
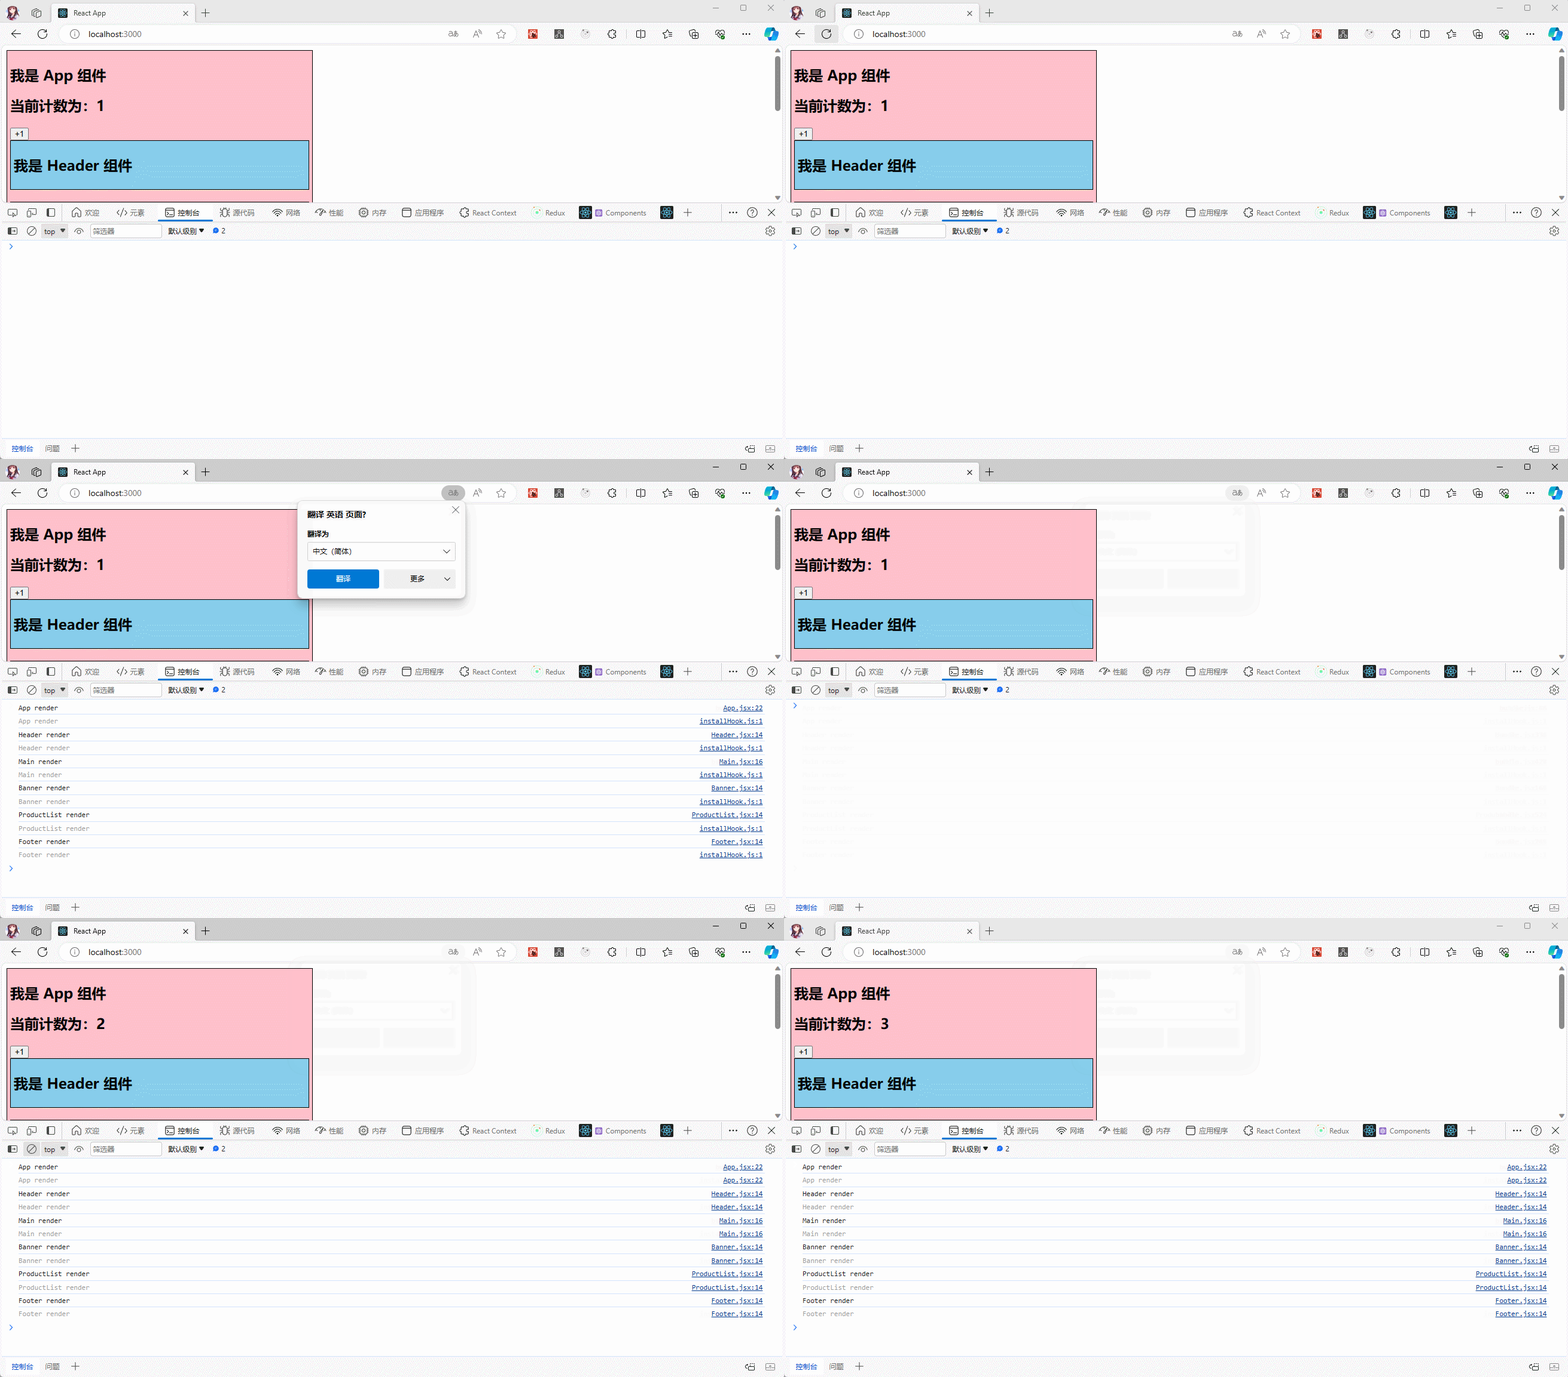
我们会发现如下的问题:
- 初次渲染,所有组件都调用 render() 方法,没什么毛病。
- 但是,只有 App 组件中的 state 发生了变化,所有的后代组件也都重新执行了 render() 方法,这性能也太差了吧。
其实,我们想要的结果就是:如果后代组件的 state 或 props 没有变化,那么就不要重新调用 render() 方法,怎么办?通过
shouldComponentUpdate生命周期方法即可。
1.3 shouldComponentUpdate 生命周期
- React 给我们提供了 shouldComponentUpdate() 生命周期(也有人称为 SCU),这个方法的定义如下:
shouldComponentUpdate?(nextProps: Readonly<P>, nextState: Readonly<S>, nextContext: any): boolean;- 参数:
- nextProps:表示修改之后,最新的 props 值。
- nextState:表示修改之后,最新的 state 值。
- 返回值:
- 如果为 true,就会调用 render 方法(默认值)。
- 如果为 false,就不会调用 render 方法。
注意⚠️:在React中,默认情况下,当父组件的
shouldComponentUpdate返回true时,即使子组件的状态(state)没有变化,子组件仍然会重新执行render方法。
- 这是因为 React 默认情况下无法确定子组件的状态是否发生了变化。即使子组件的
state没有直接变化,但是父组件的render方法可能会导致子组件的props发生变化,从而触发子组件的重新渲染。- 为了避免不必要的渲染,可以在子组件中使用
shouldComponentUpdate方法来进行优化。在shouldComponentUpdate中,可以根据具体的业务逻辑判断是否需要重新渲染子组件。如果确定子组件的state没有变化,可以返回false,以避免不必要的渲染。
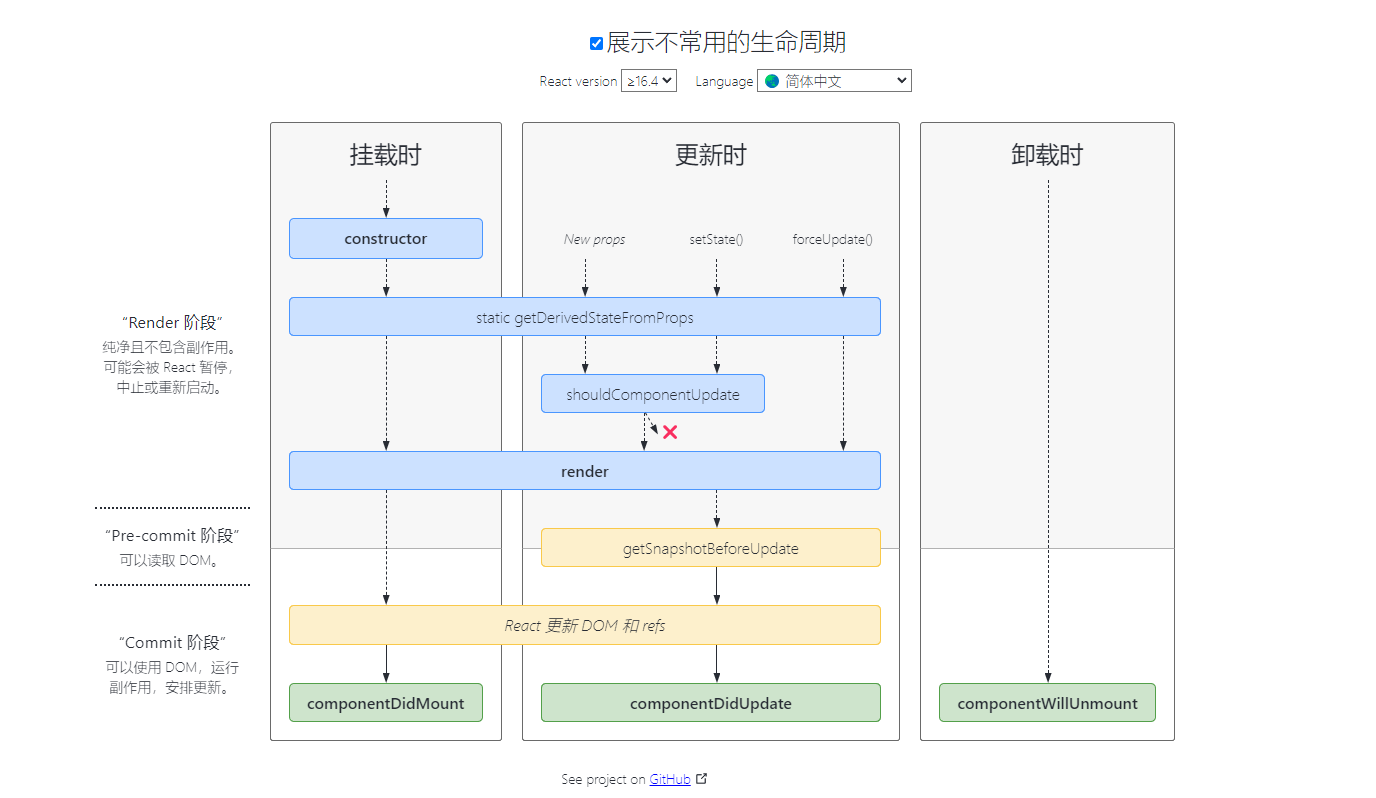
- React 的
生命周期图例,如下:
- 那么,我们就可以使用
shouldComponentUpdate生命周期方法来改造代码:
import React from 'react'

class Header extends React.Component {

  constructor(props) {
    super(props);
    this.state = {
      message: "我是 Header 组件"
    }
  }

  render() {
    const {message} = this.state
    console.log('Header render')
    return (
      <div style={{backgroundColor: 'skyblue', padding: '5px', border: "1px solid black"}}>
        <h2>{message}</h2>
      </div>
    )
  }

  // 生命周期方法
  shouldComponentUpdate(nextProps, nextState, nextContext) {
    // 如果 message 发生了变化,则返回 true,让其调用 render 函数,否则返回 false。
    if (this.state.message !== nextState.message) {
      return true
    }
    return false
  }
}

export default Header2
3
4
5
6
7
8
9
10
11
12
13
14
15
16
17
18
19
20
21
22
23
24
25
26
27
28
29
30
31
32
import React from 'react'
import Banner from "@/components/Banner"
import ProductList from "@/components/ProductList"

class Main extends React.Component {

  constructor(props) {
    super(props);
    this.state = {
      message: "我是 Main 组件"
    }
  }

  render() {
    const {message} = this.state
    console.log('Main render')
    return (
      <div style={{backgroundColor: 'orange', padding: '5px',marginTop: '20px',marginBottom: '20px', border: "1px solid black"}}>
        <h2>{message}</h2>
        <Banner/>
        <ProductList/>
      </div>
    )
  }

  // 生命周期方法
  shouldComponentUpdate(nextProps, nextState, nextContext) {
    if (this.state.message !== nextState.message) {
      return true
    }
    return false
  }
}

export default Main2
3
4
5
6
7
8
9
10
11
12
13
14
15
16
17
18
19
20
21
22
23
24
25
26
27
28
29
30
31
32
33
34
35
import React from 'react'

class Footer extends React.Component {

  constructor(props) {
    super(props);
    this.state = {
      message: "我是 Footer 组件"
    }
  }

  render() {
    const {message} = this.state
    console.log('Footer render')
    return (
      <div style={{backgroundColor: 'sienna', padding: '5px', border: "1px solid black"}}>
        <h2>{message}</h2>
      </div>
    )
  }

  // 生命周期方法
  shouldComponentUpdate(nextProps, nextState, nextContext) {
    // 如果 message 发生了变化,则返回 true,让其调用 render 函数,否则返回 false。
    if (this.state.message !== nextState.message) {
      return true
    }
    return false
  }
}

export default Footer2
3
4
5
6
7
8
9
10
11
12
13
14
15
16
17
18
19
20
21
22
23
24
25
26
27
28
29
30
31
32
import React from 'react'

class Banner extends React.Component {

  constructor(props) {
    super(props);
    this.state = {
      message: "我是 Banner 组件"
    }
  }

  render() {
    const {message} = this.state
    console.log('Banner render')
    return (
      <div style={{backgroundColor: 'mediumseagreen',  padding: '5px',marginBottom: '20px', border: "1px solid black"}}>
        <h2>{message}</h2>
      </div>
    )
  }

  // 生命周期方法
  shouldComponentUpdate(nextProps, nextState, nextContext) {
    if (this.state.message !== nextState.message) {
      return true
    }
    return false
  }
}

export default Banner2
3
4
5
6
7
8
9
10
11
12
13
14
15
16
17
18
19
20
21
22
23
24
25
26
27
28
29
30
31
import React from 'react'

class ProductList extends React.Component {

  constructor(props) {
    super(props);
    this.state = {
      message: "我是 ProductList 组件"
    }
  }

  render() {
    const {message} = this.state
    console.log('ProductList render')
    return (
      <div style={{backgroundColor: 'lightsalmon',  padding: '5px', border: "1px solid black"}}>
        <h2>{message}</h2>
      </div>
    )
  }

  // 生命周期方法
  shouldComponentUpdate(nextProps, nextState, nextContext) {
    if (this.state.message !== nextState.message) {
      return true
    }
    return false
  }
}

export default ProductList2
3
4
5
6
7
8
9
10
11
12
13
14
15
16
17
18
19
20
21
22
23
24
25
26
27
28
29
30
31
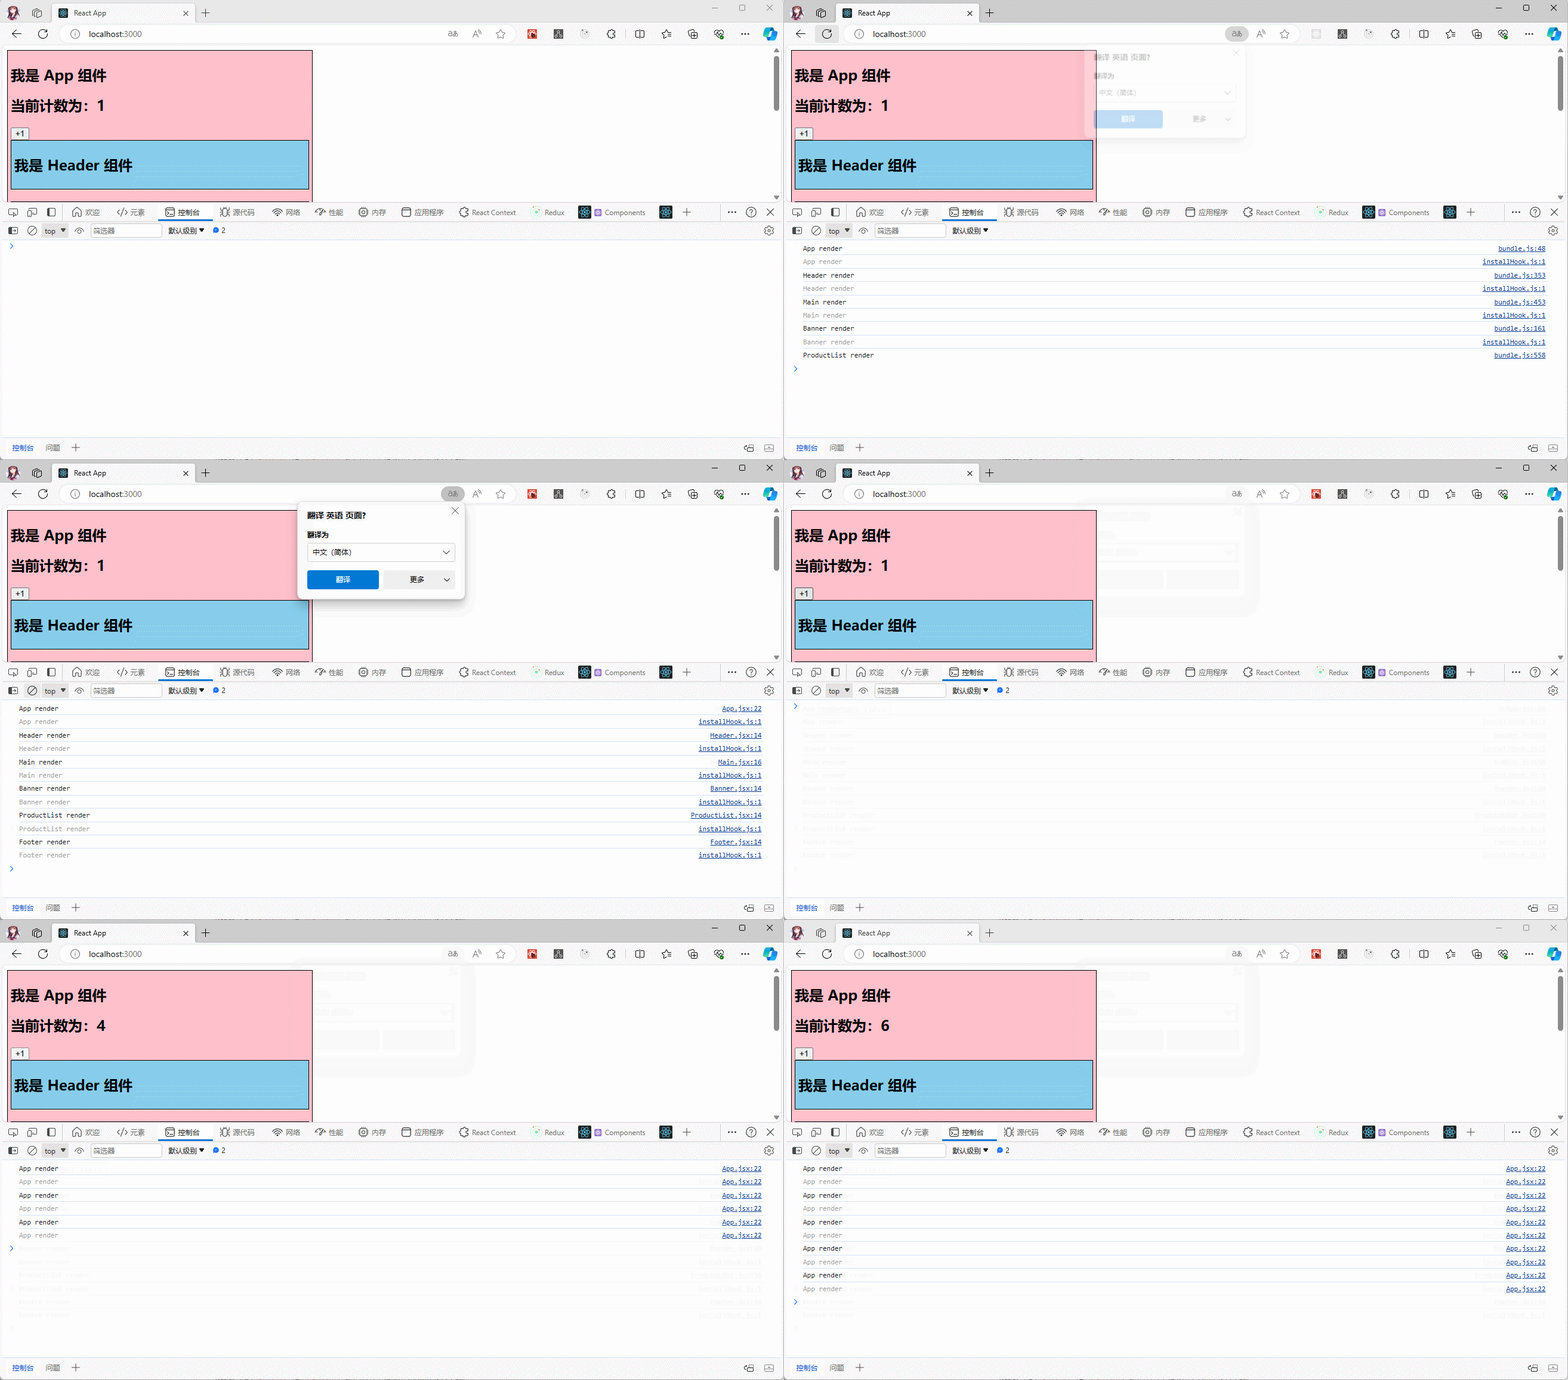
- 通过
浏览器上的点击按钮,查看控制台显示效果:
- 如果都这么开发的话,那重复的代码未免太多了吧。怎么办?其实,官方提供了一个 React.Component 类的实现类 PureComponent 类,可以大大降低我们开发的工作量。
1.4 PureComponent
- 查看 PureComponent 的 TS 定义:
class PureComponent<P = {}, S = {}, SS = any> extends Component<P, S, SS> {}- 那么,我们只需要继承该类就可以了,这就是继承的好处。
- 其中,PureComponent 类中的 shouldComponentUpdate 方法的相关实现如下:
function checkShouldComponentUpdate(
  workInProgress: Fiber,
  ctor: any,
  oldProps: any,
  newProps: any,
  oldState: any,
  newState: any,
  nextContext: any,
) {
  const instance = workInProgress.stateNode;
  // 如果我们自己继承了 Component,并实现了 shouldComponentUpdate 就调用我们自己实现的 shouldComponentUpdate
  if (typeof instance.shouldComponentUpdate === 'function') {
    let shouldUpdate = instance.shouldComponentUpdate(
      newProps,
      newState,
      nextContext,
    );
    if (__DEV__) {
      if (
        debugRenderPhaseSideEffectsForStrictMode &&
        workInProgress.mode & StrictLegacyMode
      ) {
        setIsStrictModeForDevtools(true);
        try {
          // Invoke the function an extra time to help detect side-effects.
          shouldUpdate = instance.shouldComponentUpdate(
            newProps,
            newState,
            nextContext,
          );
        } finally {
          setIsStrictModeForDevtools(false);
        }
      }
      if (shouldUpdate === undefined) {
        console.error(
          '%s.shouldComponentUpdate(): Returned undefined instead of a ' +
            'boolean value. Make sure to return true or false.',
          getComponentNameFromType(ctor) || 'Component',
        );
      }
    }

    return shouldUpdate;
  }

  // 如果我们继承了 PureComponent ,并且没有自己实现 shouldComponentUpdate 方法,就执行下面的逻辑
  if (ctor.prototype && ctor.prototype.isPureReactComponent) {
    return (
      // 比较就得 props 和 新的 props ,会进行浅层比较
      // 浅层比较的结果,如果 true,那么就取反;意味着,只有不相等,才会去更新~
      !shallowEqual(oldProps, newProps) || !shallowEqual(oldState, newState)
    );
  }

  return true;
}2
3
4
5
6
7
8
9
10
11
12
13
14
15
16
17
18
19
20
21
22
23
24
25
26
27
28
29
30
31
32
33
34
35
36
37
38
39
40
41
42
43
44
45
46
47
48
49
50
51
52
53
54
55
56
57
- shallowEqual 方法的定义如下:
// objA 和 objB 就类似于 oldProps, newProps 和 oldState, newState
function shallowEqual(objA: mixed, objB: mixed): boolean {
  // 判断两个对象是否是同一个对象,如果是,则返回 true
  if (is(objA, objB)) {
    return true;
  }

  if (
    typeof objA !== 'object' ||
    objA === null ||
    typeof objB !== 'object' ||
    objB === null
  ) {
    return false;
  }

  // 获取 props 和 state 对象中的 key
  const keysA = Object.keys(objA);
  const keysB = Object.keys(objB);

  // 假设 oldProps 中的 key 中的数量 和 newProps 中的数量不相等,就返回 false ,即 oldProps 和 newProps 不一致
  if (keysA.length !== keysB.length) {
    return false;
  }

  // 在 key 数量一致的情况下,比较第一层的 key 对应的 value 是否相等
  // Test for A's keys different from B.
  for (let i = 0; i < keysA.length; i++) {
    const currentKey = keysA[i];
    if (
      !hasOwnProperty.call(objB, currentKey) ||
      // $FlowFixMe[incompatible-use] lost refinement of `objB`
      !is(objA[currentKey], objB[currentKey])
    ) {
      return false;
    }
  }

  return true;
}2
3
4
5
6
7
8
9
10
11
12
13
14
15
16
17
18
19
20
21
22
23
24
25
26
27
28
29
30
31
32
33
34
35
36
37
38
39
40
- 那么,我们就可以使用 PureComponent 类来改造我们的代码:
import React, {PureComponent} from 'react'
import Header from "@/components/Header"
import Main from "@/components/Main"
import Footer from "@/components/Footer"

class App extends PureComponent {

  constructor(props) {
    super(props);
    this.state = {
      message: "我是 App 组件",
      count: 1
    }
  }

  add() {
    const {count} = this.state
    this.setState({count: count + 1})
  }

  render() {
    const {message, count} = this.state
    console.log('App render')
    return (
      <div style={{backgroundColor: 'pink', width: "500px", padding: '5px', border: "1px solid black"}}>
        <h2>{message}</h2>
        <h2>当前计数为:{count}</h2>
        <button onClick={() => this.add()}>+1</button>
        <Header/>
        <Main/>
        <Footer/>
      </div>
    )
  }
}

export default App2
3
4
5
6
7
8
9
10
11
12
13
14
15
16
17
18
19
20
21
22
23
24
25
26
27
28
29
30
31
32
33
34
35
36
37
import React, {PureComponent} from 'react'

class Header extends PureComponent {

  constructor(props) {
    super(props);
    this.state = {
      message: "我是 Header 组件"
    }
  }

  render() {
    const {message} = this.state
    console.log('Header render')
    return (
      <div style={{backgroundColor: 'skyblue', padding: '5px', border: "1px solid black"}}>
        <h2>{message}</h2>
      </div>
    )
  }

}

export default Header2
3
4
5
6
7
8
9
10
11
12
13
14
15
16
17
18
19
20
21
22
23
24
import React, {PureComponent} from 'react'
import Banner from "@/components/Banner"
import ProductList from "@/components/ProductList"

class Main extends PureComponent {

  constructor(props) {
    super(props);
    this.state = {
      message: "我是 Main 组件"
    }
  }

  render() {
    const {message} = this.state
    console.log('Main render')
    return (
      <div style={{
        backgroundColor: 'orange',
        padding: '5px',
        marginTop: '20px',
        marginBottom: '20px',
        border: "1px solid black"
      }}>
        <h2>{message}</h2>
        <Banner/>
        <ProductList/>
      </div>
    )
  }

}

export default Main2
3
4
5
6
7
8
9
10
11
12
13
14
15
16
17
18
19
20
21
22
23
24
25
26
27
28
29
30
31
32
33
34
import React, {PureComponent} from 'react'

class Footer extends PureComponent {

  constructor(props) {
    super(props);
    this.state = {
      message: "我是 Footer 组件"
    }
  }

  render() {
    const {message} = this.state
    console.log('Footer render')
    return (
      <div style={{backgroundColor: 'sienna', padding: '5px', border: "1px solid black"}}>
        <h2>{message}</h2>
      </div>
    )
  }


}

export default Footer2
3
4
5
6
7
8
9
10
11
12
13
14
15
16
17
18
19
20
21
22
23
24
25
import React, {PureComponent} from 'react'

class Banner extends PureComponent {
  constructor(props) {
    super(props);
    this.state = {
      message: "我是 Banner 组件"
    }
  }

  render() {
    const {message} = this.state
    console.log('Banner render')
    return (
      <div style={{backgroundColor: 'mediumseagreen', padding: '5px', marginBottom: '20px', border: "1px solid black"}}>
        <h2>{message}</h2>
      </div>
    )
  }

}

export default Banner2
3
4
5
6
7
8
9
10
11
12
13
14
15
16
17
18
19
20
21
22
23
import React, {PureComponent} from 'react'

class ProductList extends PureComponent {

  constructor(props) {
    super(props);
    this.state = {
      message: "我是 ProductList 组件"
    }
  }

  render() {
    const {message} = this.state
    console.log('ProductList render')
    return (
      <div style={{backgroundColor: 'lightsalmon', padding: '5px', border: "1px solid black"}}>
        <h2>{message}</h2>
      </div>
    )
  }

}

export default ProductList2
3
4
5
6
7
8
9
10
11
12
13
14
15
16
17
18
19
20
21
22
23
24
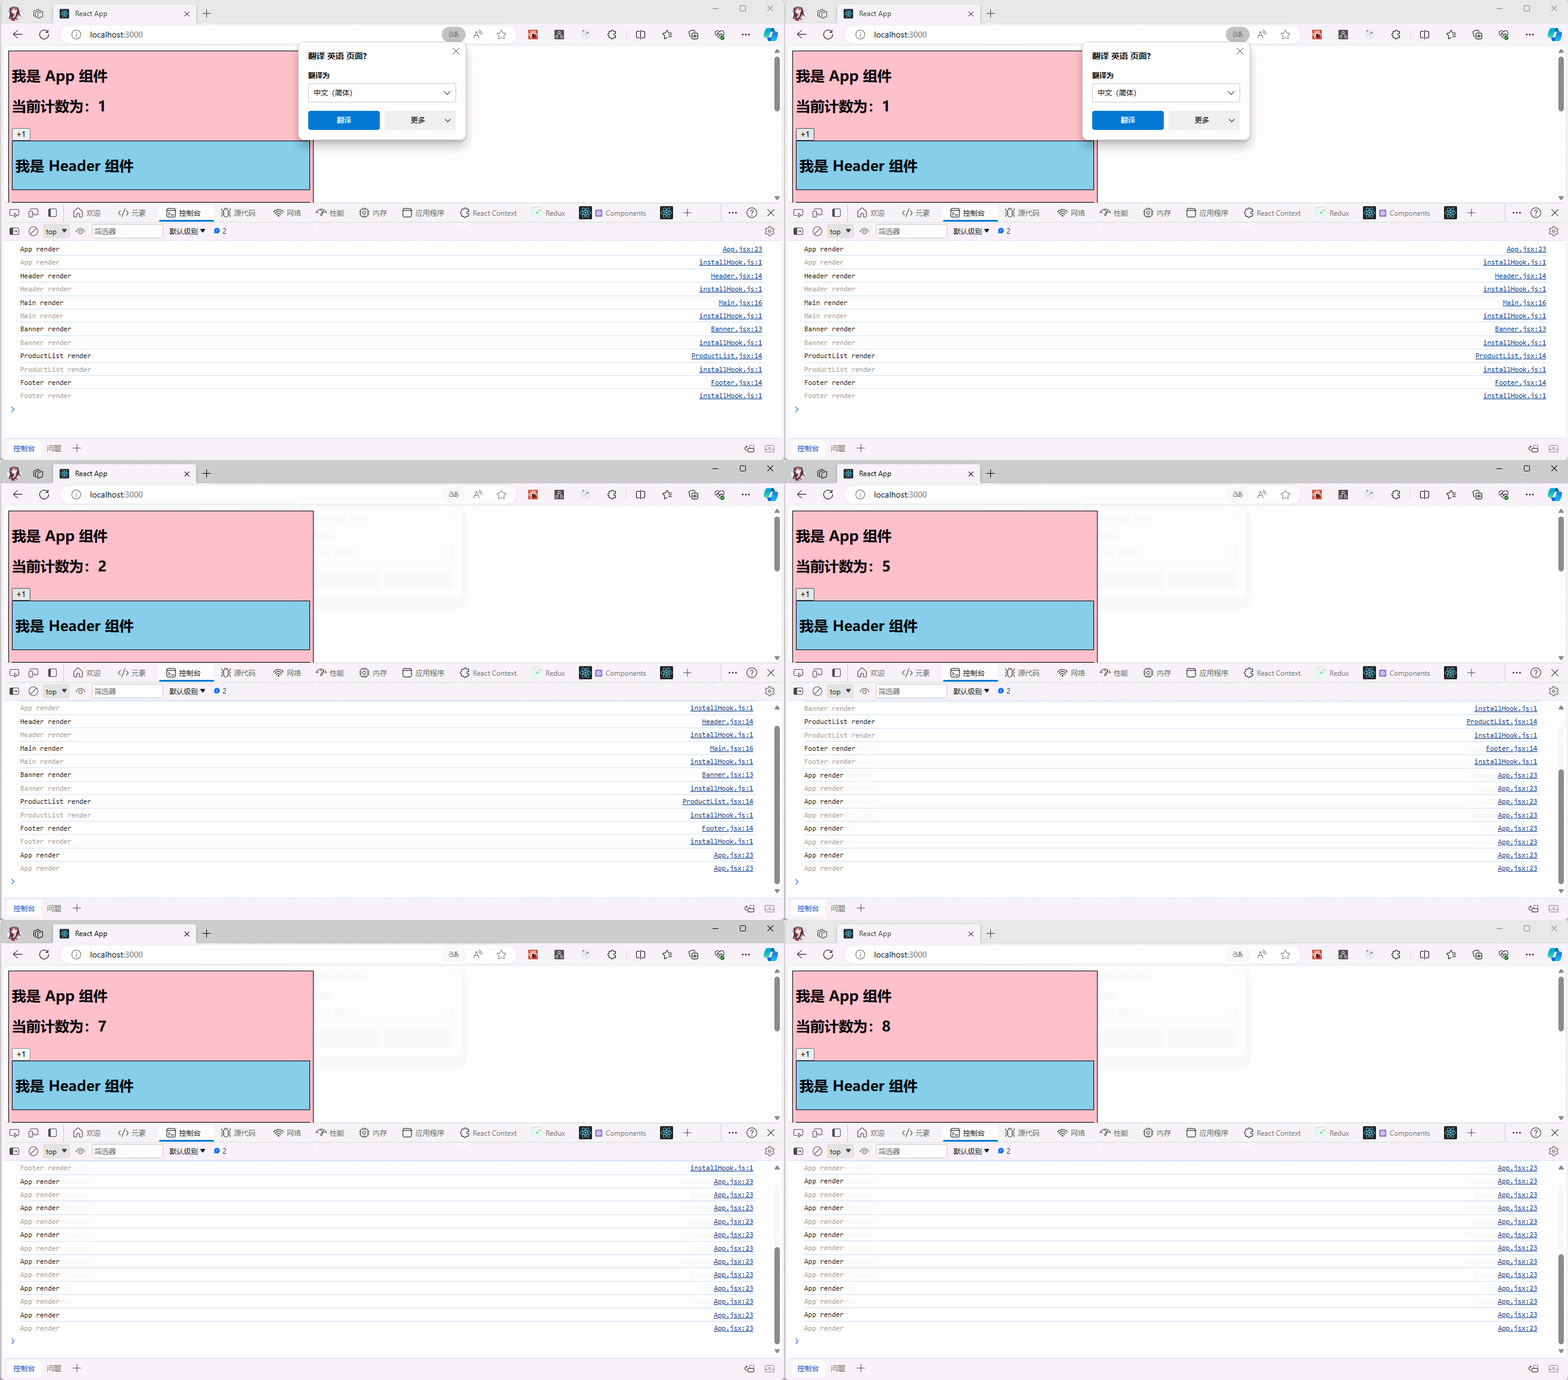
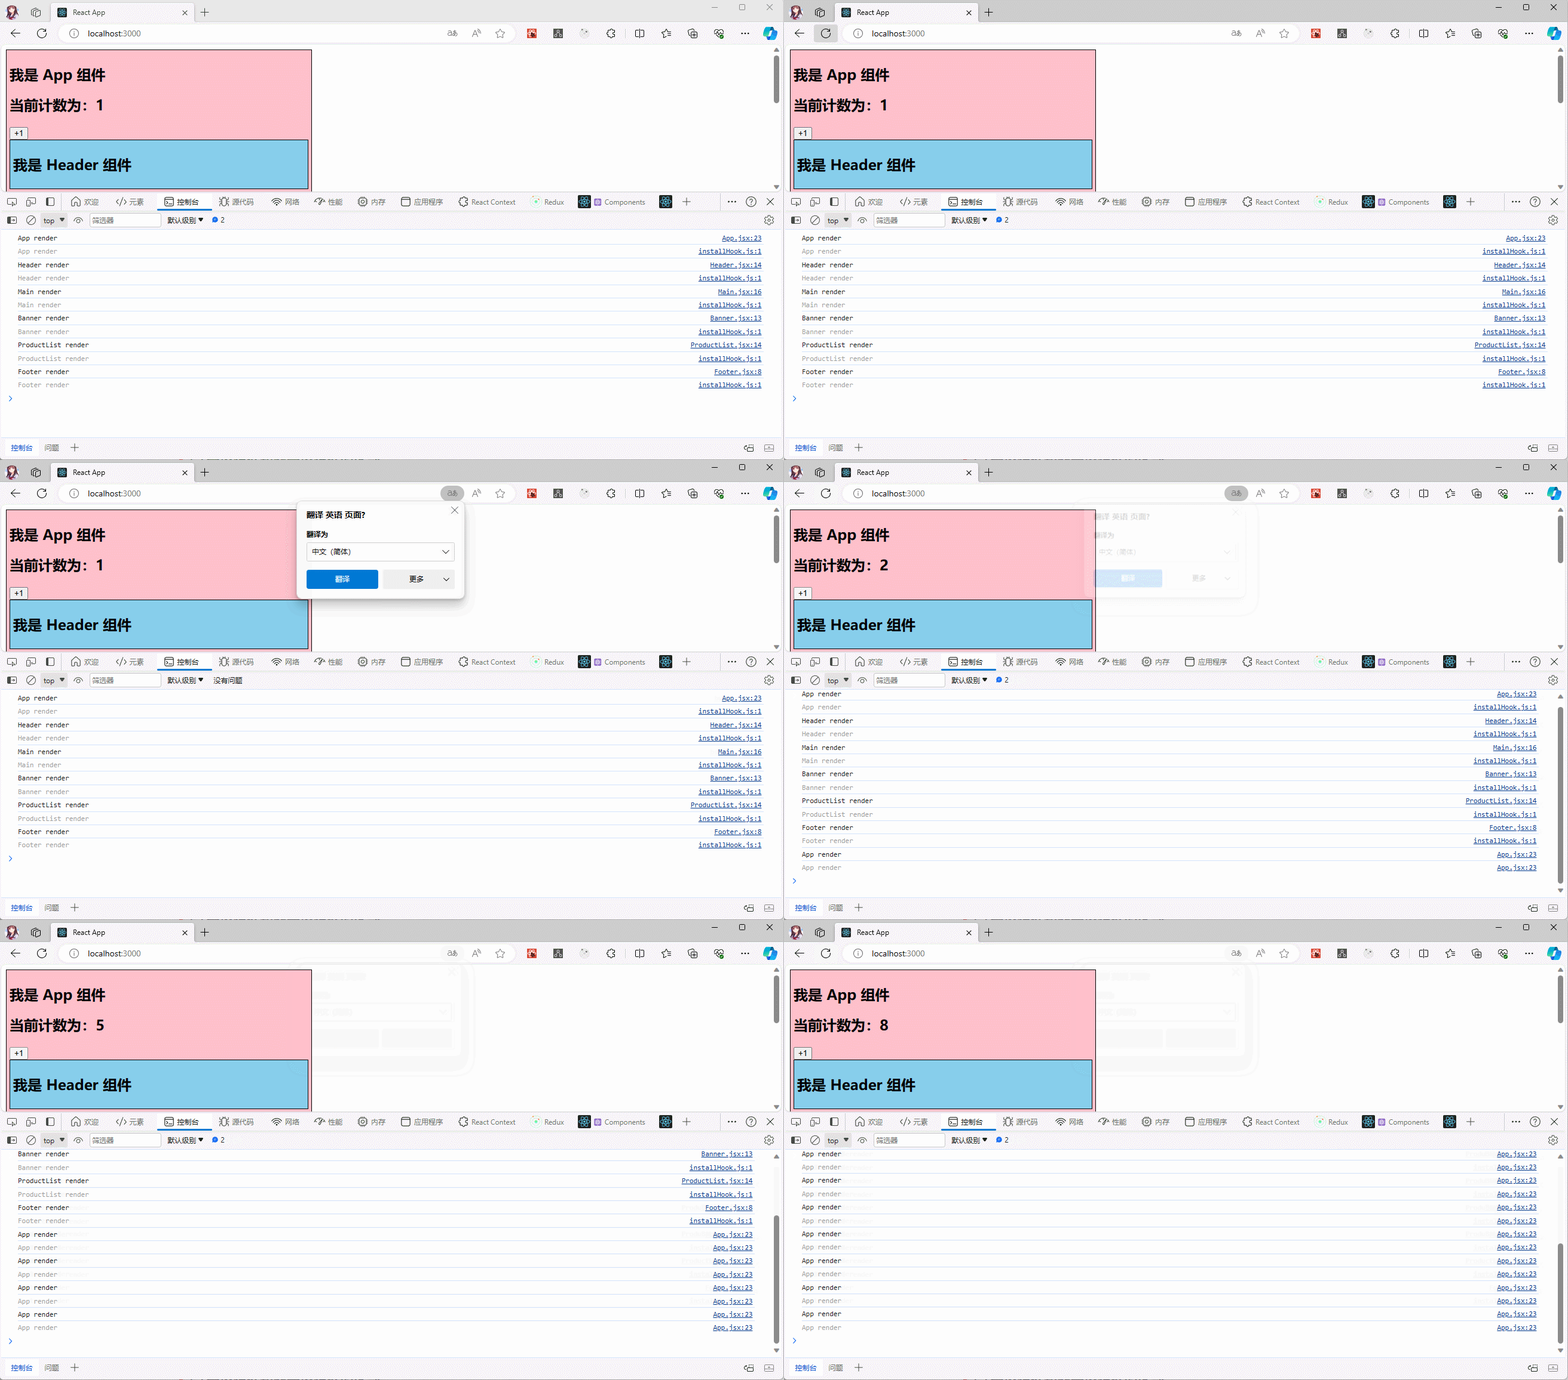
- 通过
浏览器上的点击按钮,查看控制台显示效果:
注意⚠️:类式组件是可以继承 PureComponent 类的,函数式组件可不能继承 PureComponent 类的;此时,函数式组件就需要使用
React.memo()高阶组件了。
- 改造其中一个子组件,是其变为函数式组件,并使用
React.memo()高阶组件包装使其进行浅层比较:
import React, {memo, useState} from 'react'


const Footer = memo(function Footer() {

  const [message] = useState('我是 Footer 组件')

  console.log('Footer render')

  return (
    <div style={{backgroundColor: 'sienna', padding: '5px', border: "1px solid black"}}>
      <h2>{message}</h2>
    </div>
  )
})


export default Footer2
3
4
5
6
7
8
9
10
11
12
13
14
15
16
17
18
- 通过
浏览器上的点击按钮,查看控制台显示效果:
1.5 不可变数据的力量(⭐)
1.5.1 概述
我们知道,PureComponent 类使用的是 shallowEqual 方法来进行比较的,是浅层比较的,难道有什么问题?
之前,我们实现过购物车的案例;但是,我们当时是在
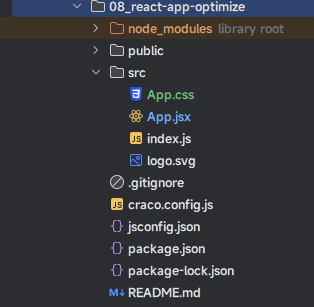
html中完成的;现在,我们将复制到工程中。项目结构:
- 基本功能搭建:
- 其中,App.css
table {
    border-collapse: collapse;
    text-align: center;
}

table th, td {
    border: 1px solid black;
    padding: 8px 16px;
}

table thead {
    background-color: #f5f5f5;
}

.active {
    background-color: pink;
}2
3
4
5
6
7
8
9
10
11
12
13
14
15
16
17
- 其中,App.jsx
import React, {Component} from 'react'
import '@/App.css'

class App extends Component {

  state = {
    books: [
      {
        id: 1,
        name: '《算法导论》',
        date: '2006-9',
        price: 85.00,
        count: 1
      },
      {
        id: 2,
        name: '《UNIX编程艺术》',
        date: '2006-2',
        price: 59.00,
        count: 1
      },
      {
        id: 3,
        name: '《编程珠玑》',
        date: '2008-10',
        price: 39.00,
        count: 1
      },
      {
        id: 4,
        name: '《代码大全》',
        date: '2006-3',
        price: 128.00,
        count: 1
      },
      {
        id: 5,
        name: '《你不知道的JavaScript》',
        date: '2014-8',
        price: 88.00,
        count: 1
      },
    ]
  }

  // 改变购物车中书籍的数量,如果不传递 num ,就是新增;否则,传递 -1 就是减少
  changeCount(id, num = 1) {
    const {books} = this.state

    if (id) {
      const newBooks = books.map(book => {
        if (book.id === id) {
          book.count += num
        }
        return book
      })
      this.setState({
        books: newBooks
      })
    }
  }

  // 删除购物车中的书籍
  delete(id) {
    const {books} = this.state

    if (id) {
      const newBooks = books.filter(book => book.id !== id)
      this.setState({
        books: newBooks
      })
    }
  }

  // 当购物车中的书籍数据不为空的时候的渲染函数
  renderBookList() {
    const {books} = this.state
    const totalPrice = books.map(item => item.price * item.count).reduce((prev, next) => prev + next, 0)
    return (<div>
      <table>
        <thead>
          <tr>
            <th>序号</th>
            <th>书籍名称</th>
            <th>出版日期</th>
            <th>价格</th>
            <th>购买数量</th>
            <th>操作</th>
          </tr>
        </thead>
        <tbody>
          {
            books && books.map((book, index) => {
              return (
                <tr key={index}>
                  <td>{index}</td>
                  <td>{book.name}</td>
                  <td>{book.date}</td>
                  <td>{"¥" + book.price.toFixed(2)}</td>
                  <td>
                    <button disabled={book.count <= 1} onClick={() => this.changeCount(book.id, -1)}>-</button>
                    {book.count}
                    <button onClick={() => this.changeCount(book.id)}>+</button>
                  </td>
                  <td>
                    <button onClick={() => this.delete(book.id)}>移除</button>
                  </td>
                </tr>
              )
            })
          }
        </tbody>
        <tfoot>
          <tr>
            <td colSpan="6">总价格:{"¥" + totalPrice.toFixed(2)}</td>
          </tr>
        </tfoot>
      </table>
    </div>)
  }

  // 当购物车中的书籍数据为空的时候的渲染函数
  renderBookEmpty() {
    return (<div>暂无数据</div>)
  }

  render() {
    const {books} = this.state
    return books.length ? this.renderBookList() : this.renderBookEmpty()
  }
}

export default App2
3
4
5
6
7
8
9
10
11
12
13
14
15
16
17
18
19
20
21
22
23
24
25
26
27
28
29
30
31
32
33
34
35
36
37
38
39
40
41
42
43
44
45
46
47
48
49
50
51
52
53
54
55
56
57
58
59
60
61
62
63
64
65
66
67
68
69
70
71
72
73
74
75
76
77
78
79
80
81
82
83
84
85
86
87
88
89
90
91
92
93
94
95
96
97
98
99
100
101
102
103
104
105
106
107
108
109
110
111
112
113
114
115
116
117
118
119
120
121
122
123
124
125
126
127
128
129
130
131
132
133
- 通过
浏览器,查看控制台显示效果:
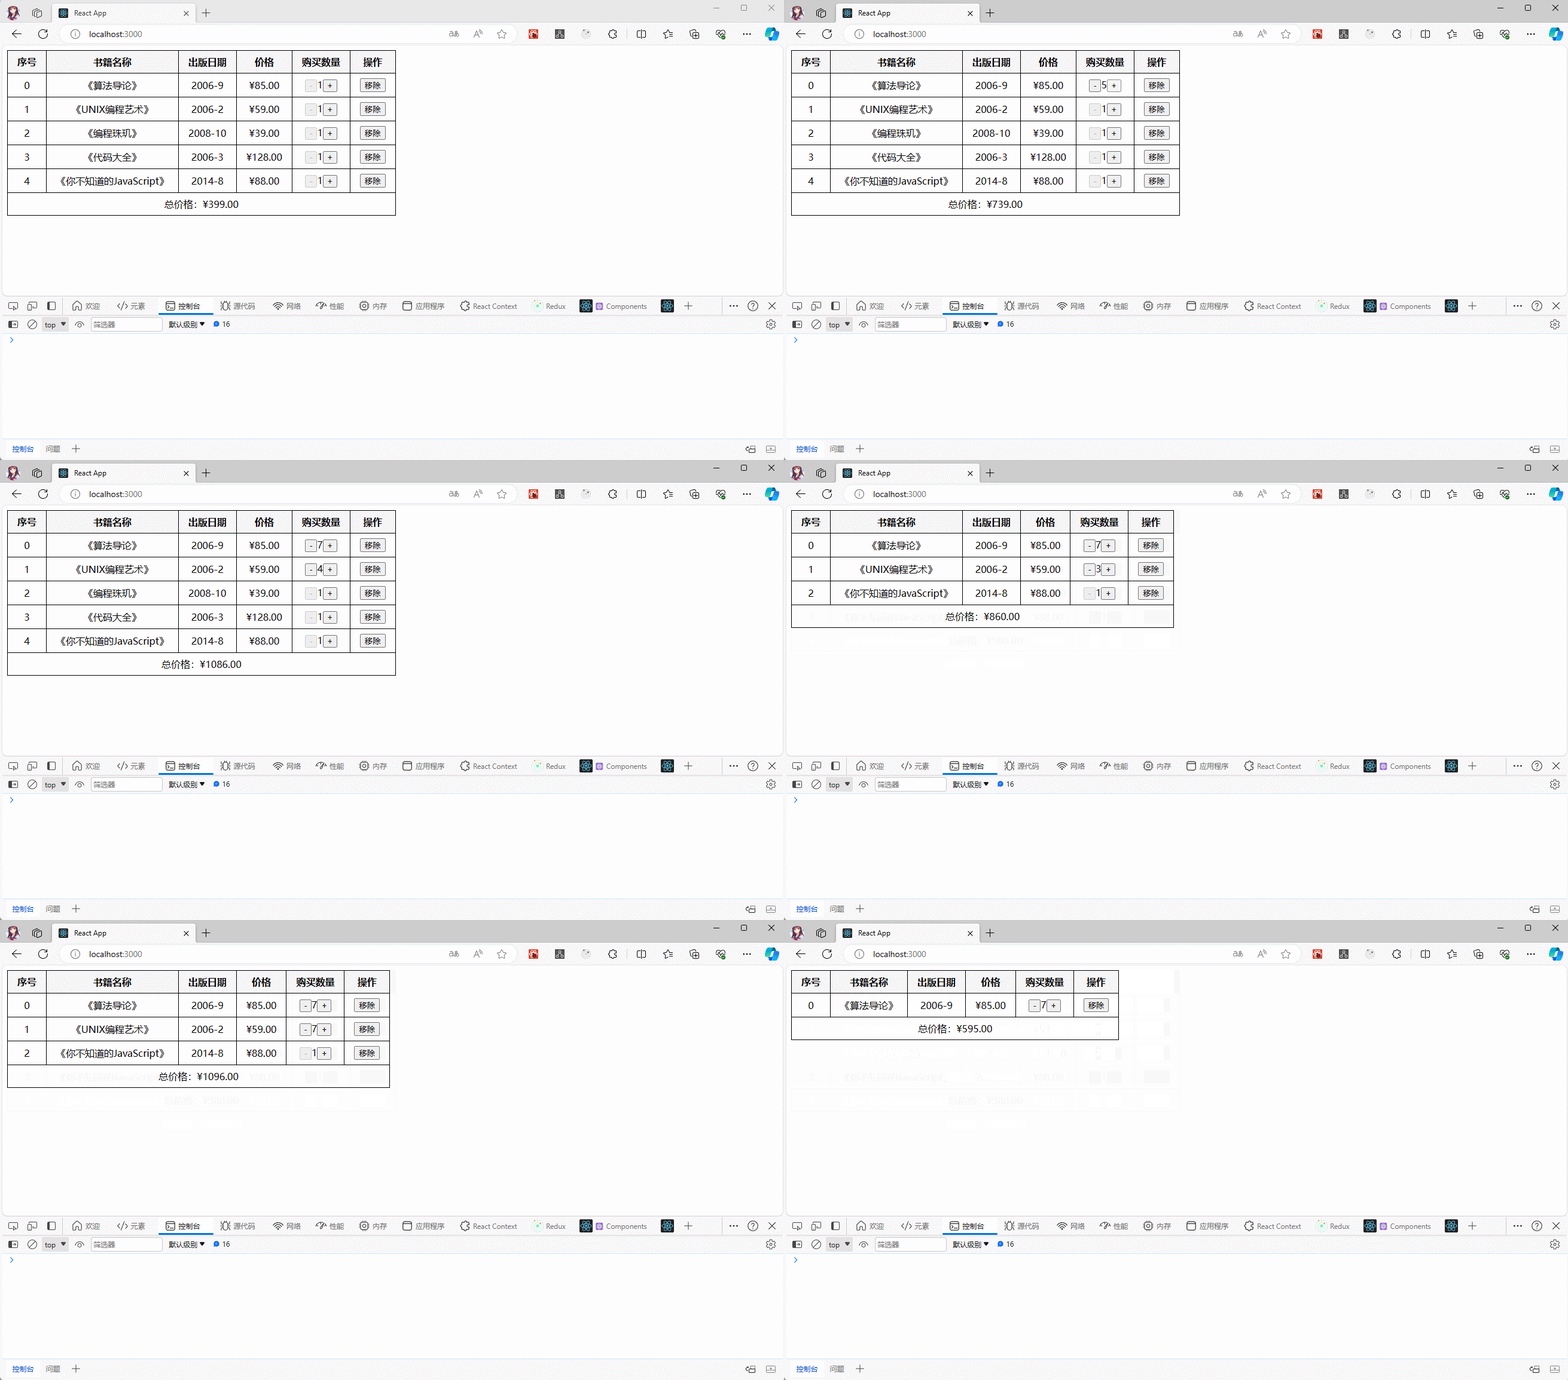
- 功能很正常,之前我们是继承 Component 类的;现在,改为 PureComponent 类:
import React, {PureComponent} from 'react'
import '@/App.css'

class App extends PureComponent {

  state = {
    books: [
      {
        id: 1,
        name: '《算法导论》',
        date: '2006-9',
        price: 85.00,
        count: 1
      },
      {
        id: 2,
        name: '《UNIX编程艺术》',
        date: '2006-2',
        price: 59.00,
        count: 1
      },
      {
        id: 3,
        name: '《编程珠玑》',
        date: '2008-10',
        price: 39.00,
        count: 1
      },
      {
        id: 4,
        name: '《代码大全》',
        date: '2006-3',
        price: 128.00,
        count: 1
      },
      {
        id: 5,
        name: '《你不知道的JavaScript》',
        date: '2014-8',
        price: 88.00,
        count: 1
      },
    ]
  }

  // 改变购物车中书籍的数量,如果不传递 num ,就是新增;否则,传递 -1 就是减少
  changeCount(id, num = 1) {
    const {books} = this.state

    if (id) {
      const newBooks = books.map(book => {
        if (book.id === id) {
          book.count += num
        }
        return book
      })
      this.setState({
        books: newBooks
      })
    }
  }

  // 删除购物车中的书籍
  delete(id) {
    const {books} = this.state

    if (id) {
      const newBooks = books.filter(book => book.id !== id)
      this.setState({
        books: newBooks
      })
    }
  }

  // 当购物车中的书籍数据不为空的时候的渲染函数
  renderBookList() {
    const {books} = this.state
    const totalPrice = books.map(item => item.price * item.count).reduce((prev, next) => prev + next, 0)
    return (<div>
      <table>
        <thead>
          <tr>
            <th>序号</th>
            <th>书籍名称</th>
            <th>出版日期</th>
            <th>价格</th>
            <th>购买数量</th>
            <th>操作</th>
          </tr>
        </thead>
        <tbody>
          {
            books && books.map((book, index) => {
              return (
                <tr key={index}>
                  <td>{index}</td>
                  <td>{book.name}</td>
                  <td>{book.date}</td>
                  <td>{"¥" + book.price.toFixed(2)}</td>
                  <td>
                    <button disabled={book.count <= 1} onClick={() => this.changeCount(book.id, -1)}>-</button>
                    {book.count}
                    <button onClick={() => this.changeCount(book.id)}>+</button>
                  </td>
                  <td>
                    <button onClick={() => this.delete(book.id)}>移除</button>
                  </td>
                </tr>
              )
            })
          }
        </tbody>
        <tfoot>
          <tr>
            <td colSpan="6">总价格:{"¥" + totalPrice.toFixed(2)}</td>
          </tr>
        </tfoot>
      </table>
    </div>)
  }

  // 当购物车中的书籍数据为空的时候的渲染函数
  renderBookEmpty() {
    return (<div>暂无数据</div>)
  }

  render() {
    const {books} = this.state
    return books.length ? this.renderBookList() : this.renderBookEmpty()
  }
}

export default App2
3
4
5
6
7
8
9
10
11
12
13
14
15
16
17
18
19
20
21
22
23
24
25
26
27
28
29
30
31
32
33
34
35
36
37
38
39
40
41
42
43
44
45
46
47
48
49
50
51
52
53
54
55
56
57
58
59
60
61
62
63
64
65
66
67
68
69
70
71
72
73
74
75
76
77
78
79
80
81
82
83
84
85
86
87
88
89
90
91
92
93
94
95
96
97
98
99
100
101
102
103
104
105
106
107
108
109
110
111
112
113
114
115
116
117
118
119
120
121
122
123
124
125
126
127
128
129
130
131
132
133
- 通过
浏览器,查看控制台显示效果:

- 其实,之前我们就已经下意识的规避了一个问题:我们在更新
数组数据的时候,是创建一个新的数组,在调用 setState() 方法的:
import React, {PureComponent} from 'react'
import '@/App.css'

class App extends PureComponent {

  state = {
    books: [
      {
        id: 1,
        name: '《算法导论》',
        date: '2006-9',
        price: 85.00,
        count: 1
      },
      {
        id: 2,
        name: '《UNIX编程艺术》',
        date: '2006-2',
        price: 59.00,
        count: 1
      },
      {
        id: 3,
        name: '《编程珠玑》',
        date: '2008-10',
        price: 39.00,
        count: 1
      },
      {
        id: 4,
        name: '《代码大全》',
        date: '2006-3',
        price: 128.00,
        count: 1
      },
      {
        id: 5,
        name: '《你不知道的JavaScript》',
        date: '2014-8',
        price: 88.00,
        count: 1
      },
    ]
  }

  // 改变购物车中书籍的数量,如果不传递 num ,就是新增;否则,传递 -1 就是减少
  changeCount(id, num = 1) {
    const {books} = this.state

    if (id) {
      const newBooks = books.map(book => {
        if (book.id === id) {
          book.count += num
        }
        return book
      })

      console.log('changeCount', newBooks === books) // false
      this.setState({
        books: newBooks
      })
    }
  }

  // 删除购物车中的书籍
  delete(id) {
    const {books} = this.state

    if (id) {
      const newBooks = books.filter(book => book.id !== id)

      console.log('delete', newBooks === books) // false
      this.setState({
        books: newBooks
      })
    }
  }

  // 当购物车中的书籍数据不为空的时候的渲染函数
  renderBookList() {
    const {books} = this.state
    const totalPrice = books.map(item => item.price * item.count).reduce((prev, next) => prev + next, 0)
    return (<div>
      <table>
        <thead>
          <tr>
            <th>序号</th>
            <th>书籍名称</th>
            <th>出版日期</th>
            <th>价格</th>
            <th>购买数量</th>
            <th>操作</th>
          </tr>
        </thead>
        <tbody>
          {
            books && books.map((book, index) => {
              return (
                <tr key={index}>
                  <td>{index}</td>
                  <td>{book.name}</td>
                  <td>{book.date}</td>
                  <td>{"¥" + book.price.toFixed(2)}</td>
                  <td>
                    <button disabled={book.count <= 1} onClick={() => this.changeCount(book.id, -1)}>-</button>
                    {book.count}
                    <button onClick={() => this.changeCount(book.id)}>+</button>
                  </td>
                  <td>
                    <button onClick={() => this.delete(book.id)}>移除</button>
                  </td>
                </tr>
              )
            })
          }
        </tbody>
        <tfoot>
          <tr>
            <td colSpan="6">总价格:{"¥" + totalPrice.toFixed(2)}</td>
          </tr>
        </tfoot>
      </table>
    </div>)
  }

  // 当购物车中的书籍数据为空的时候的渲染函数
  renderBookEmpty() {
    return (<div>暂无数据</div>)
  }

  render() {
    const {books} = this.state
    return books.length ? this.renderBookList() : this.renderBookEmpty()
  }
}

export default App2
3
4
5
6
7
8
9
10
11
12
13
14
15
16
17
18
19
20
21
22
23
24
25
26
27
28
29
30
31
32
33
34
35
36
37
38
39
40
41
42
43
44
45
46
47
48
49
50
51
52
53
54
55
56
57
58
59
60
61
62
63
64
65
66
67
68
69
70
71
72
73
74
75
76
77
78
79
80
81
82
83
84
85
86
87
88
89
90
91
92
93
94
95
96
97
98
99
100
101
102
103
104
105
106
107
108
109
110
111
112
113
114
115
116
117
118
119
120
121
122
123
124
125
126
127
128
129
130
131
132
133
134
135
136
137
- 如果不这么做,直接在原来数组上修改呢?
import React, {PureComponent} from 'react'
import '@/App.css'

class App extends PureComponent {

  state = {
    books: [
      {
        id: 1,
        name: '《算法导论》',
        date: '2006-9',
        price: 85.00,
        count: 1
      },
      {
        id: 2,
        name: '《UNIX编程艺术》',
        date: '2006-2',
        price: 59.00,
        count: 1
      },
      {
        id: 3,
        name: '《编程珠玑》',
        date: '2008-10',
        price: 39.00,
        count: 1
      },
      {
        id: 4,
        name: '《代码大全》',
        date: '2006-3',
        price: 128.00,
        count: 1
      },
      {
        id: 5,
        name: '《你不知道的JavaScript》',
        date: '2014-8',
        price: 88.00,
        count: 1
      },
    ]
  }

  // 改变购物车中书籍的数量,如果不传递 num ,就是新增;否则,传递 -1 就是减少
  changeCount(id, num = 1) {
    const {books} = this.state

    if (id) {
      const newBooks = books.map(book => {
        if (book.id === id) {
          book.count += num
        }
        return book
      })

      console.log('changeCount', newBooks === books) // false
      this.setState({
        books: newBooks
      })
    }
  }

  // 删除购物车中的书籍
  delete(id) {
    /*  const {books} = this.state

      if (id) {
        const newBooks = books.filter(book => book.id !== id)

        console.log('delete', newBooks === books) // false
        this.setState({
          books: newBooks
        })
      }*/

    if (id) {
      this.state.books.splice(this.state.books.findIndex(item => item.id === id), 1);
      console.log('delete', this.state.books)
      this.setState({ // 在原先的数组上修改
        books: this.state.books
      })
    }
  }

  // 当购物车中的书籍数据不为空的时候的渲染函数
  renderBookList() {
    const {books} = this.state
    const totalPrice = books.map(item => item.price * item.count).reduce((prev, next) => prev + next, 0)
    return (<div>
      <table>
        <thead>
          <tr>
            <th>序号</th>
            <th>书籍名称</th>
            <th>出版日期</th>
            <th>价格</th>
            <th>购买数量</th>
            <th>操作</th>
          </tr>
        </thead>
        <tbody>
          {
            books && books.map((book, index) => {
              return (
                <tr key={index}>
                  <td>{index}</td>
                  <td>{book.name}</td>
                  <td>{book.date}</td>
                  <td>{"¥" + book.price.toFixed(2)}</td>
                  <td>
                    <button disabled={book.count <= 1} onClick={() => this.changeCount(book.id, -1)}>-</button>
                    {book.count}
                    <button onClick={() => this.changeCount(book.id)}>+</button>
                  </td>
                  <td>
                    <button onClick={() => this.delete(book.id)}>移除</button>
                  </td>
                </tr>
              )
            })
          }
        </tbody>
        <tfoot>
          <tr>
            <td colSpan="6">总价格:{"¥" + totalPrice.toFixed(2)}</td>
          </tr>
        </tfoot>
      </table>
    </div>)
  }

  // 当购物车中的书籍数据为空的时候的渲染函数
  renderBookEmpty() {
    return (<div>暂无数据</div>)
  }

  render() {
    const {books} = this.state
    return books.length ? this.renderBookList() : this.renderBookEmpty()
  }
}

export default App2
3
4
5
6
7
8
9
10
11
12
13
14
15
16
17
18
19
20
21
22
23
24
25
26
27
28
29
30
31
32
33
34
35
36
37
38
39
40
41
42
43
44
45
46
47
48
49
50
51
52
53
54
55
56
57
58
59
60
61
62
63
64
65
66
67
68
69
70
71
72
73
74
75
76
77
78
79
80
81
82
83
84
85
86
87
88
89
90
91
92
93
94
95
96
97
98
99
100
101
102
103
104
105
106
107
108
109
110
111
112
113
114
115
116
117
118
119
120
121
122
123
124
125
126
127
128
129
130
131
132
133
134
135
136
137
138
139
140
141
142
143
144
145
- 通过
浏览器,查看控制台显示效果:
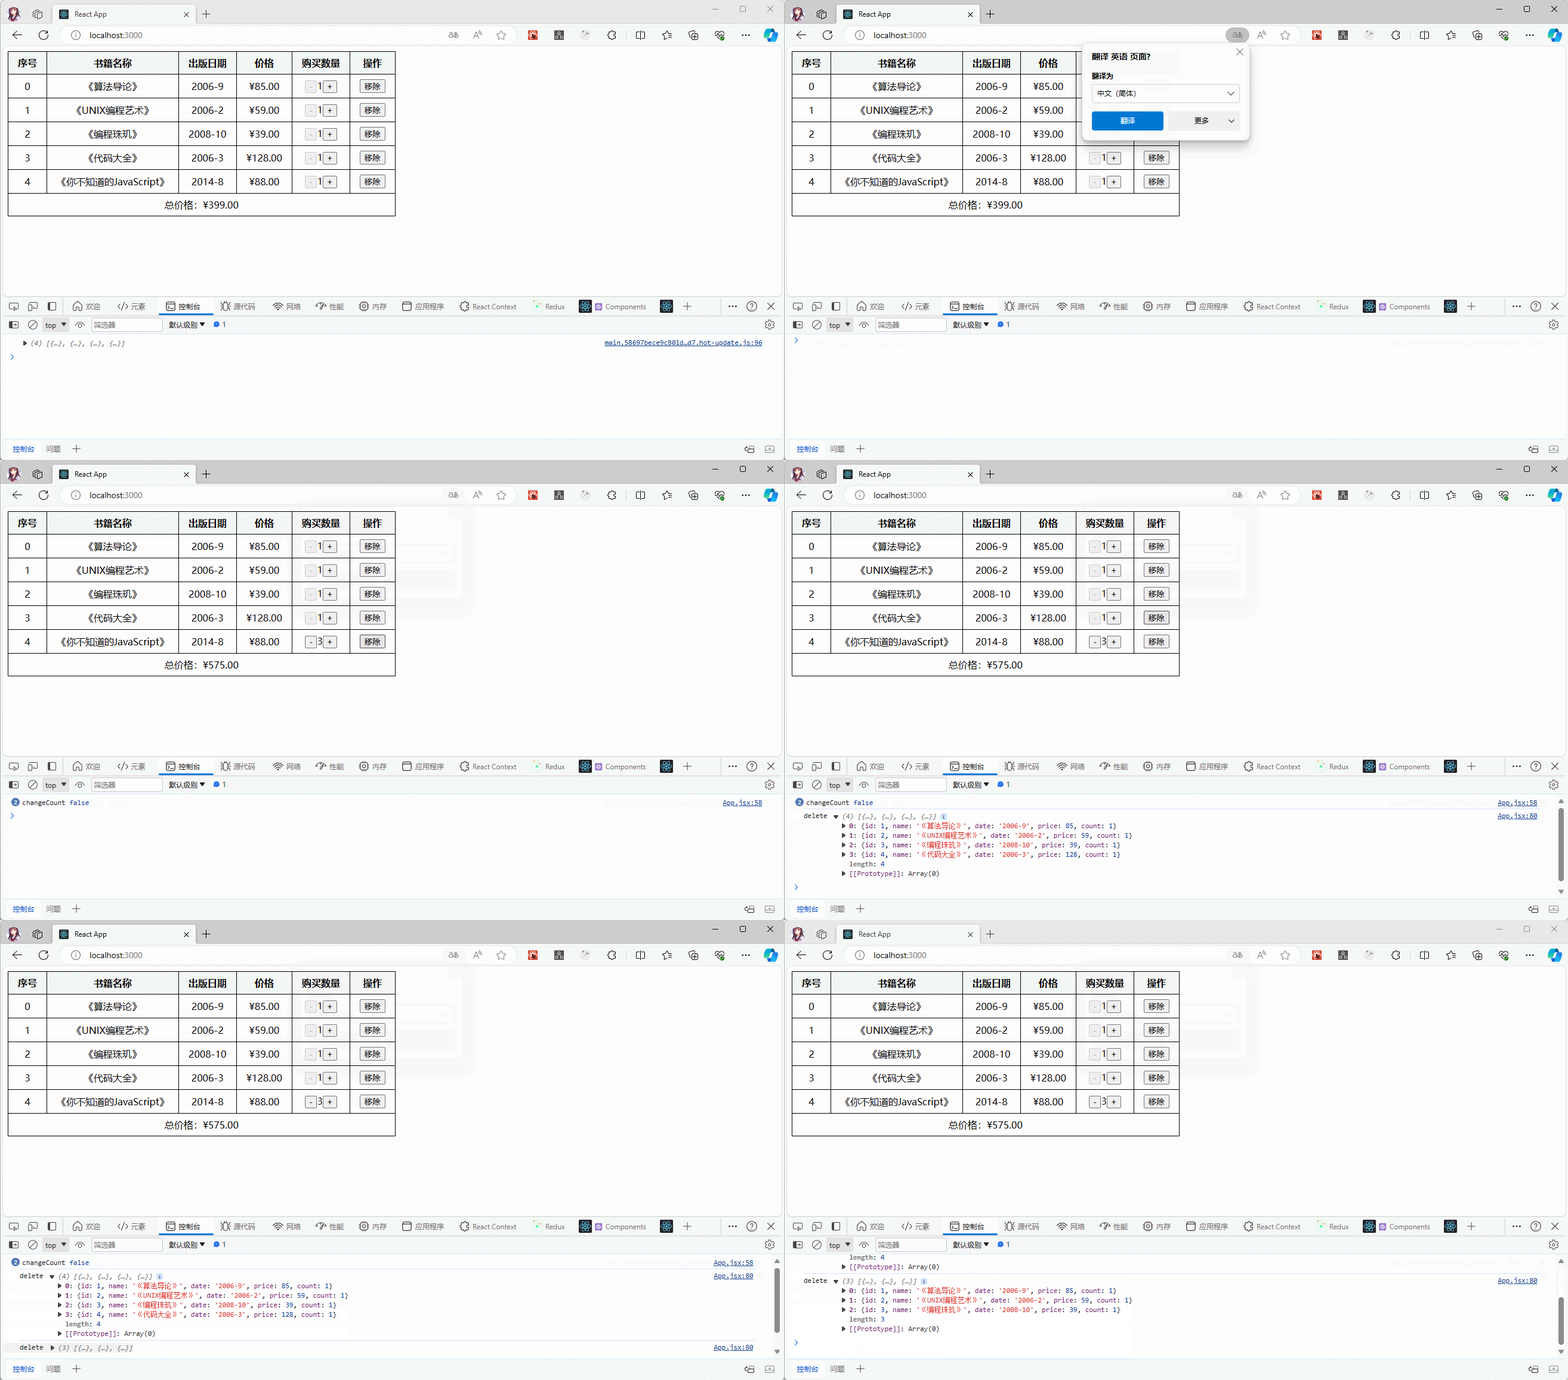
- 数据是删除了,但是界面却没有更新?出现 bug 了,那是因为 PureComponent 就是进行浅层比较;上述案例中的 state 中 books 属性所指向的数组是同一个,当然不会更新了。
注意⚠️:在实际开发中,React 建议我们不要在原有的 state 或 props 去更新数据,以避免 bug 的产生。
1.5.2 其他设置 state 或 props 的方式
- ES6 中的数组支持扩展运算符,在 Create React App 也支持该语法:
handleClick() {
  this.setState(state => ({
    books: [...state.books, {id: 1,name: 'xxx',price: 22.00}],
  }));
};2
3
4
5
- 对于对象,ES 提供了 Object.assign 方法,在 Create React App 也支持该语法:
handleClick() {
  this.setState(state => ({
    book: Object.assign(state,{name: xxx})
  }));
};2
3
4
5
- ES2018 也支持对象扩展属性,在 Create React App 也支持该语法:
handleClick() {
  this.setState(state => ({
    book: {...state,{name: xxx}}
  }));
};2
3
4
5
注意⚠️:在处理深层嵌套对象的时候,可以使用 immutability-helper 库。
第二章:获取原生 DOM(refs)
2.1 概述
- 在 React 开发中,通常不需要,也不建议使用原生 DOM 对象;但是,在某些特殊的场景下,确实需要获取 DOM 进行某些操作,如:
- ① 管理焦点,文本选择或媒体播放。
- ② 触发强制动画。
- ③ 集成第三方 DOM 库。
- ④ ……
注意⚠️:React 建议我们尽量避免使用 refs 来做任何可以通过声明式实现来完成的事情。
2.2 如何使用 ref(⭐)
2.2.1 概述
React 通过 refs 来获取对应的原生 DOM 对象,有三种方式:
第一种方式:传入字符串,使用的时候通过。this.refs.字符串获取对应的元素第二种方式:传入对象
- 通过 React.createRef() 方式创建 Ref 对象,并传入该 Ref 对象。
- 使用的时候获取到刚才创建的 Ref 对象的 current 属性。
第三种方式:传入一个函数
- 该函数会在 DOM 被挂载的时候进行回调,并且会传入一个元素对象,我们可以自己保存。
- 使用的时候,直接拿到之前保存的元素对象即可。
注意⚠️:
- 第一种方式已经废弃。
- 函数式组件是没有 this 的,就需要使用
React.forwardRef()高阶组件或useRef()这样的 hooks ,后续讲解。
2.2.2 第一种方式(已废弃)
- 需求:获取 h2 元素的 DOM 对象。
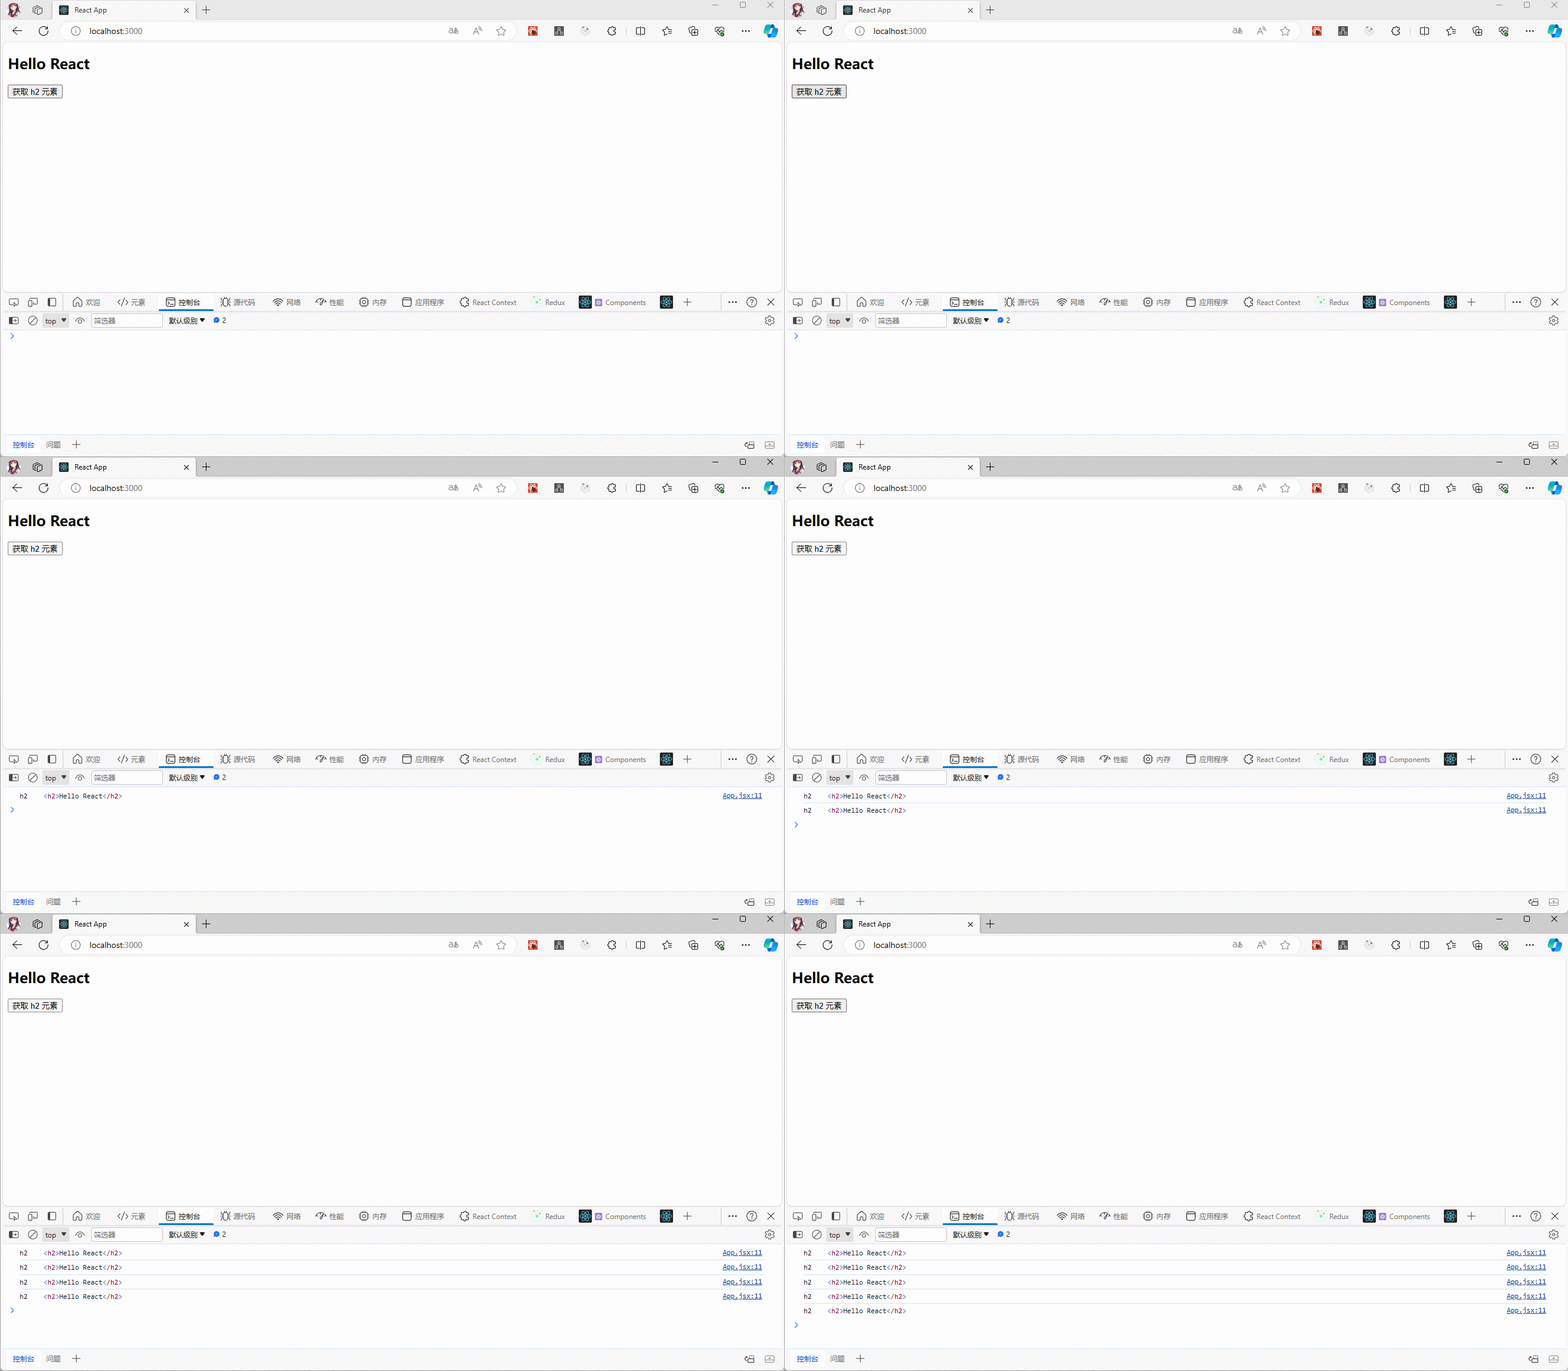
- 项目结构:
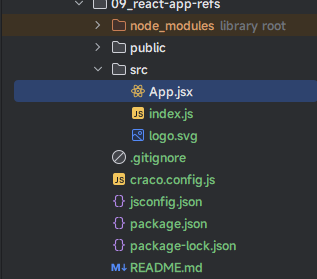
- 示例:
import React from 'react'

class App extends React.Component {

  state = {
    message: 'Hello React'
  }

  getH2Dom() {
    /* 通过 this.refs.字符串 获取该 DOM 对象;注意,该方式已经过时!!! */
    const h2 = this.refs.h2
    console.log('h2',h2)
  }

  render() {
    return (
      <div>
        {/* 通过 ref 传入一个字符串 */}
        <h2 ref="h2">{this.state.message}</h2>
        <button onClick={() => this.getH2Dom()}>获取 h2 元素</button>
      </div>
    )
  }
}

export default App2
3
4
5
6
7
8
9
10
11
12
13
14
15
16
17
18
19
20
21
22
23
24
25
26
2.2.3 第二种方式
- 需求:获取 h2 元素的 DOM 对象。

- 项目结构:
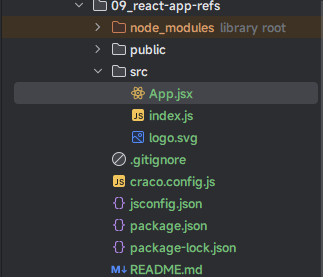
- 示例:
import React from 'react'

class App extends React.Component {

  state = {
    message: 'Hello React'
  }

  // ① 通过 React.createRef() 方式创建 Ref 对象
  h2Ref = React.createRef()


  getH2Dom() {
    /* ③ 通过 Ref 对象 的 current 属性 */
    const h2 = this.h2Ref.current
    console.log('h2',h2)
  }

  render() {
    return (
      <div>
        {/* ② 通过 ref 传入一个Ref 对象 */}
        <h2 ref={this.h2Ref}>{this.state.message}</h2>
        <button onClick={() => this.getH2Dom()}>获取 h2 元素</button>
      </div>
    )
  }
}

export default App2
3
4
5
6
7
8
9
10
11
12
13
14
15
16
17
18
19
20
21
22
23
24
25
26
27
28
29
30
2.2.4 第三种方式
- 需求:获取 h2 元素的 DOM 对象。

- 项目结构:
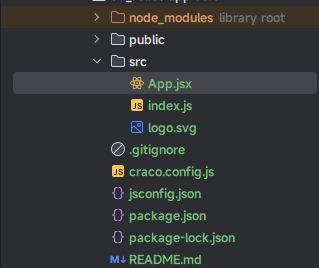
- 示例 :
import React from 'react'

class App extends React.Component {

  state = {
    message: 'Hello React'
  }

  // ① 定义一个 Ref 变量
  h2Ref = null

  getH2Dom() {
    /* ③ 在 this 身上获取即可 */
    console.log('h2',this.h2Ref)
  }

  render() {
    return (
      <div>
        {/* ② 在 ref 中传入一个回调函数,该函数会在 DOM 被挂载的时候回调,并将当前元素作为参数,传入进来 */}
        <h2 ref={el => this.h2Ref = el}>{this.state.message}</h2>
        <button onClick={() => this.getH2Dom()}>获取 h2 元素</button>
      </div>
    )
  }
}

export default App2
3
4
5
6
7
8
9
10
11
12
13
14
15
16
17
18
19
20
21
22
23
24
25
26
27
28
2.3 ref 访问组件(⭐)
2.3.1 ref 访问类式组件
React 中的类式组件是有组件实例的,所以可以通过 ref 来获取类式组件实例,进而调用该实例身上的属性或方法,如:state、props 、refs 等。
示例:
import React from 'react'

class HelloWorld extends React.PureComponent {

  state = {
    message: '我是 HelloWorld 组件'
  }

  hello() {
    this.setState((prevState) => {
      return {
        message: '大家好,' + prevState.message
      }
    })
  }

  render() {
    const {message} = this.state
    return (
      <div style={{backgroundColor: 'skyblue', padding: '5px'}}>
        <h2>{message}</h2>
      </div>
    )
  }
}

class App extends React.PureComponent {

  state = {
    message: '我是 App 组件'
  }

  helloWorldRef = React.createRef()

  render() {
    const {message} = this.state
    return (
      <div style={{backgroundColor: 'pink', padding: '5px', width: '500px'}}>
        <h2>{message}</h2>
        <button onClick={() => this.helloWorldRef.current.hello()}
                style={{marginBottom: '5px'}}>访问HelloWorld组件实例身上的hello()方法
        </button>
        <HelloWorld ref={this.helloWorldRef}/>
      </div>
    )
  }
}

export default App2
3
4
5
6
7
8
9
10
11
12
13
14
15
16
17
18
19
20
21
22
23
24
25
26
27
28
29
30
31
32
33
34
35
36
37
38
39
40
41
42
43
44
45
46
47
48
49
2.3.2 ref 和函数式组件
- 我们知道,函数式组件是不能使用 ref 属性的,因为它们并没有实例。
function MyFunctionComponent() {
  return <input />;
}

class Parent extends React.Component {
  constructor(props) {
    super(props);
    this.textInput = React.createRef();
  }
  render() {
    // This will *not* work!
    return (
      <MyFunctionComponent ref={this.textInput} />
    );
  }
}2
3
4
5
6
7
8
9
10
11
12
13
14
15
16
- 如果要在函数式组件中使用 ref ,就可以使用 forwardRef 高阶函数。
import React, {forwardRef} from 'react'

const HelloWorld = forwardRef(function HelloWorld(props, ref) {

  const [message] = React.useState('我是 HelloWorld 组件')

  return (
    <div style={{backgroundColor: 'skyblue', padding: '5px'}}>
      <h2 ref={ref}>{message}</h2>
    </div>
  )
})

class App extends React.PureComponent {

  state = {
    message: '我是 App 组件'
  }

  helloWorldRef = React.createRef()

  render() {
    const {message} = this.state
    return (
      <div style={{backgroundColor: 'pink', padding: '5px', width: '500px'}}>
        <h2>{message}</h2>
        <button onClick={() => console.log(this.helloWorldRef.current)}
                style={{marginBottom: '5px'}}>
          访问 HelloWorld 组件的 h2 元素
        </button>
        <HelloWorld ref={this.helloWorldRef}/>
      </div>
    )
  }
}

export default App2
3
4
5
6
7
8
9
10
11
12
13
14
15
16
17
18
19
20
21
22
23
24
25
26
27
28
29
30
31
32
33
34
35
36
37
注意⚠️:上述的这种形式,React 官方称为 refs 转发,其流程如下:
- ① 通过调用
React.createRef创建了一个React ref并将其赋值给ref变量(App 组件)。- ② 通过指定的 ref 为 JSX 属性,将其向下传递给
<HelloWorld ref={this.helloWorldRef}/>(App 组件)。- ③ React 传递
ref给forwardRef内函数(props, ref) => ...,作为其第二个参数(HelloWorld 组件)。- ④ 我们向下转发该
ref参数到<h2 ref={ref}>{message}</h2>,将其指定为 JSX 属性(HelloWorld 组件)。- ⑤ 当 ref 挂载完成,
ref.current将指向<h2 >DOM 节点。
第三章:受控组件和非受控组件(⭐)
3.1 概述
React 中的
受控组件和非受控组件是两种不同的组件状态管理方式。受控组件是指组件的状态由 React 控制和管理。在受控组件中,组件的值和状态由state传递给组件,并且通过事件处理函数来更新组件的状态。例如,一个受控的 input 组件,其值由 state 传递给 value 属性,并通过 onChange 事件来更新值。非受控组件是指组件的状态由组件自身管理。在非受控组件中,组件的值和状态不受 React 控制,而是由 DOM 元素本身来管理。例如,一个非受控的 input 组件,其值由用户输入直接更新到 DOM 元素中,通过 ref 来获取输入的值。
总结来说,
受控组件通过state和事件处理函数来管理组件的状态,而非受控组件则由DOM 元素自身来管理状态。受控组件提供了更精确的控制和验证,而非受控组件则更加简单和直接。选择使用哪种方式取决于具体的需求和场景。
3.2 如何理解受控组件?
- 在 Vue 中,我们是通过
v-model来实现表单的收集和维护的(Vue 通过 v-model 实现了双向绑定):
<input v-model="searchText" />- 对于,原生的 HTML 而言,是通过浏览器保存状态的;因为,我们可以通过事件对象
event来获取:
<!DOCTYPE html>
<html lang="en">

<head>
  <meta charset="UTF-8">
  <meta name="viewport" content="width=device-width, initial-scale=1.0">
  <title>Document</title>
</head>

<body>

  <input type="text" id="username">

  <script>
    let inputEl = document.querySelector("#username")

    inputEl.addEventListener("input", function (e) {
      console.log('input', e.target.value)
    })

  </script>

</body>

</html>2
3
4
5
6
7
8
9
10
11
12
13
14
15
16
17
18
19
20
21
22
23
24
25
- 在 React 中,如果将此类表单放到 JSX 中,和原生没有什么区别?
import React from 'react'

class App extends React.PureComponent {

  state = {
    message: 'Hello React'
  }

  render() {
    return (
      <div>
        <input type="text" name={"username"}/>
      </div>
    )
  }
}

export default App2
3
4
5
6
7
8
9
10
11
12
13
14
15
16
17
18
- 早期的前后端交互,不是通过 Ajax 来进行交互方式的,而是通过原生的 HTML 的
form元素来进行交互的,即:
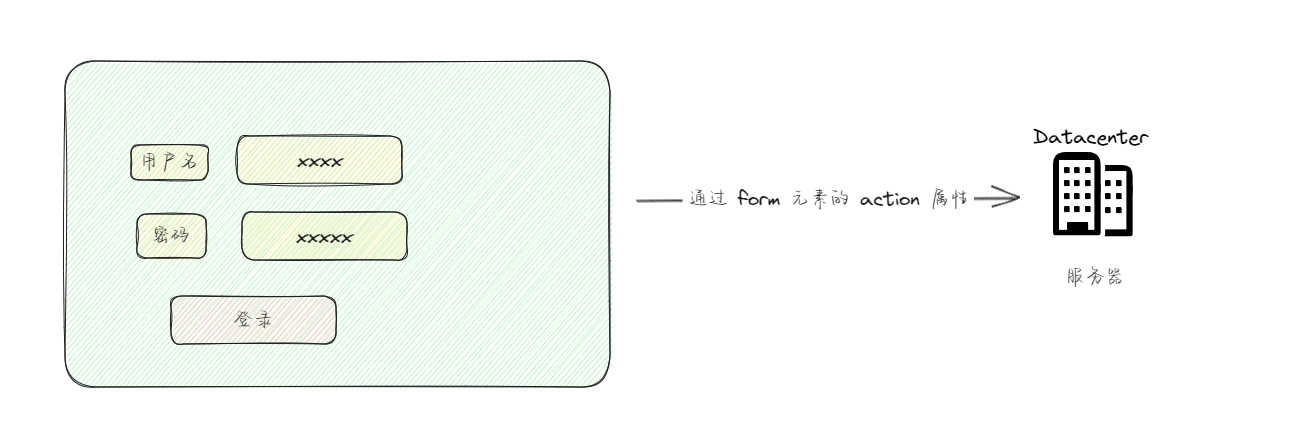
- 对应的原生 HTML 代码,如下所示:
<form action="#" method="post">
  <div>
    <label for="username">
      用户名:<input type="text" name="username"/>
    </label>
  </div>
  <div>
    <label for="password">
      密码:<input type="text" name="password"/>
    </label>
  </div>
  <input type="submit" value="登录"/>
</form>2
3
4
5
6
7
8
9
10
11
12
13
- 同理,在 React 中,如果采取这样的逻辑,也是支持的;即这样的表单具有默认的 HTML 表单行为,在用户提交后,浏览器会跳转到新页面:
import React from 'react'

class App extends React.PureComponent {

  state = {
    message: 'Hello React'
  }

  render() {
    return (
      <div>
        <form action="#" method="post">
          <div>
            <label htmlFor="username">
              用户名:<input type="text" name="username"/>
            </label>
          </div>
          <div>
            <label htmlFor="password">
              密码:<input type="text" name="password"/>
            </label>
          </div>
          <input type="submit" value="登录"/>
        </form>
      </div>
    )
  }
}

export default App2
3
4
5
6
7
8
9
10
11
12
13
14
15
16
17
18
19
20
21
22
23
24
25
26
27
28
29
30
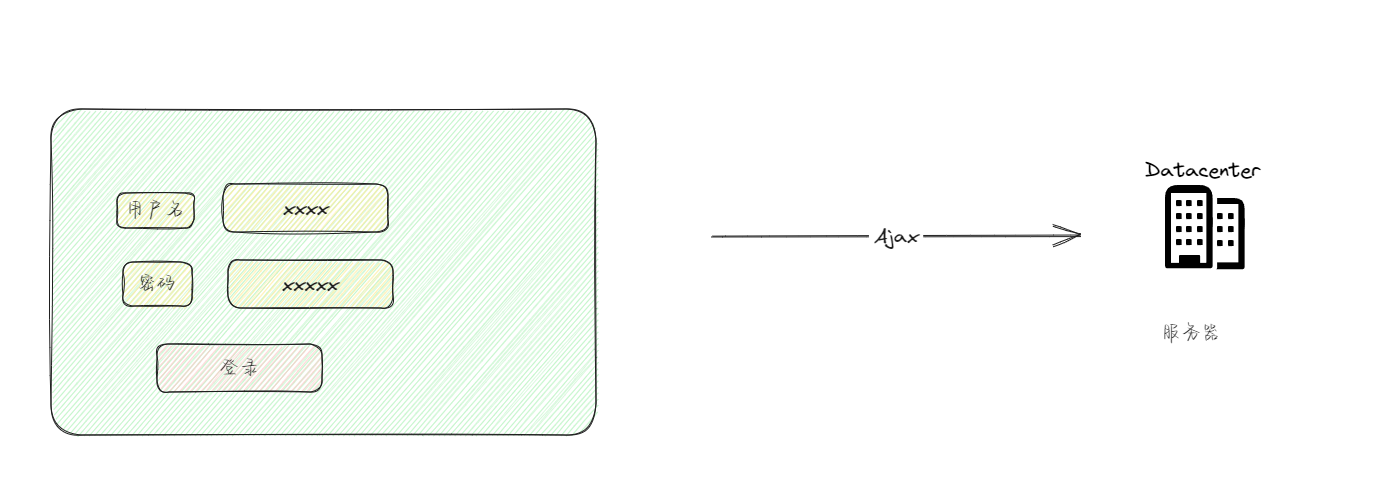
- 但是,上述的方案有弊端,就是会产生页面的刷新;所以,现在的前后端数据的交互大多数采用 Ajax 来进行交互了,即开发者手动去收集表单的数据,然后通过 Ajax 和服务器交互。
注意⚠️:form 表单有 onSubmit 事件,我们可以通过
event.preventDefault()的方式阻止表单自动提交。
- 并且,在 React 开发中,我们会将数据维护在 state 中,并使用 JavaScript 函数来处理表单的提交,以及访问用户填写的表单数据;实现此类效果的标准方式就需要使用
受控组件。
React 官方的定义:
- 在 HTML 中,表单元素(如
<input>、<textarea>和<select>)通常自己维护 state,并根据用户输入进行更新。- 而在 React 中,可变状态(mutable state)通常
保存在组件的state属性中,并且只能通过使用setState()来更新。- React 可以把两者结合起来,使 React 的 state 成为
“唯一数据源”。渲染表单的 React 组件还控制着用户输入过程中表单发生的操作。被 React 以这种方式控制取值的表单输入元素就叫做“受控组件”。个人理解:
- 对于像 input、textarea 和 select 等的表单元素,我们通常会将 value 属性设置为 state 中的值;一旦这样设置之后,React 就会强制你使用 onChange 事件来将用户输入的数据通过 setState() 维护到 state 中;
- 一旦这样,页面中显示的值始终就是
this.state.xxx, 这将使得 React 的 state 成为唯一的数据源。
3.3 受控组件的使用
3.3.1 简单使用
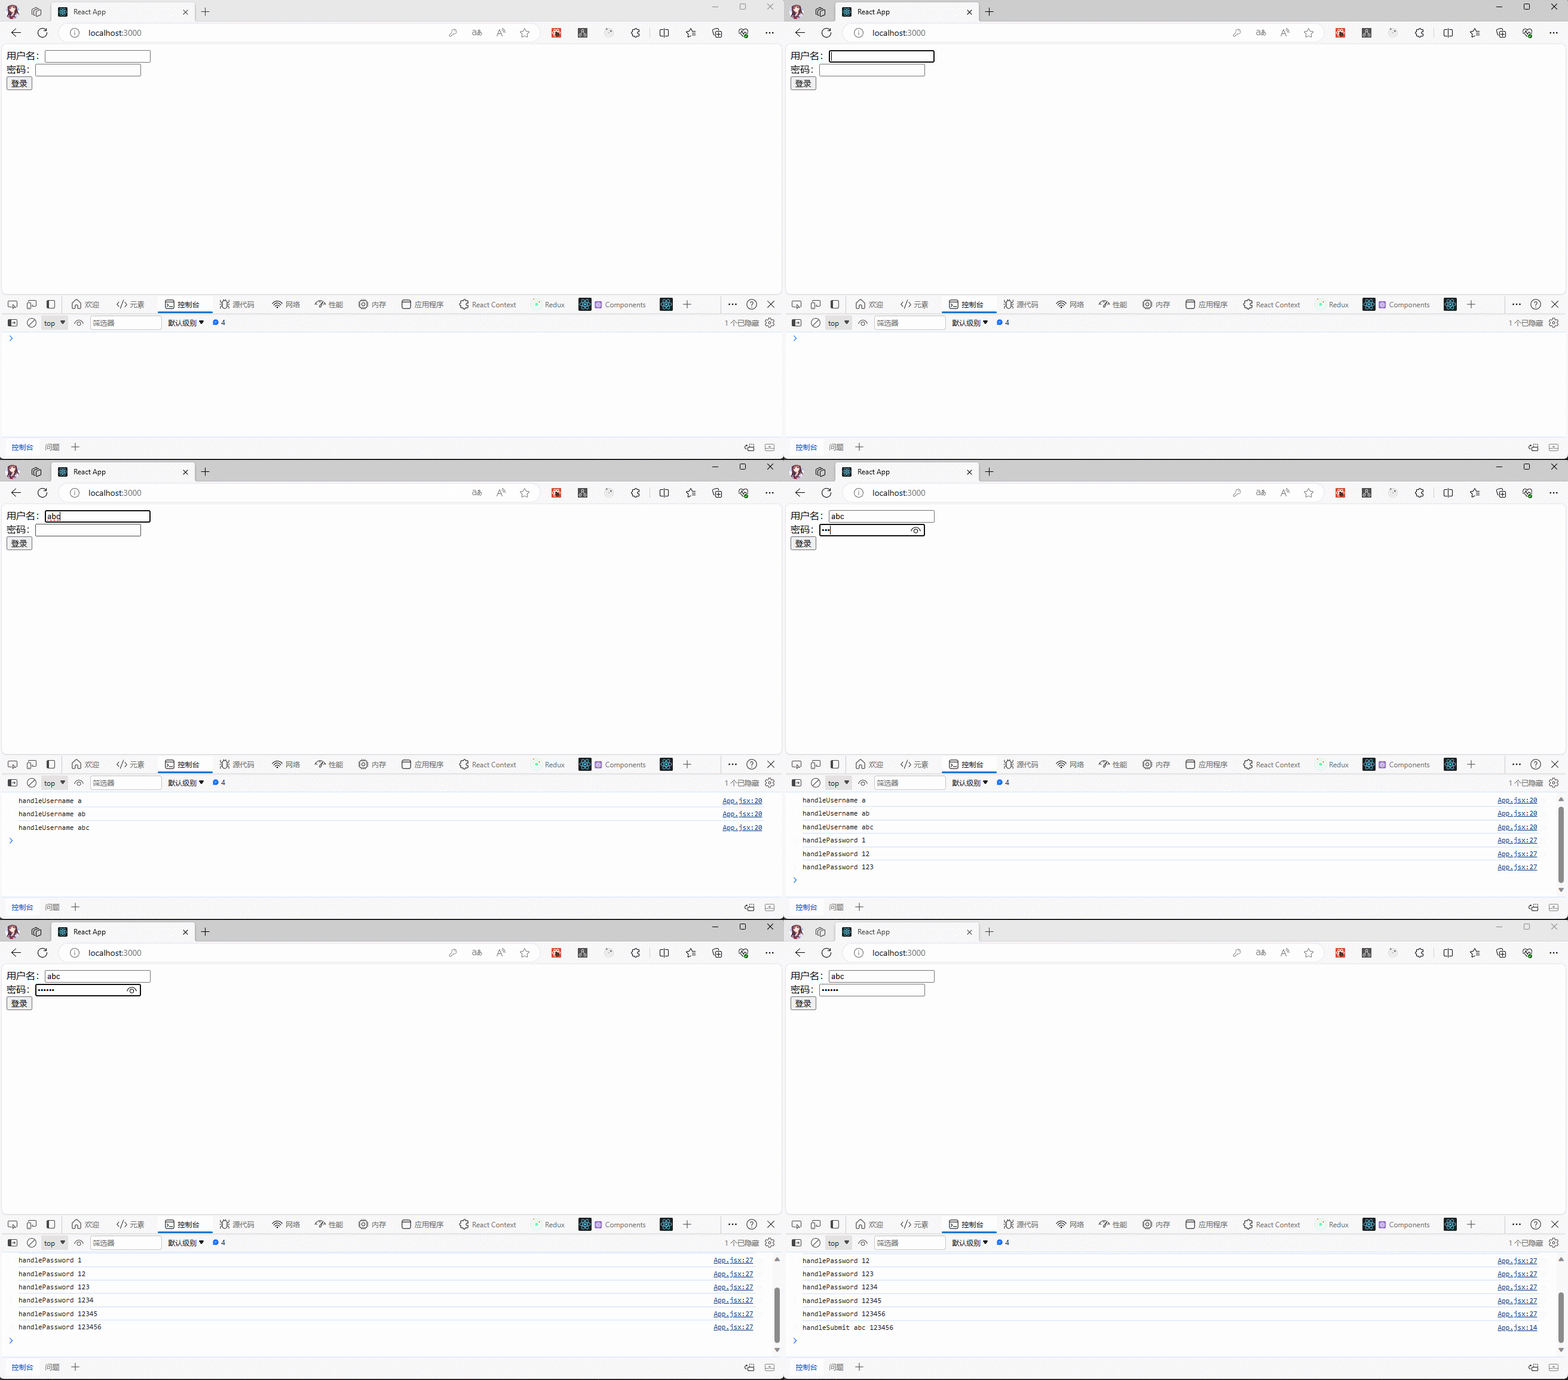
- 需求:收集表单数据,维护到 state 中。
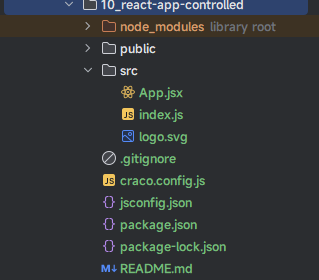
- 项目结构:
- 示例:
import React from 'react'

class App extends React.PureComponent {

  state = { // ① state 中维护表单数据
    username: '',
    password: ''
  }

  handleSubmit(event) {
    // 阻止表单自动提交
    event.preventDefault()
    const {username, password} = this.state
    console.log('handleSubmit', username, password)
  }

  // 处理用户名
  handleUsername(e) {
    const username = e.target.value
    console.log('handleUsername', username)
    this.setState({username})
  }

  // 处理密码
  handlePassword(e) {
    const password = e.target.value
    console.log('handlePassword', password)
    this.setState({password})
  }

  render() {
    const {username, password} = this.state
    return (
      <div>
        {/* ② onSubmit 中阻止表单自动提交,并在对应的事件处理函数中获取 state 中的数据,然后使用 Ajax 提交到服务器中 */}
        <form onSubmit={(e) => this.handleSubmit(e)}>
          <div>
            <label htmlFor="username">
              {/* ③ 通过 value 获取 state 中维护的数据,这样显示的值就始终是 this.state.username,这就使得 React 中的 state 成为唯一的数据源 */}
              {/* ③ 一旦用户输入数据,将自动执行 onChange 事件,这样我们就可以编写逻辑,将数据更新到 React 中的 state 中*/}
              用户名:<input type="text" id="username" name="username" value={username} onChange={(e) => this.handleUsername(e)}/>
            </label>
          </div>
          <div>
            <label htmlFor="password">
              密码:<input type="password" id="password" name="password" value={password} onChange={(e) => this.handlePassword(e)}/>
            </label>
          </div>
          <input type="submit" value="登录"/>
        </form>
      </div>
    )
  }
}

export default App2
3
4
5
6
7
8
9
10
11
12
13
14
15
16
17
18
19
20
21
22
23
24
25
26
27
28
29
30
31
32
33
34
35
36
37
38
39
40
41
42
43
44
45
46
47
48
49
50
51
52
53
54
55
56
3.3.2 处理多个输入
如果每个
input元素,我们都需要编写对应的事件处理函数,那么也太麻烦了;此时,我们就可以给每个 input 元素添加name属性,并让事件处理函数根据event.target.name的值选择要执行的操作。示例:
import React from 'react'

class App extends React.PureComponent {

  state = { // ① state 中维护表单数据
    username: '',
    password: ''
  }

  handleSubmit(event) {
    // 阻止表单自动提交
    event.preventDefault()
    const {username, password} = this.state
    console.log('handleSubmit', username, password)
  }

  // 处理输入
  handleInput(e) {
    const name = e.target.name
    const value = e.target.value
    console.log('handleInput', name, value)
    this.setState({
      [name]: value
    })
  }

  render() {
    const {username, password} = this.state
    return (
      <div>
        {/* ② onSubmit 中阻止表单自动提交,并在对应的事件处理函数中获取 state 中的数据,然后使用 Ajax 提交到服务器中 */}
        <form onSubmit={(e) => this.handleSubmit(e)}>
          <div>
            <label htmlFor="username">
              {/* ③ 通过 value 获取 state 中维护的数据,这样显示的值就始终是 this.state.username,这就使得 React 中的 state 成为唯一的数据源 */}
              {/* ③ 一旦用户输入数据,将自动执行 onChange 事件,这样我们就可以编写逻辑,将数据更新到 React 中的 state 中*/}
              用户名:<input type="text" name="username" id="username" value={username} onChange={(e) => this.handleInput(e)}/>
            </label>
          </div>
          <div>
            <label htmlFor="password">
              密码:<input type="password" name="password" id="password" value={password} onChange={(e) => this.handleInput(e)}/>
            </label>
          </div>
          <input type="submit" value="登录"/>
        </form>
      </div>
    )
  }
}

export default App2
3
4
5
6
7
8
9
10
11
12
13
14
15
16
17
18
19
20
21
22
23
24
25
26
27
28
29
30
31
32
33
34
35
36
37
38
39
40
41
42
43
44
45
46
47
48
49
50
51
52
3.3.3 单个 checkbox
对于单个 checkbox 元素,就不是使用 value 来获取 state 中维护的数据了,而是使用
checked;并且,在事件处理函数中,也不是通过 event.target.value 获取值,而是通过event.target.checked获取用户选中的值。示例:
import React from 'react'

class App extends React.PureComponent {

  state = {
    username: '',
    password: '',
    agree: true
  }

  handleSubmit(event) {
    event.preventDefault()
    const {username, password, agree} = this.state
    console.log('handleSubmit', username, password, agree)
  }

  // 处理常规输入
  handleInput(e) {
    const name = e.target.name
    this.setState({
      [name]: e.target.value
    })
  }

  /* 处理单选 checkbox */
  handleAgree(e) {
    this.setState({
      agree: e.target.checked
    })
  }

  render() {
    const {username, password, agree, hobbies} = this.state
    return (
      <div>
        <form onSubmit={(e) => this.handleSubmit(e)}>
          <div>
            <label htmlFor="username">
              用户名:<input type="text" name="username" id="username" value={username}
                            onChange={(e) => this.handleInput(e)}/>
            </label>
          </div>
          <div>
            <label htmlFor="password">
              密码:<input type="password" name="password" id="password" value={password}
                          onChange={(e) => this.handleInput(e)}/>
            </label>
          </div>
          {/* 单选 */}
          <div>
            <label htmlFor="agree">
              同意:<input type="checkbox" name="agree" id="agree" checked={agree}
                          onChange={(e) => this.handleAgree(e)}/>
            </label>
          </div>
          <input type="submit" value="登录"/>
        </form>
      </div>
    )
  }
}

export default App2
3
4
5
6
7
8
9
10
11
12
13
14
15
16
17
18
19
20
21
22
23
24
25
26
27
28
29
30
31
32
33
34
35
36
37
38
39
40
41
42
43
44
45
46
47
48
49
50
51
52
53
54
55
56
57
58
59
60
61
62
63
3.3.4 多个 checkbox
Vue 中对于多个 checkbox 的处理,是使用
数组来收集的。但是,在 React 中比较麻烦,需要使用数组对象来处理。示例:
import React from 'react'

class App extends React.PureComponent {

  state = {
    username: '',
    password: '',
    agree: true,
    hobbies: [
      {value: 'eat', text: '吃饭', isChecked: false},
      {value: 'sleep', text: '睡觉', isChecked: false},
      {value: 'play', text: '玩游戏', isChecked: true},
    ]
  }

  handleSubmit(event) {
    event.preventDefault()
    const {username, password, agree, hobbies} = this.state
    console.log('handleSubmit', username, password, agree, hobbies)
  }

  // 处理常规输入
  handleInput(e) {
    const name = e.target.name
    this.setState({
      [name]: e.target.value
    })
  }

  /* 处理单选 checkbox */
  handleAgree(e) {
    this.setState({
      agree: e.target.checked
    })
  }

  /* 处理多选 checkbox */
  handleHobbies(e, index) {
    const hobbies = [...this.state.hobbies]
    hobbies[index].isChecked = e.target.checked
    this.setState({
      hobbies
    })
  }

  render() {
    const {username, password, agree, hobbies} = this.state
    return (
      <div>
        <form onSubmit={(e) => this.handleSubmit(e)}>
          <div>
            <label htmlFor="username">
              用户名:<input type="text" name="username" id="username" value={username}
                            onChange={(e) => this.handleInput(e)}/>
            </label>
          </div>
          <div>
            <label htmlFor="password">
              密码:<input type="password" name="password" id="password" value={password}
                          onChange={(e) => this.handleInput(e)}/>
            </label>
          </div>
          {/* 兴趣 */}
          <div>
            兴趣:
            {
              hobbies.map((hobby, index) => (
                <label htmlFor={hobby.value} key={index}>
                  <input type="checkbox" name={hobby.value} id={hobby.value} checked={hobby.isChecked}
                         onChange={(e) => this.handleHobbies(e, index)}/>
                  <span>{hobby.text}</span>
                </label>
              ))
            }
          </div>
          {/* 单选 */}
          <div>
            <label htmlFor="agree">
              同意:<input type="checkbox" name="agree" id="agree" checked={agree}
                          onChange={(e) => this.handleAgree(e)}/>
            </label>
          </div>
          <input type="submit" value="登录"/>
        </form>
      </div>
    )
  }
}

export default App2
3
4
5
6
7
8
9
10
11
12
13
14
15
16
17
18
19
20
21
22
23
24
25
26
27
28
29
30
31
32
33
34
35
36
37
38
39
40
41
42
43
44
45
46
47
48
49
50
51
52
53
54
55
56
57
58
59
60
61
62
63
64
65
66
67
68
69
70
71
72
73
74
75
76
77
78
79
80
81
82
83
84
85
86
87
88
89
90
3.3.5 select 单选
select 单选和
普通的文本控件的处理,没什么区别。示例:
import React from 'react'

class App extends React.PureComponent {

  state = {
    username: '',
    password: '',
    agree: true,
    hobbies: [
      {value: 'eat', text: '吃饭', isChecked: false},
      {value: 'sleep', text: '睡觉', isChecked: false},
      {value: 'play', text: '玩游戏', isChecked: true},
    ],
    fruit: "lime"
  }

  handleSubmit(event) {
    event.preventDefault()
    const {username, password, agree, hobbies} = this.state
    console.log('handleSubmit', username, password, agree, hobbies)
  }

  // 处理常规输入
  handleInput(e) {
    const name = e.target.name
    this.setState({
      [name]: e.target.value
    })
  }

  /* 处理单选 checkbox */
  handleAgree(e) {
    this.setState({
      agree: e.target.checked
    })
  }

  /* 处理多选 checkbox */
  handleHobbies(e, index) {
    const hobbies = [...this.state.hobbies]
    hobbies[index].isChecked = e.target.checked
    this.setState({
      hobbies
    })
  }
  // select 单选
  handleFruit(e){
    this.setState({
      fruit: e.target.value
    })
  }

  render() {
    const {username, password, agree, hobbies,fruit,fruits} = this.state
    return (
      <div>
        <form onSubmit={(e) => this.handleSubmit(e)}>
          <div>
            <label htmlFor="username">
              用户名:<input type="text" name="username" id="username" value={username}
                            onChange={(e) => this.handleInput(e)}/>
            </label>
          </div>
          <div>
            <label htmlFor="password">
              密码:<input type="password" name="password" id="password" value={password}
                          onChange={(e) => this.handleInput(e)}/>
            </label>
          </div>
          {/* 兴趣 */}
          <div>
            兴趣:
            {
              hobbies.map((hobby, index) => (
                <label htmlFor={hobby.value} key={index}>
                  <input type="checkbox" name={hobby.value} id={hobby.value} checked={hobby.isChecked}
                         onChange={(e) => this.handleHobbies(e, index)}/>
                  <span>{hobby.text}</span>
                </label>
              ))
            }
          </div>
          {/* select 单选 */}
          <div>
            选择你喜欢的一个水果:
            <label>
              <select value={fruit} onChange={(e) => this.handleFruit(e)} name="fruit">
                <option value="grapefruit">葡萄柚</option>
                <option value="lime">酸橙</option>
                <option value="coconut">椰子</option>
                <option value="mango">芒果</option>
              </select>
            </label>
          </div>
          {/* 单选 */}
          <div>
            <label htmlFor="agree">
              同意:<input type="checkbox" name="agree" id="agree" checked={agree}
                          onChange={(e) => this.handleAgree(e)}/>
            </label>
          </div>
          <input type="submit" value="登录"/>
        </form>
      </div>
    )
  }
}

export default App2
3
4
5
6
7
8
9
10
11
12
13
14
15
16
17
18
19
20
21
22
23
24
25
26
27
28
29
30
31
32
33
34
35
36
37
38
39
40
41
42
43
44
45
46
47
48
49
50
51
52
53
54
55
56
57
58
59
60
61
62
63
64
65
66
67
68
69
70
71
72
73
74
75
76
77
78
79
80
81
82
83
84
85
86
87
88
89
90
91
92
93
94
95
96
97
98
99
100
101
102
103
104
105
106
107
108
109
3.3.6 select 多选(了解)
select 多选比较麻烦,在 state 中维护的数据的类型是
数组;在事件处理函数中,处理选中的数据维护在e.target.selectedOptions这个可迭代对象中,需要手动转换为数组。示例:
import React from 'react'

class App extends React.PureComponent {

  state = {
    username: '',
    password: '',
    agree: true,
    hobbies: [
      {value: 'eat', text: '吃饭', isChecked: false},
      {value: 'sleep', text: '睡觉', isChecked: false},
      {value: 'play', text: '玩游戏', isChecked: true},
    ],
    fruit: "lime",
    fruits: ["lime", "coconut"]
  }

  handleSubmit(event) {
    event.preventDefault()
    const {username, password, agree, hobbies} = this.state
    console.log('handleSubmit', username, password, agree, hobbies)
  }

  // 处理常规输入
  handleInput(e) {
    const name = e.target.name
    this.setState({
      [name]: e.target.value
    })
  }

  /* 处理单选 checkbox */
  handleAgree(e) {
    this.setState({
      agree: e.target.checked
    })
  }

  /* 处理多选 checkbox */
  handleHobbies(e, index) {
    const hobbies = [...this.state.hobbies]
    hobbies[index].isChecked = e.target.checked
    this.setState({
      hobbies
    })
  }

  handleFruit(e){
    this.setState({
      fruit: e.target.value
    })
  }

  // select 多选
  handleMultipleFruit(e){
    this.setState({
      fruits: Array.from(e.target.selectedOptions).map(o => o.value)
    })
  }

  render() {
    const {username, password, agree, hobbies,fruit,fruits} = this.state
    return (
      <div>
        <form onSubmit={(e) => this.handleSubmit(e)}>
          <div>
            <label htmlFor="username">
              用户名:<input type="text" name="username" id="username" value={username}
                            onChange={(e) => this.handleInput(e)}/>
            </label>
          </div>
          <div>
            <label htmlFor="password">
              密码:<input type="password" name="password" id="password" value={password}
                          onChange={(e) => this.handleInput(e)}/>
            </label>
          </div>
          {/* 兴趣 */}
          <div>
            兴趣:
            {
              hobbies.map((hobby, index) => (
                <label htmlFor={hobby.value} key={index}>
                  <input type="checkbox" name={hobby.value} id={hobby.value} checked={hobby.isChecked}
                         onChange={(e) => this.handleHobbies(e, index)}/>
                  <span>{hobby.text}</span>
                </label>
              ))
            }
          </div>
          {/* select 单选 */}
          <div>
            选择你喜欢的一个水果:
            <label>
              <select value={fruit} onChange={(e) => this.handleFruit(e)} name="fruit">
                <option value="grapefruit">葡萄柚</option>
                <option value="lime">酸橙</option>
                <option value="coconut">椰子</option>
                <option value="mango">芒果</option>
              </select>
            </label>
          </div>
          {/* select 多选 */}
          <div>
            选择你喜欢的几个水果:
            <label>
              <select value={fruits} onChange={(e) => this.handleMultipleFruit(e)} name="fruit" multiple>
                <option value="grapefruit">葡萄柚</option>
                <option value="lime">酸橙</option>
                <option value="coconut">椰子</option>
                <option value="mango">芒果</option>
              </select>
            </label>
          </div>
          {/* 单选 */}
          <div>
            <label htmlFor="agree">
              同意:<input type="checkbox" name="agree" id="agree" checked={agree}
                          onChange={(e) => this.handleAgree(e)}/>
            </label>
          </div>
          <input type="submit" value="登录"/>
        </form>
      </div>
    )
  }
}

export default App2
3
4
5
6
7
8
9
10
11
12
13
14
15
16
17
18
19
20
21
22
23
24
25
26
27
28
29
30
31
32
33
34
35
36
37
38
39
40
41
42
43
44
45
46
47
48
49
50
51
52
53
54
55
56
57
58
59
60
61
62
63
64
65
66
67
68
69
70
71
72
73
74
75
76
77
78
79
80
81
82
83
84
85
86
87
88
89
90
91
92
93
94
95
96
97
98
99
100
101
102
103
104
105
106
107
108
109
110
111
112
113
114
115
116
117
118
119
120
121
122
123
124
125
126
127
128
129
3.4 非受控组件的使用
3.4.1 概述
- React 推荐在绝大多数情况下使用
受控组件来处理表单数据;换言之,在受控组件中,表单的数据由 React 组件中的 state 来维护和管理。 - 但是,有的时候,使用受控组件非常麻烦,因为我们需要为数据变化的每种方式编写事件处理函数,并将数据维护在 React 中的 state 中;这个时候
非受控组件可能是另一种选择,即我们需要使用 ref 来从 DOM 节点上获取表单数据。
注意⚠️:
- ① 在非受控组件中,通常使用
defaultValue、defaultChecked来设置默认值;- ② 不能使用
value等来设置,如果使用 value 等来设置,就是受控组件了。
3.4.2 案例
- 示例:
import React from 'react'

class App extends React.PureComponent {

  usernameRef = null;
  passwordRef = null;

  handleSubmit(event) {
    event.preventDefault()
    const {usernameRef, passwordRef} = this
    console.log('handleSubmit', usernameRef.value, passwordRef.value)
  }

  render() {
    return (
      <div>
        <form onSubmit={(e) => this.handleSubmit(e)}>
          <div>
            {/* 非受控组件中,通过 ref 获取 DOM 节点上表单的数据 */}
            <label htmlFor="username">
              用户名:<input type="text" id="username" ref={el => this.usernameRef = el}
                           defaultValue={"admin"}/>
            </label>
          </div>
          <div>
            {/* 非受控组件中,通过 ref 获取 DOM 节点上表单的数据 */}
            <label htmlFor="password">
              密码:<input type="password" id="password" ref={el => this.passwordRef = el}
                          />
            </label>
          </div>

          <input type="submit" value="登录"/>
        </form>
      </div>
    )
  }
}

export default App2
3
4
5
6
7
8
9
10
11
12
13
14
15
16
17
18
19
20
21
22
23
24
25
26
27
28
29
30
31
32
33
34
35
36
37
38
39
40