前提:
本文是上一篇文章为基础,所有的代码都是在之前代码的基础上搭建而来。
第一章:React 组件化开发
1.1 什么是组件化开发?
- 组件化是一种
分而治之的思想:- 如果我们
将一个页面的所有处理逻辑全部放在一起,处理起来就会变得非常复杂和繁琐,并且不利于后期的管理和维护。 - 相反,如果我们
将一个页面拆分成一个个小的功能块,每个功能块完成属于自己独立的功能,然后再组装起来;之后,整个页面的管理和维护将变得非常容易了。
- 如果我们
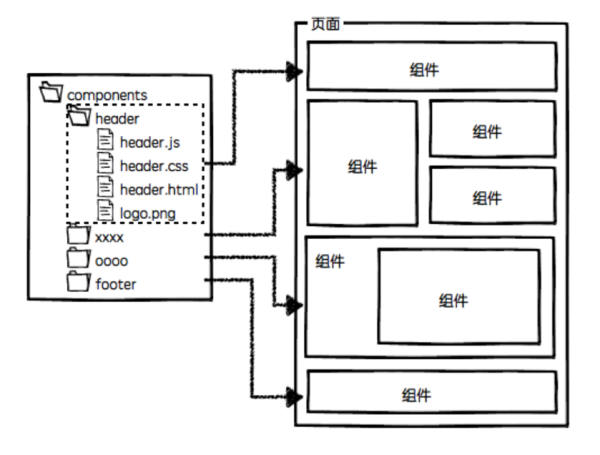
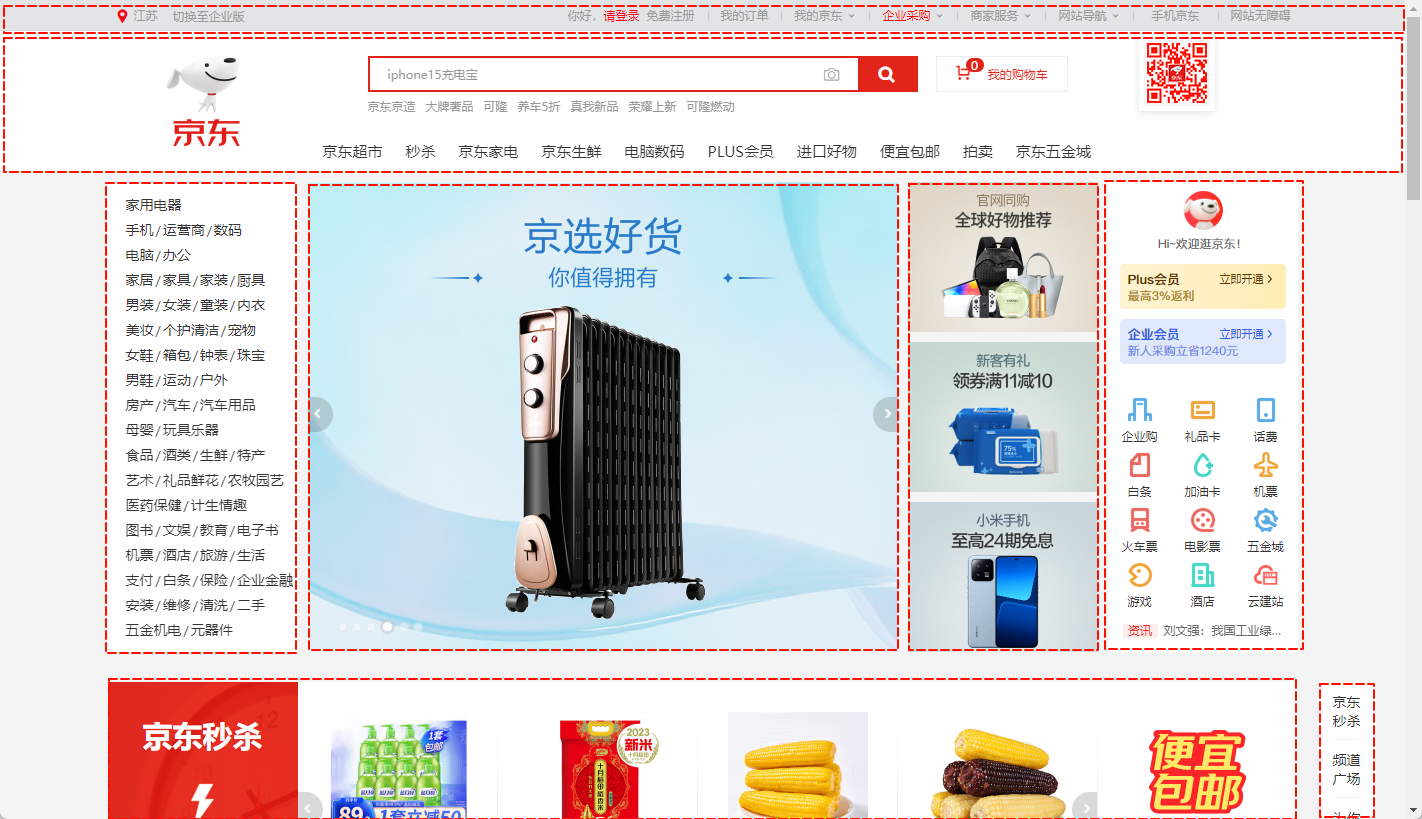
- 那么,我们在实际开发中,就可以通过
组件化的思想来开发整个应用程序。- 我们可以将一个完整的页面拆分为很多个组件。
- 每个组件都用于实现页面的一个功能模块。
- 每一个组件也可以进一步拆分,拆成更多的组件。
- 组件本身可以在多个地方进行复用。
1.2 React 中的组件化(⭐)
- 组件化是 React 的核心思想:
- 组件允许我们将 UI 拆分为独立可复用的代码片段,并对每个片段进行独立构思。
- 任何应用都可以被抽象成一颗组件树。
React中的组件相对于Vue中的组件来说更加灵活和多样,按照不同的方式可以将组件分为很多种类:- 根据
组件的定义方式,可以分为:函数组件(Functional Component)和类组件(Class Component)。 - 根据
组件的内部是否有状态需要维护,可以分为:无状态组件(Stateless Component)和有状态组件(Stateful Component)。 - 根据
组件的职责不同,可以分为:展示型组件(Presentational Component)和容器型组件(Container Component)。
- 根据
这些概念之间有很多重叠,但是他们最主要的是关注
数据逻辑和UI 展示的分离:函数组件、无状态组件、展示型组件主要关注的是UI 的展示。类组件、有状态组件、容器型组件主要关注的是数据逻辑。
其实,React 组件还有其他的概念,如:
异步组件、高阶组件等,后续再讲解。
1.3 类组件(⭐)
类组件的
定义有如下的要求:- ① 组件的
名称是以大写字母开头(大驼峰的原则,无论类组件还是函数组件)。 - ② 类组件需要继承自
React.Component。 - ③ 类组件必须实现
render函数。
- ① 组件的
React推荐我们使用ES6的class来定义类组件,其中:constructor()构造方法是可选的,我们通常会在constructor()中初始化一些数据。this.state中维护的就是组件内部的数据。render()方法是类组件中唯一必须实现的方法。
import React from 'react'

class App extends React.Component{

  constructor(){
      super()
  	  this.state = {
          message: '你好,React'
      }
  }

  render() {
    return (
      <div>
        <h2>{this.state.message}</h2>
      </div>
    )
  }
}

export default App2
3
4
5
6
7
8
9
10
11
12
13
14
15
16
17
18
19
20
21
- 当
render()方法被调用的时候,它会检查this.props和this.state中的变化并返回以下的任意一种类型: - ① React 元素:通常是通过 JSX 创建的。如:
<div></div>会被 React 渲染为 DOM 节点,而<HelloWorld />会被 React 渲染为自定义的组件。并且,<div></div>和<HelloWorld />都是 React 元素。
import React from 'react'

class App extends React.Component{

  state = {
    message: 'Hello React'
  }

  render() {
    // React 元素:通过 JSX 编写的代码就会被编译成 React.createElement ,所以返回的就是一个 React 元素。
    return <h2>{this.state.message}</h2>
  }
}

export default App2
3
4
5
6
7
8
9
10
11
12
13
14
15
- ② 数组或 fragments,这样可以返回多个元素。
import React from 'react'

class App extends React.Component{

  state = {
    message: 'Hello React'
  }

  render() {
    // ② 返回数组或 fragments:这样可以返回多个元素。
    return ["abc","cba", <h1>我是h1元素</h1>, <h2>我是h2元素</h2>]
  }
}

export default App2
3
4
5
6
7
8
9
10
11
12
13
14
15
- ③ Portals:可以渲染子节点到不同的 DOM 子树中(后续讲解)。
- ④ 字符串或数值类型:它们在 DOM 中会被渲染为文本节点。
import React from 'react'

class App extends React.Component{

  state = {
    message: 'Hello React'
  }

  render() {
    // ① 返回 React 元素:通过 JSX 编写的代码就会被编译成 React.createElement ,所以返回的就是一个 React 元素。
    // return <h2>{this.state.message}</h2>
    // ② 返回数组或 fragments:这样可以返回多个元素。
    // return ["abc","cba", <h1>我是h1元素</h1>, <h2>我是h2元素</h2>]
    // ④ 字符串或数值类型:它们在 DOM 中会被渲染为文本节点。
    return "abc"
  }
}

export default App2
3
4
5
6
7
8
9
10
11
12
13
14
15
16
17
18
19
- ⑤ 布尔类型或 null :什么都不渲染。
注意⚠️:如果一个函数没有
return ;语句或只写了return ;语句,那么返回的就是 undefined ,在 React 中也是什么都不渲染。
1.4 函数组件(⭐)
在 React 中,
函数组件是使用 function 定义的函数,并且这个函数会返回和类组件中render函数一样的内容。函数组件有自己的特点(在没有 hooks 的前提下):
- ① 没有生命周期,也会被更新并挂载(其实,是因为没有生命周期函数)。
- ② this 关键字不能指向组件实例(其实,是因为没有组件实例)。
- ③ 没有内部状态(state)。
- ④ ……
示例:
function App2() {
  return (
    <div>你好啊,React</div>
  )
}

export default App22
3
4
5
6
7
第二章:React 组件生命周期
2.1 扫清概念(⭐)
- 我们知道,在 ES6+ 中,是支持类的:
class Person {

}2
3
- 所以,在 ES6+ 中,我们可以使用 new 关键字来创建对象的:
class person = new Person()
class person2 = new Person()2
注意⚠️:每一次 new 的时候,默认情况下,都会生成一个新的对象(实例)。
- 在 TypeScript 中,为了给类添加约束,我们可以使用接口来进行约束。
interface IPerson {
    name: string;
    age: number;

    eat?(): void; // 可选
}

class Person implements IPerson {
    name: string;
    age: number;

    constructor(name: string, age: number) {
        this.name = name;
        this.age = age;
    }
}2
3
4
5
6
7
8
9
10
11
12
13
14
15
16
- 但是这样太麻烦了,为了给类添加类型,我们还需要多
想一个接口名,并且需要写implements关键字;在 TypeScript 中,允许定义同名的接口和类。这种情况下,类会自动实现接口,即类的属性和方法会与接口定义的属性和方法保持一致。我们可以将接口视为类的规范或契约,用于约束类的结构。
interface Person {
    name: string;
    age: number;

    eat?(): void; // 可选
}

// 省略了 implements IPerson
class Person  {
    name: string;
    age: number;

    constructor(name: string, age: number) {
        this.name = name;
        this.age = age;
    }
}2
3
4
5
6
7
8
9
10
11
12
13
14
15
16
17
注意⚠️:在原生 JavaScript 中,目前是没有接口的概念;在编译的过程中,会将接口擦除掉;换言之,接口视为类的规范或契约,用于约束类的结构。
再看 Vue 官方对生命周期的定义:
- 每个 Vue 组件
实例在创建时都需要经历一系列的初始化步骤,比如设置好数据侦听,编译模板,挂载实例到 DOM,以及在数据改变时更新 DOM。 - 在此过程中,它也
会运行被称为生命周期钩子的函数,让开发者有机会在特定阶段的运行自己的代码。
- 每个 Vue 组件
并且,Vue 官方也给了 Vue 组件的生命周期图例:
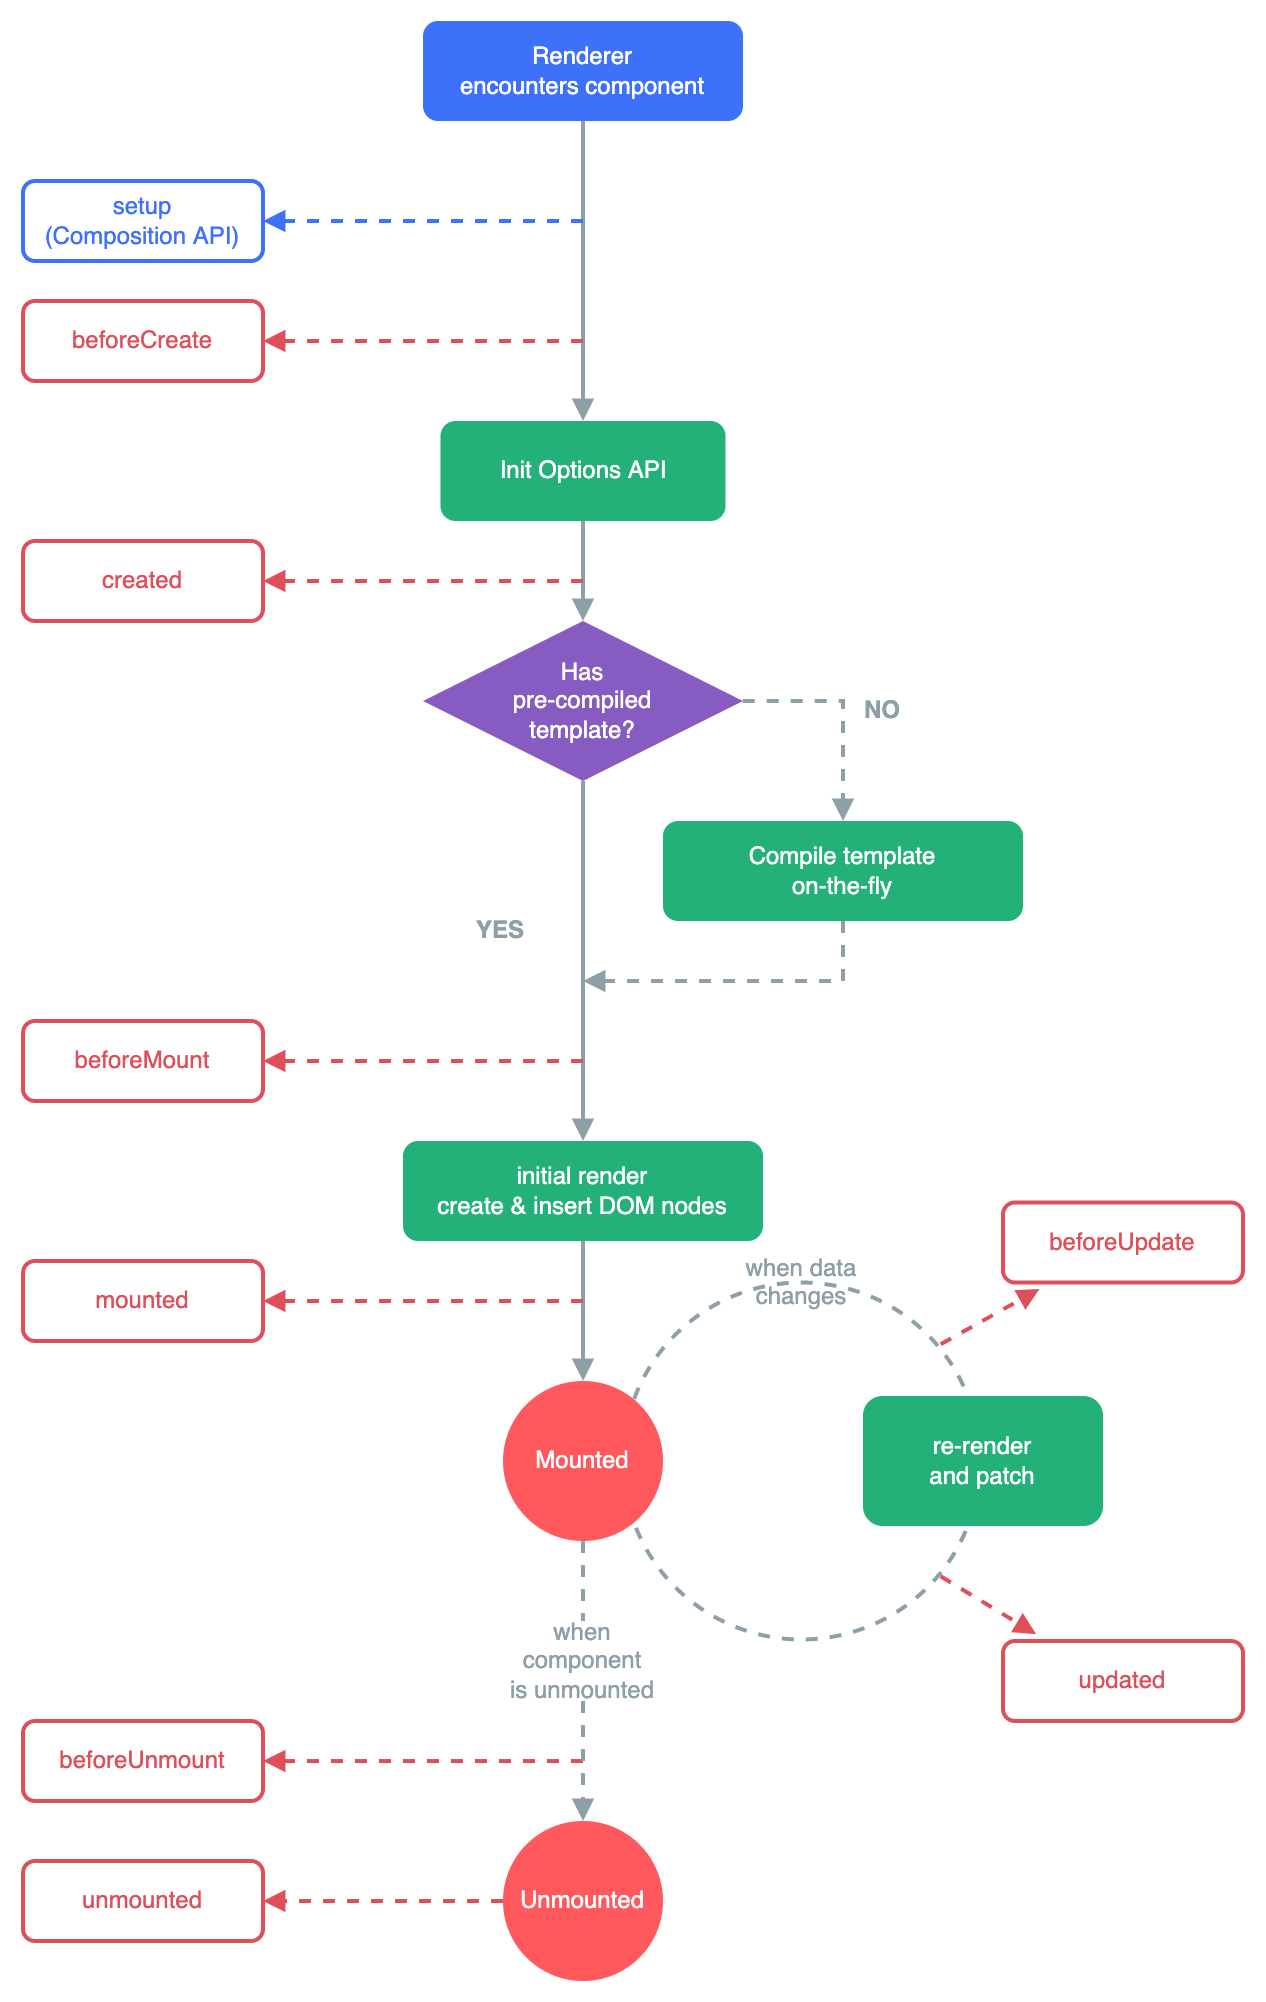
- 其实,Vue 中的应用程序(组件)主要经历如下的四个主要事件(8 个主要的钩子函数):
- ① 创建 — 在组件创建时执行。
- ② 挂载 — DOM 被挂载时执行。
- ③ 更新 — 当响应数据被修改时执行。
- ④ 销毁 — 在元素被销毁之前立即运行。
总结:
- Vue 中的组件的生命周期,就是 Vue 组件从创建、挂载、更新到销毁的一系列的过程,是个抽象的概念。
- 在生命周期的每个阶段(创建、挂载、更新、销毁等)提供了不同的钩子函数,并在程序运行的时候,在适当的时机调用这些函数。
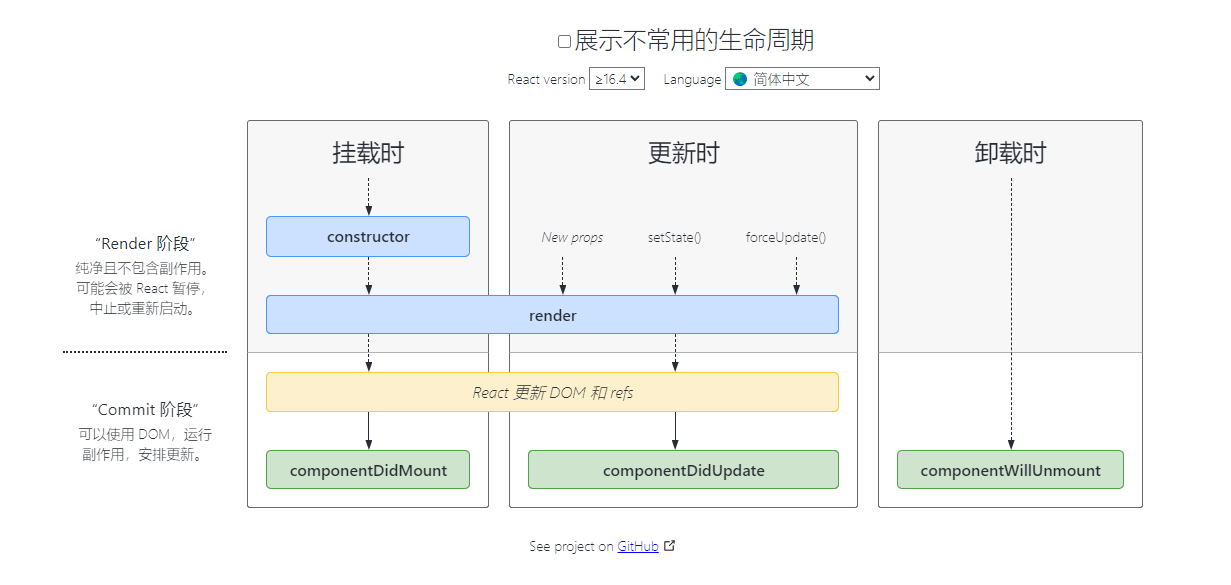
- 同理,React
组件也有自己的生命周期,并且如果我们了解 React 组件的生命周期,也可以让 React 有机会在特定阶段的运行我们自己的代码。 - React 组件的生命周期主要分为三个阶段:
- 挂载阶段(Mount):组件第一次在 DOM 树中被渲染的过程。
- 更新过程(Update):组件状态发生变化,重新更新渲染的过程。
- 卸载过程(Unmount),组件从 DOM 树中被移除的过程。
- 下面是 React 组件的
常用的生命周期图例:
- 下面是 React 组件的
不常用的生命周期图例(包含常用的生命周期):
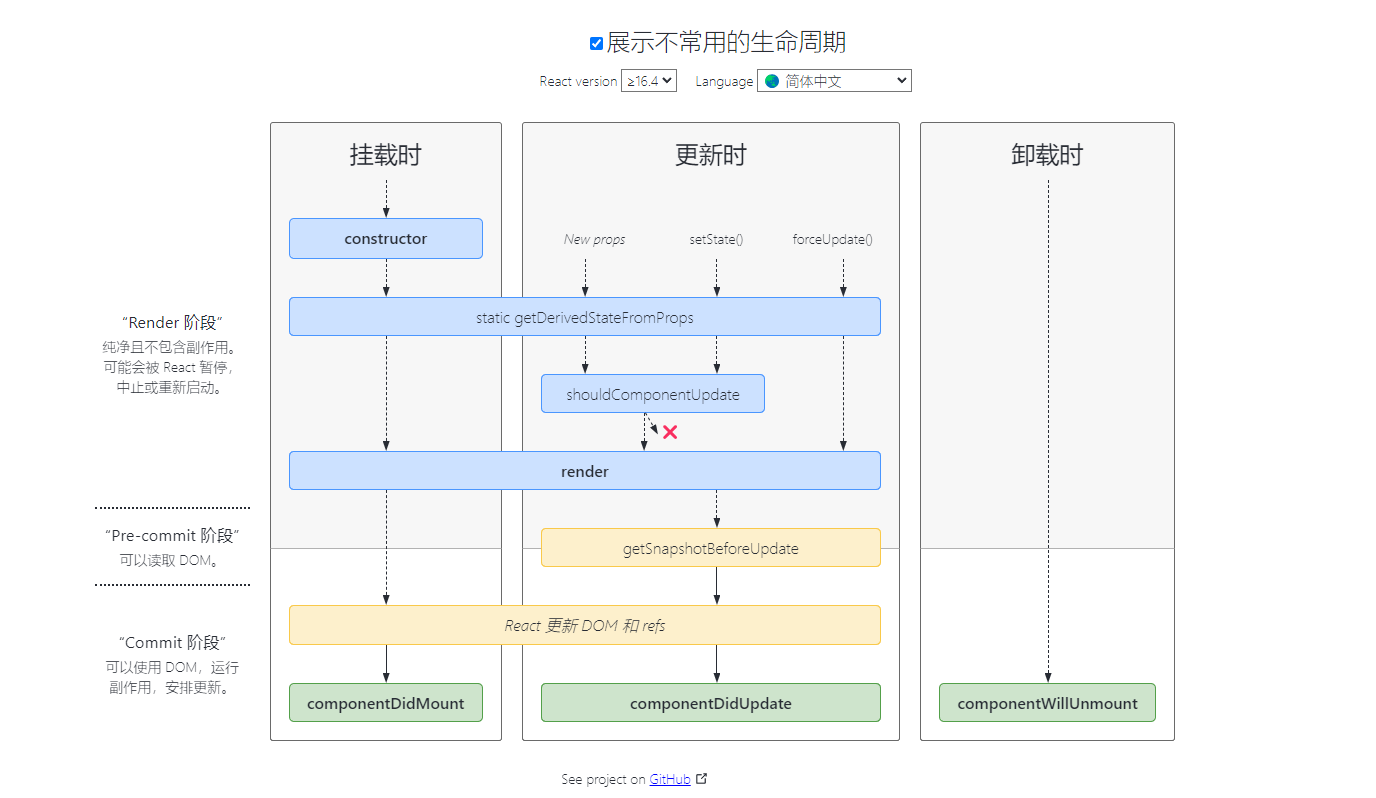
- 其实,我们通过 TS 代码也是可以查看到的:
// 生命周期的接口
interface ComponentLifecycle<P, S, SS = any> extends NewLifecycle<P, S, SS>, DeprecatedLifecycle<P, S> {
   // 组件已经挂载到DOM上时,就会回调
   componentDidMount?(): void;
   // 组件已经发生了更新时,就会回调;
   shouldComponentUpdate?(nextProps: Readonly<P>, nextState: Readonly<S>, nextContext: any): boolean;
   // 组件即将被移除时,就会回调;
   componentWillUnmount?(): void;
   componentDidCatch?(error: Error, errorInfo: ErrorInfo): void;
}

// 和类名相同的接口
interface Component<P = {}, S = {}, SS = any> extends ComponentLifecycle<P, S, SS> {}

class Component<P, S> {
	// 其余略
}2
3
4
5
6
7
8
9
10
11
12
13
14
15
16
17
- 本文在上面也提到:在 TypeScript 中,允许定义同名的接口和类。这种情况下,类会自动实现接口,即类的属性和方法会与接口定义的属性和方法保持一致。我们可以将接口视为类的规范或契约,用于约束类的结构。
注意⚠️:在谈及 React 生命周期的时候,我们主要讨论的是
类的生命周期,因为函数式组件是没有生命周期的(后面我们可以通过 hooks 来模拟一些生命周期)。
2.2 补充概念(⭐)
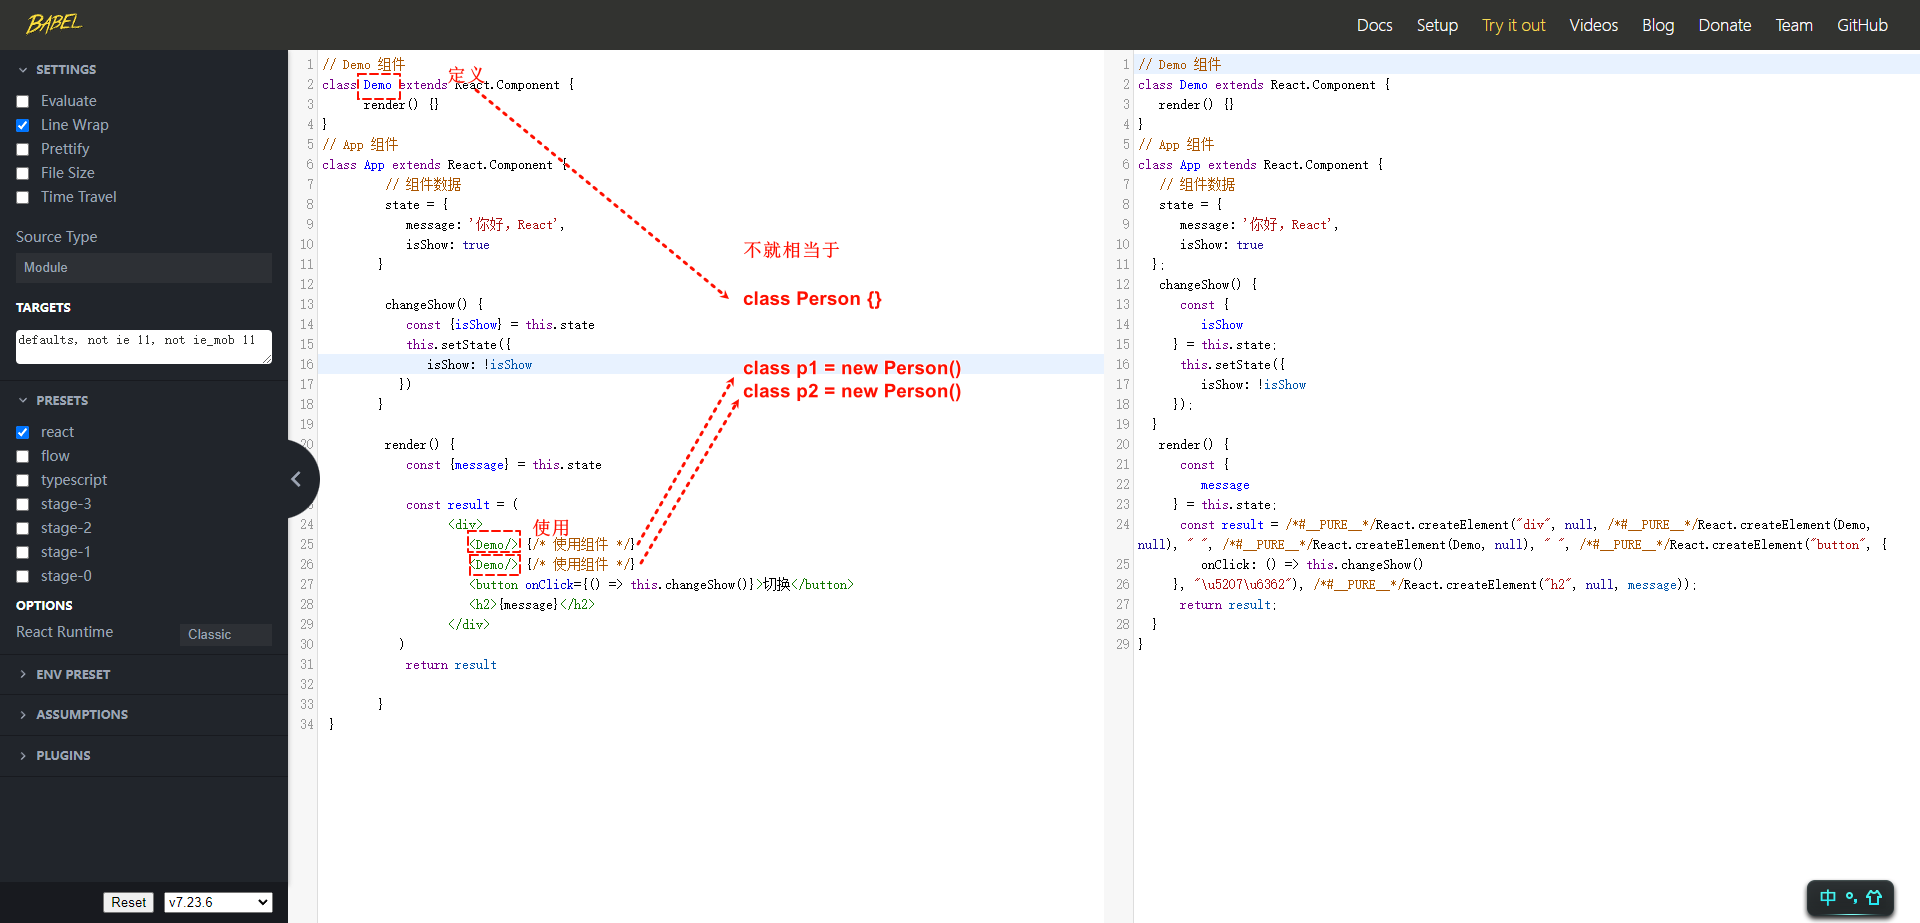
- 很多时候,我们在讨论组件的时候,会谈及
组件和组件实例的概念;甚至,你可能会听到别人谈及:定义组件、使用组件的概念,如下所示:
// Demo 组件
class Demo extends React.Component {
    render() {}
}
// App 组件
class App extends React.Component {
      // 组件数据
      state = {
        message: '你好,React',
        isShow: true
      }

      changeShow() {
        const {isShow} = this.state
        this.setState({
          isShow: !isShow
        })
      }

      render() {
        const {message} = this.state

        const result = (
            <div>
              <Demo/> {/* 使用组件 */}
              <Demo/> {/* 使用组件 */}
              <button onClick={() => this.changeShow()}>切换</button>
              <h2>{message}</h2>
            </div>
        )
        return result

      }
}2
3
4
5
6
7
8
9
10
11
12
13
14
15
16
17
18
19
20
21
22
23
24
25
26
27
28
29
30
31
32
33
34
- 我们可以通过 babel 将其转换一下:
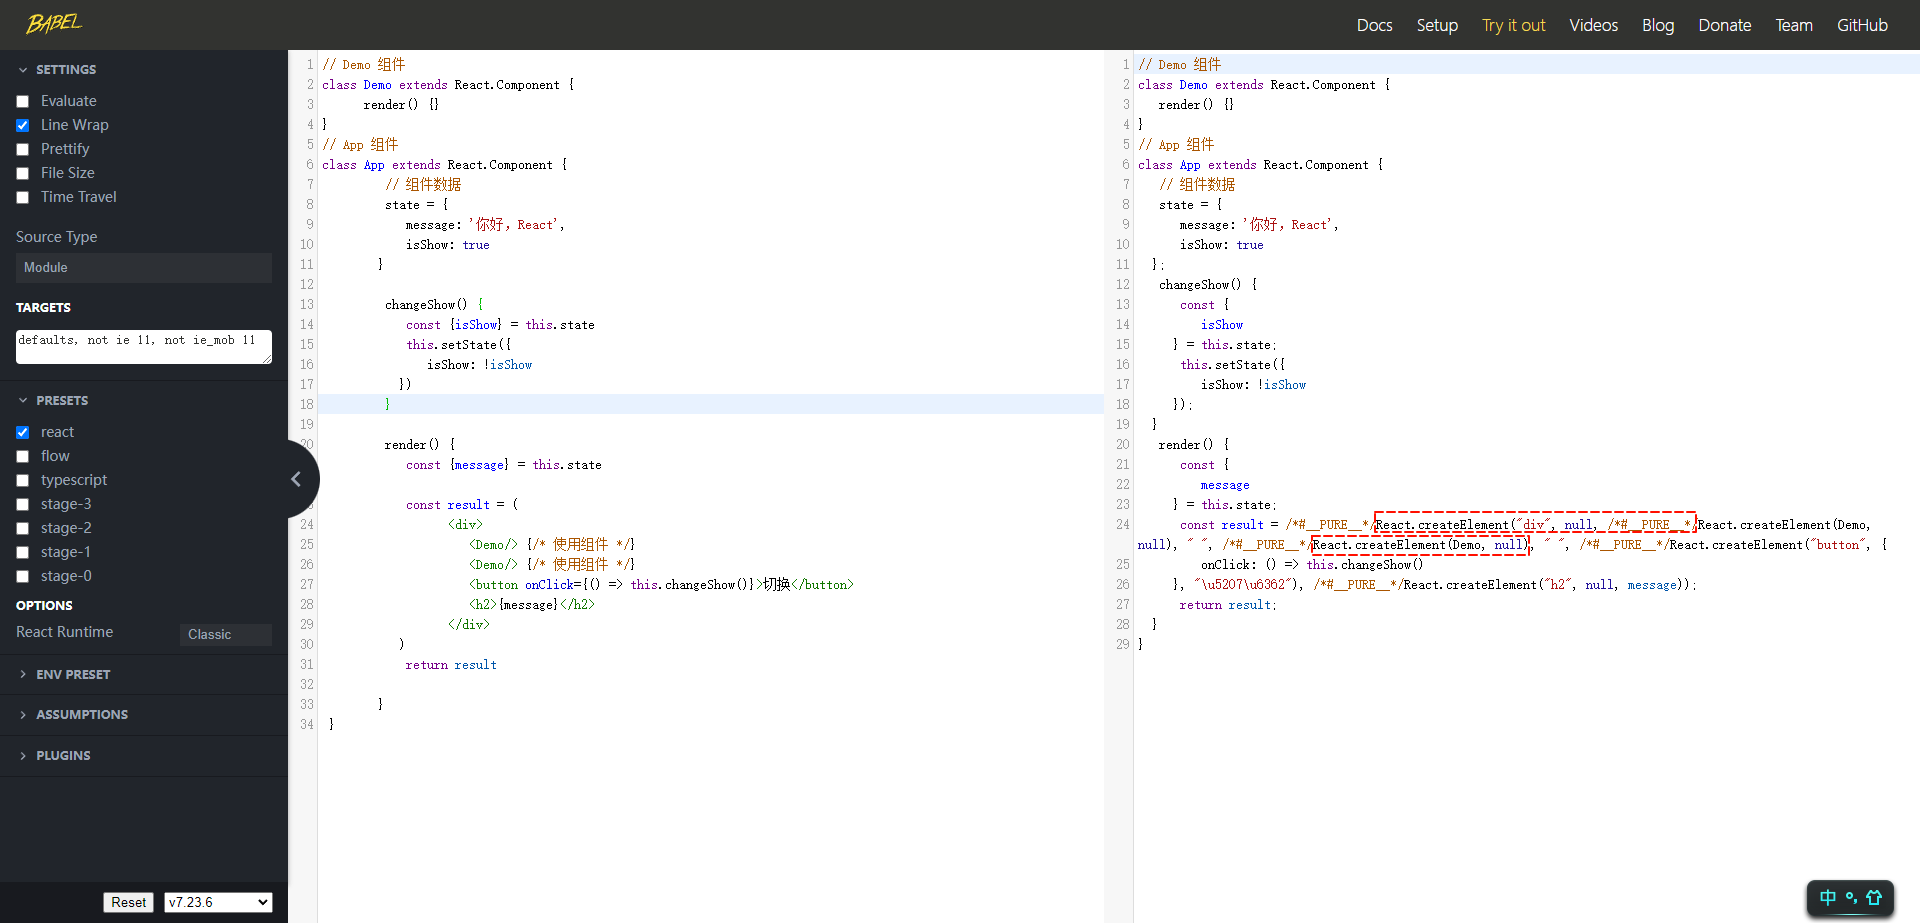
- 我们知道,本质上原生的
html标签和<Demo />,都会在底层转换为React.createElement对象,其定义如下:
createElement(type, props, ...children)- 会根据第一个参数
type判断到底是字符串还是一个React 组件;需要说明的是,我们通常所说的使用组件,其实是 React 在内部帮助我们创建了组件的实例对象;换言之,我们在 JSX 中,每一次写<Demo />就是 React 在内部帮我们创建了Demo的组件实例。
2.3 演示 React 组件的生命周期(⭐)
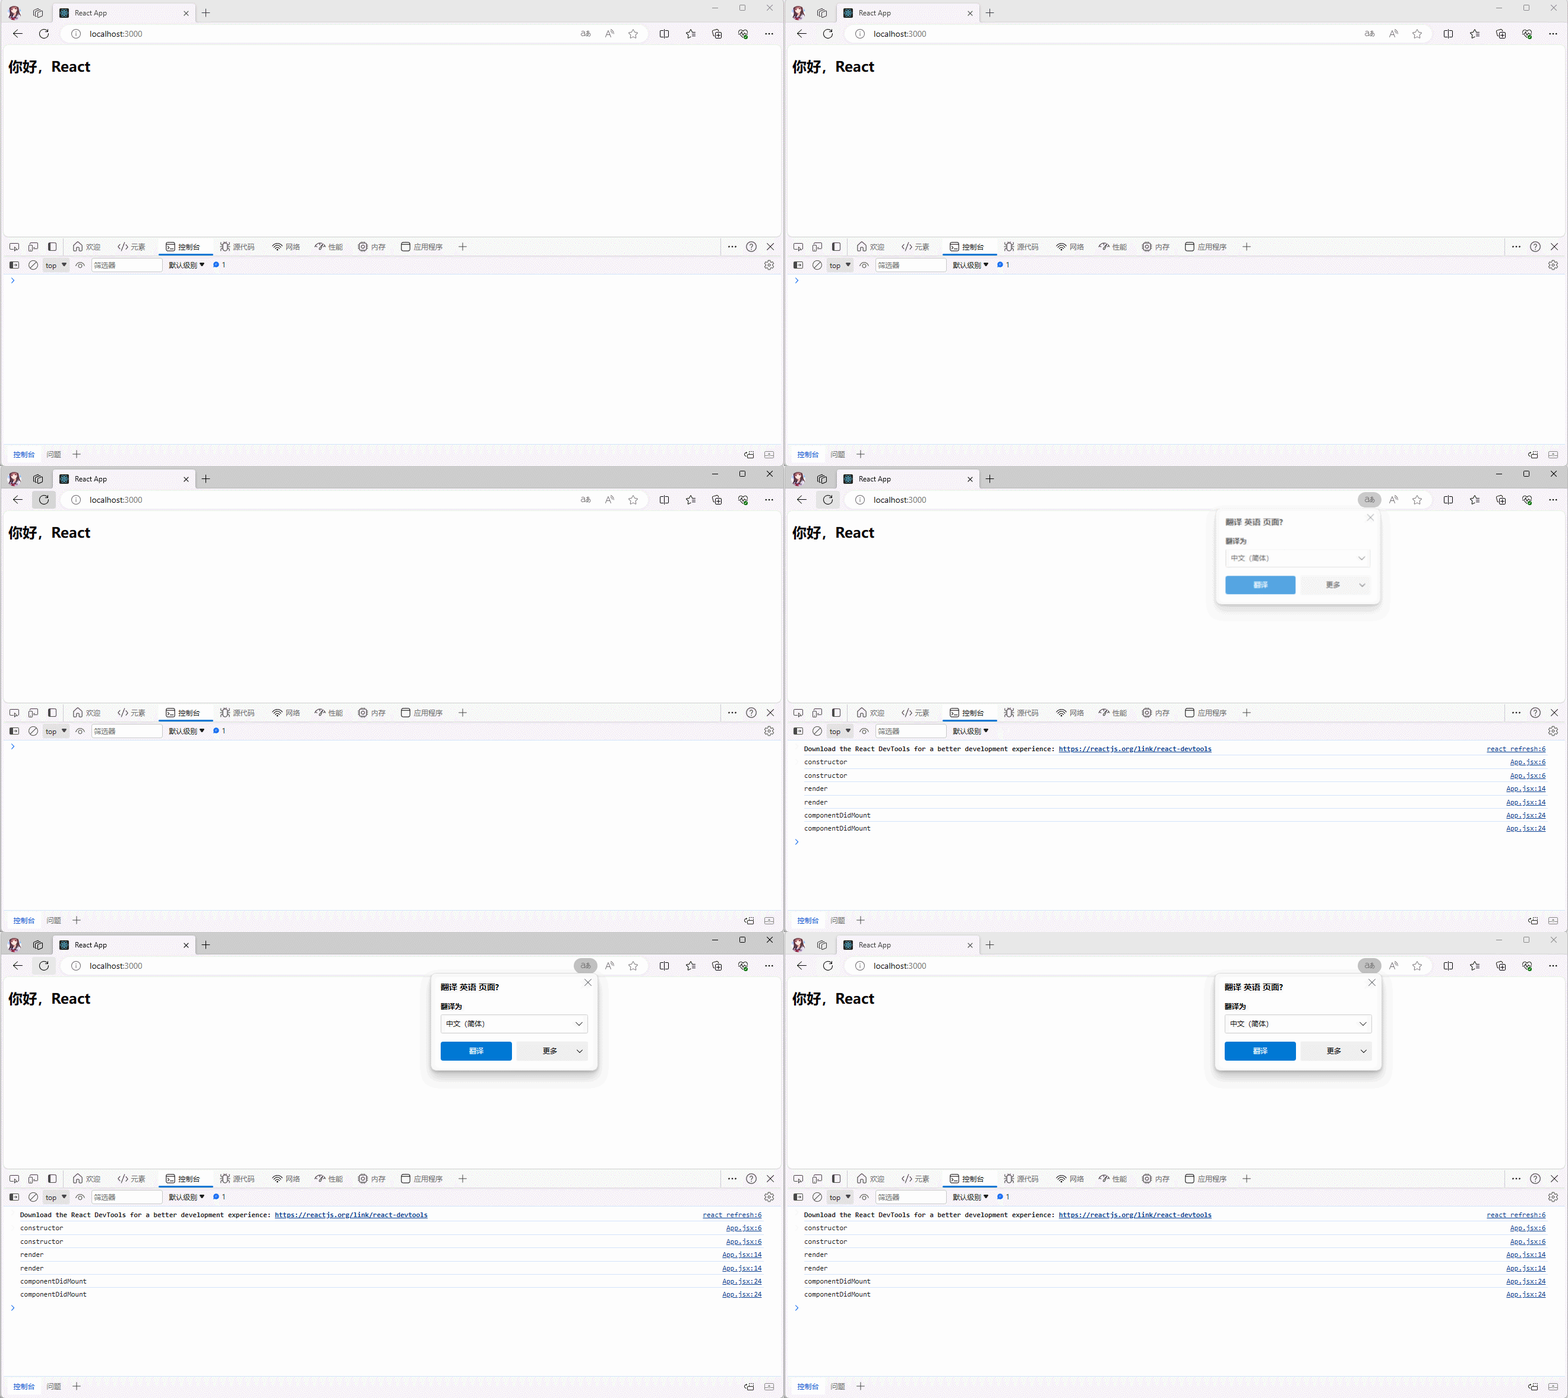
2.3.1 挂载阶段
- 需求:演示 React 组件挂载阶段的生命周期。
- 示例:
import React from 'react'

class App extends React.Component {

  constructor(props) {
    console.log('constructor')
    super(props)
    this.state = {
      message: "你好,React"
    }
  }

  render() {
    console.log('render')
    const {message} = this.state
    return (
      <div>
        <h2>{message}</h2>
      </div>
    )
  }

  componentDidMount() {
    console.log('componentDidMount')
  }
}

export default App2
3
4
5
6
7
8
9
10
11
12
13
14
15
16
17
18
19
20
21
22
23
24
25
26
27
28
2.3.2 更新阶段
- 需求:演示 React 组件更新阶段的生命周期。
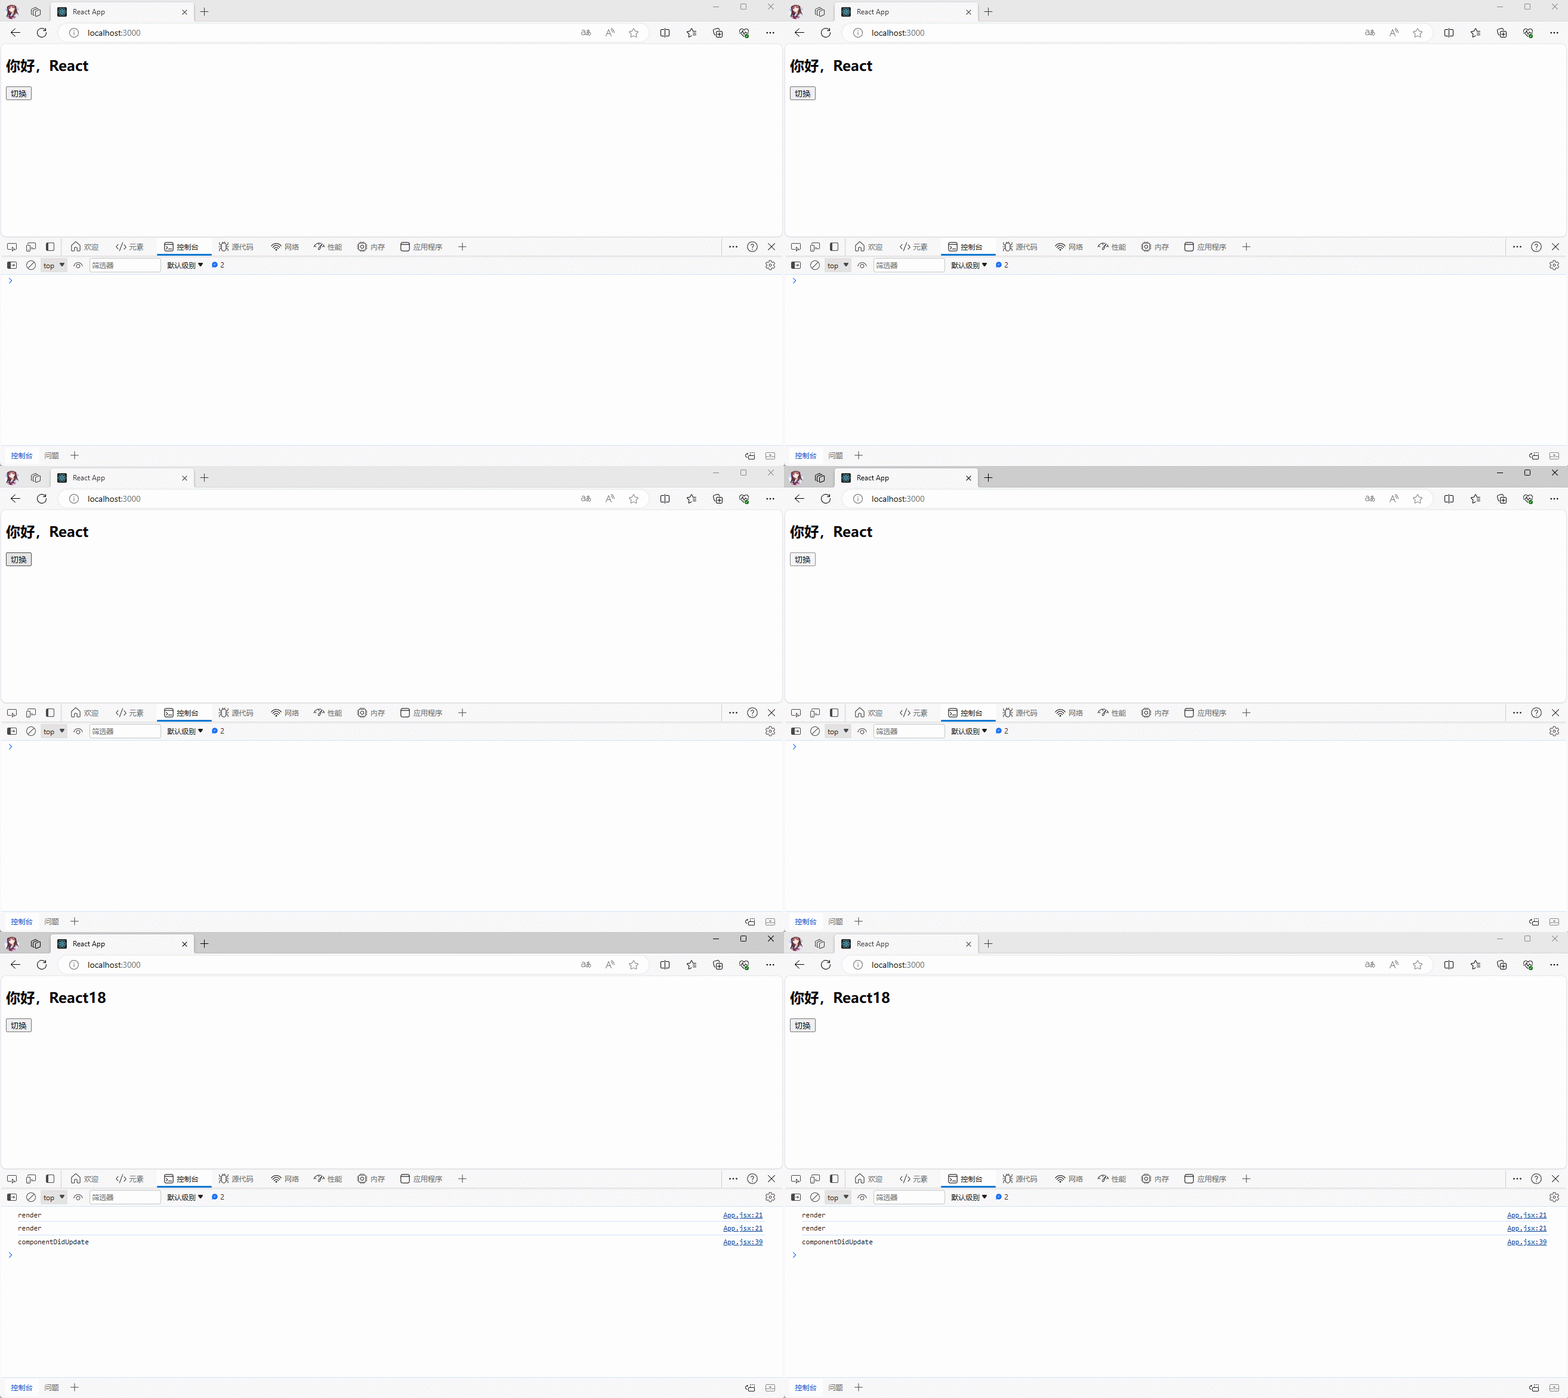
- 示例:
import React from 'react'

class App extends React.Component {

  constructor(props) {
    console.log('constructor')
    super(props)
    this.state = {
      message: "你好,React"
    }
  }

  change() {
    this.setState({
      message: '你好,React18'
    })
  }


  render() {
    console.log('render')
    const {message} = this.state
    return (
      <div>
        <h2>{message}</h2>
        <button onClick={() => {
          this.change()
        }}>切换
        </button>
      </div>
    )
  }

  componentDidMount() {
    console.log('componentDidMount')
  }

  componentDidUpdate(prevProps, prevState, snapshot) {
    console.log('componentDidUpdate')
  }

}

export default App2
3
4
5
6
7
8
9
10
11
12
13
14
15
16
17
18
19
20
21
22
23
24
25
26
27
28
29
30
31
32
33
34
35
36
37
38
39
40
41
42
43
44
2.3.2 销毁阶段
- 需求:演示 React 组件销毁阶段的生命周期。
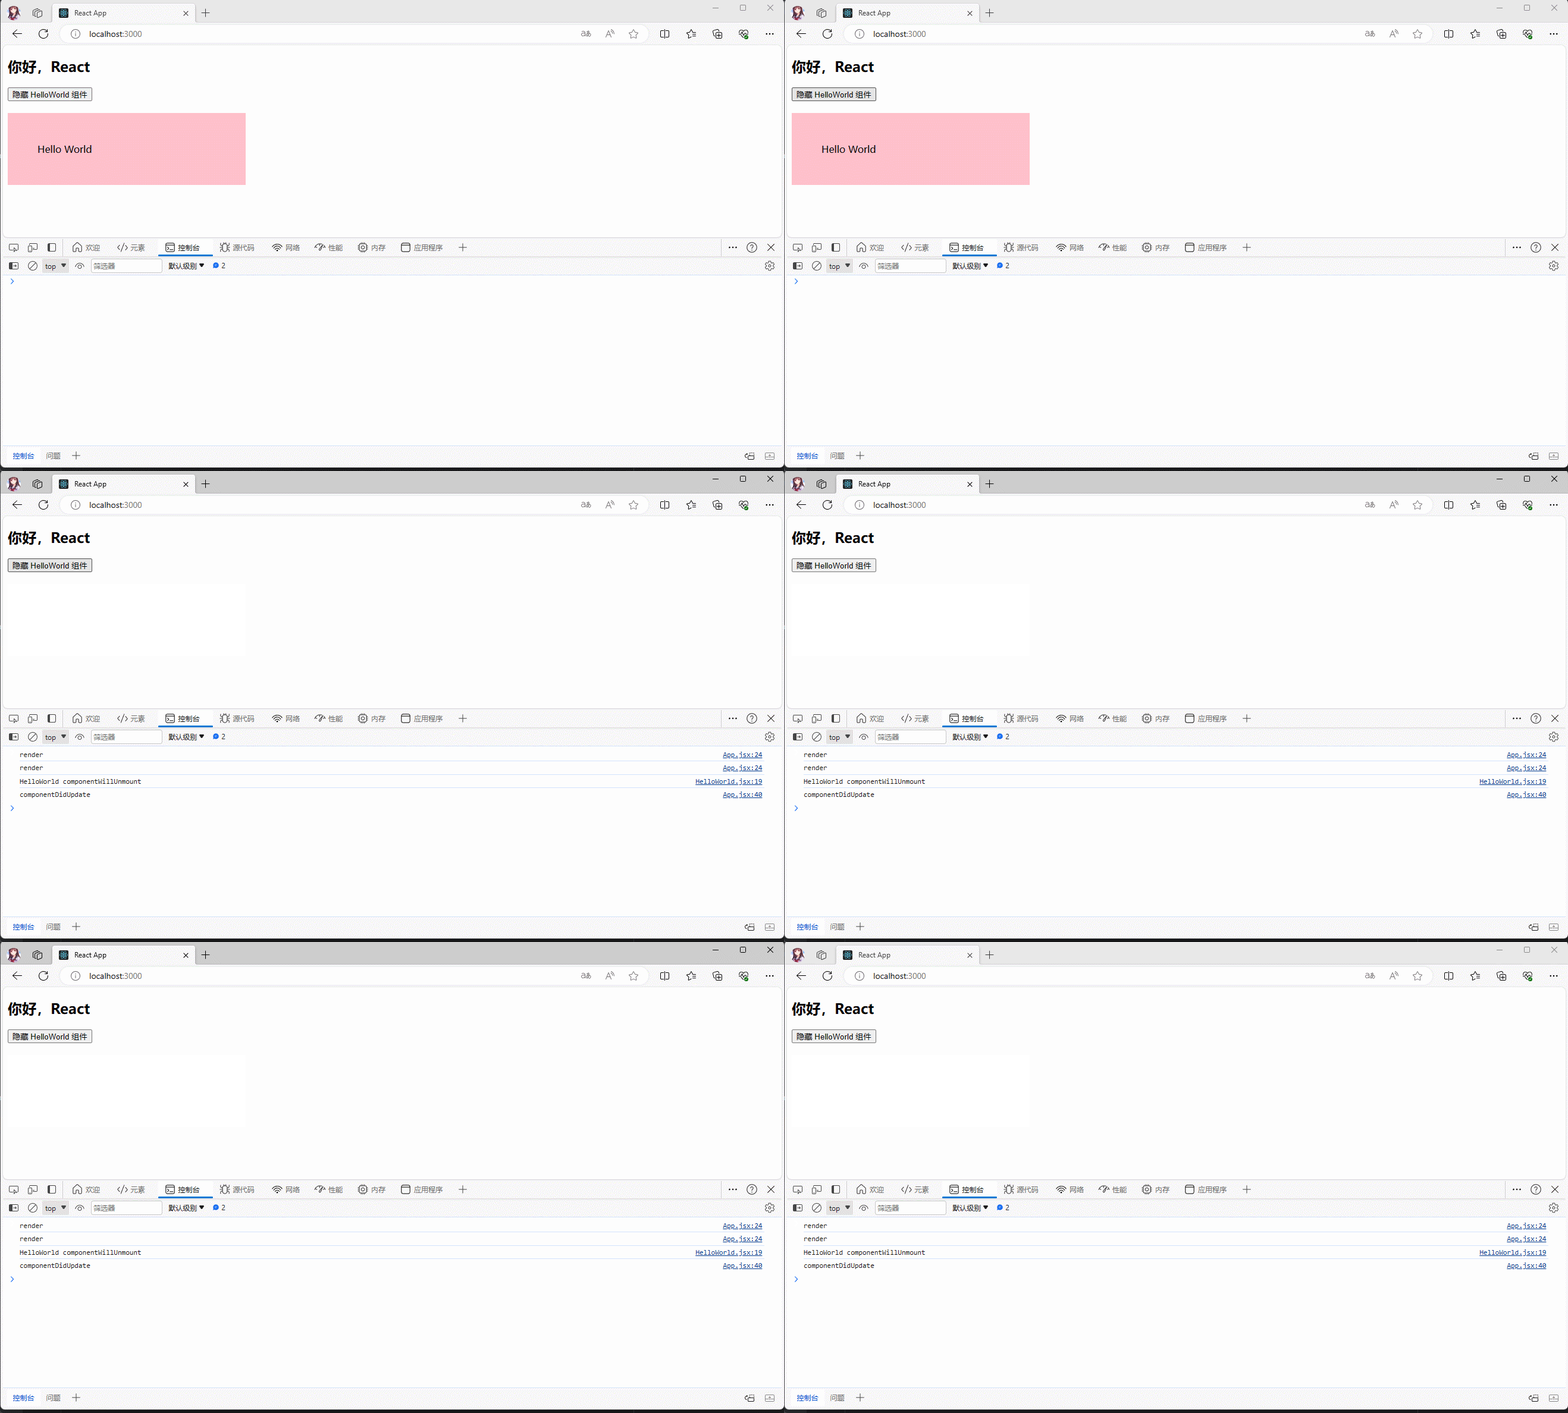
- 项目结构:
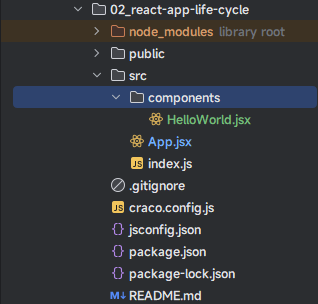
- 示例:
- 其中,HelloWorld.jsx
import React from "react"

class HelloWorld extends React.Component {
  render() {
    console.log('HelloWorld render')
    return (
      <div style={{
        background: 'pink',
        width: '300px',
        padding: '50px',
        marginTop: '20px'
      }}>
        Hello World
      </div>
    )
  }

  componentWillUnmount() {
    console.log('HelloWorld componentWillUnmount')
  }
}

export default HelloWorld2
3
4
5
6
7
8
9
10
11
12
13
14
15
16
17
18
19
20
21
22
23
- 其中,App.jsx
import React from 'react'
import HelloWorld from "@/components/HelloWorld";


class App extends React.Component {

  constructor(props) {
    console.log('constructor')
    super(props)
    this.state = {
      message: "你好,React",
      isShow: true
    }
  }


  hide(){
    this.setState({
      isShow: false
    })
  }

  render() {
    console.log('render')
    const {message, isShow} = this.state
    return (
      <div>
        <h2>{message}</h2>
        <button onClick={() => {this.hide()}}>隐藏 HelloWorld 组件</button>
        {isShow && <HelloWorld/>}
      </div>
    )
  }

  componentDidMount() {
    console.log('componentDidMount')
  }

  componentDidUpdate(prevProps, prevState, snapshot) {
    console.log('componentDidUpdate')
  }

}

export default App2
3
4
5
6
7
8
9
10
11
12
13
14
15
16
17
18
19
20
21
22
23
24
25
26
27
28
29
30
31
32
33
34
35
36
37
38
39
40
41
42
43
44
45
2.4 React 组件的生命周期的案例(⭐)
- 需求:封装一个计时器的组件,可以通过按钮来显示和隐藏。
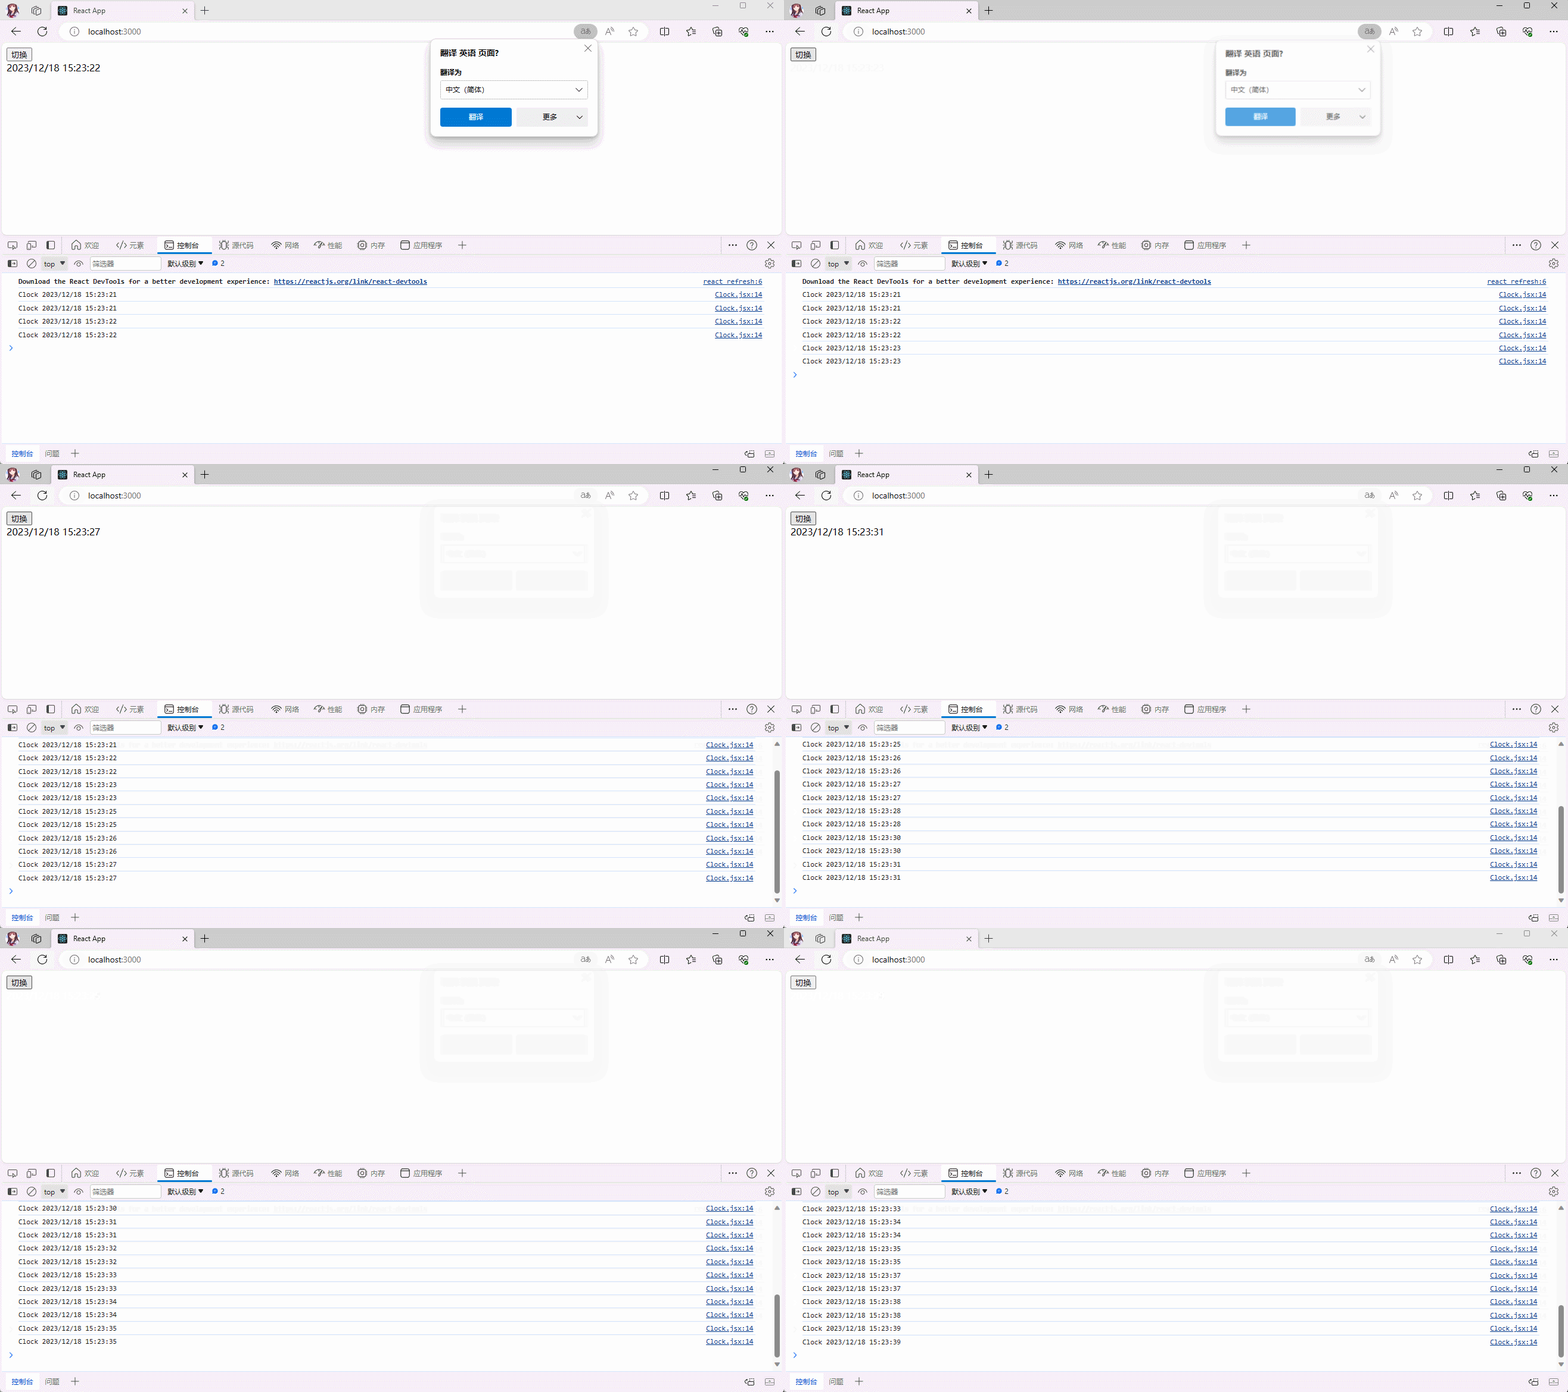
注意⚠️:在组件销毁的时候,必须将定时器关闭;否则,随着时间的推移,用户电脑的 CPU 会越来越高。
- 项目结构:
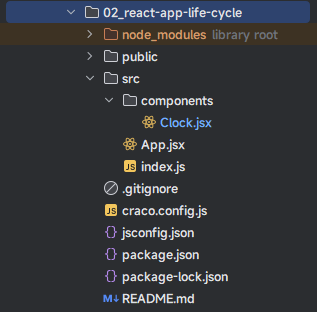
- 示例:
- 其中,Clock.jsx
import React from "react"

class Clock extends React.Component {

  constructor(props) {
    super(props)
    this.state = {
      date: new Date()
    }
  }

  render() {
    const {date} = this.state
    console.log(`Clock ${date.toLocaleString()}`)
    return (
      <div>{date.toLocaleString()}</div>
    )
  }

  componentDidMount() { // 创建定时器
    this.timer = setInterval(() => {
      this.setState({
        date: new Date()
      })
    }, 1000)
  }

  componentWillUnmount() { // 清除定时器
    clearInterval(this.timer)
  }

}

export default Clock2
3
4
5
6
7
8
9
10
11
12
13
14
15
16
17
18
19
20
21
22
23
24
25
26
27
28
29
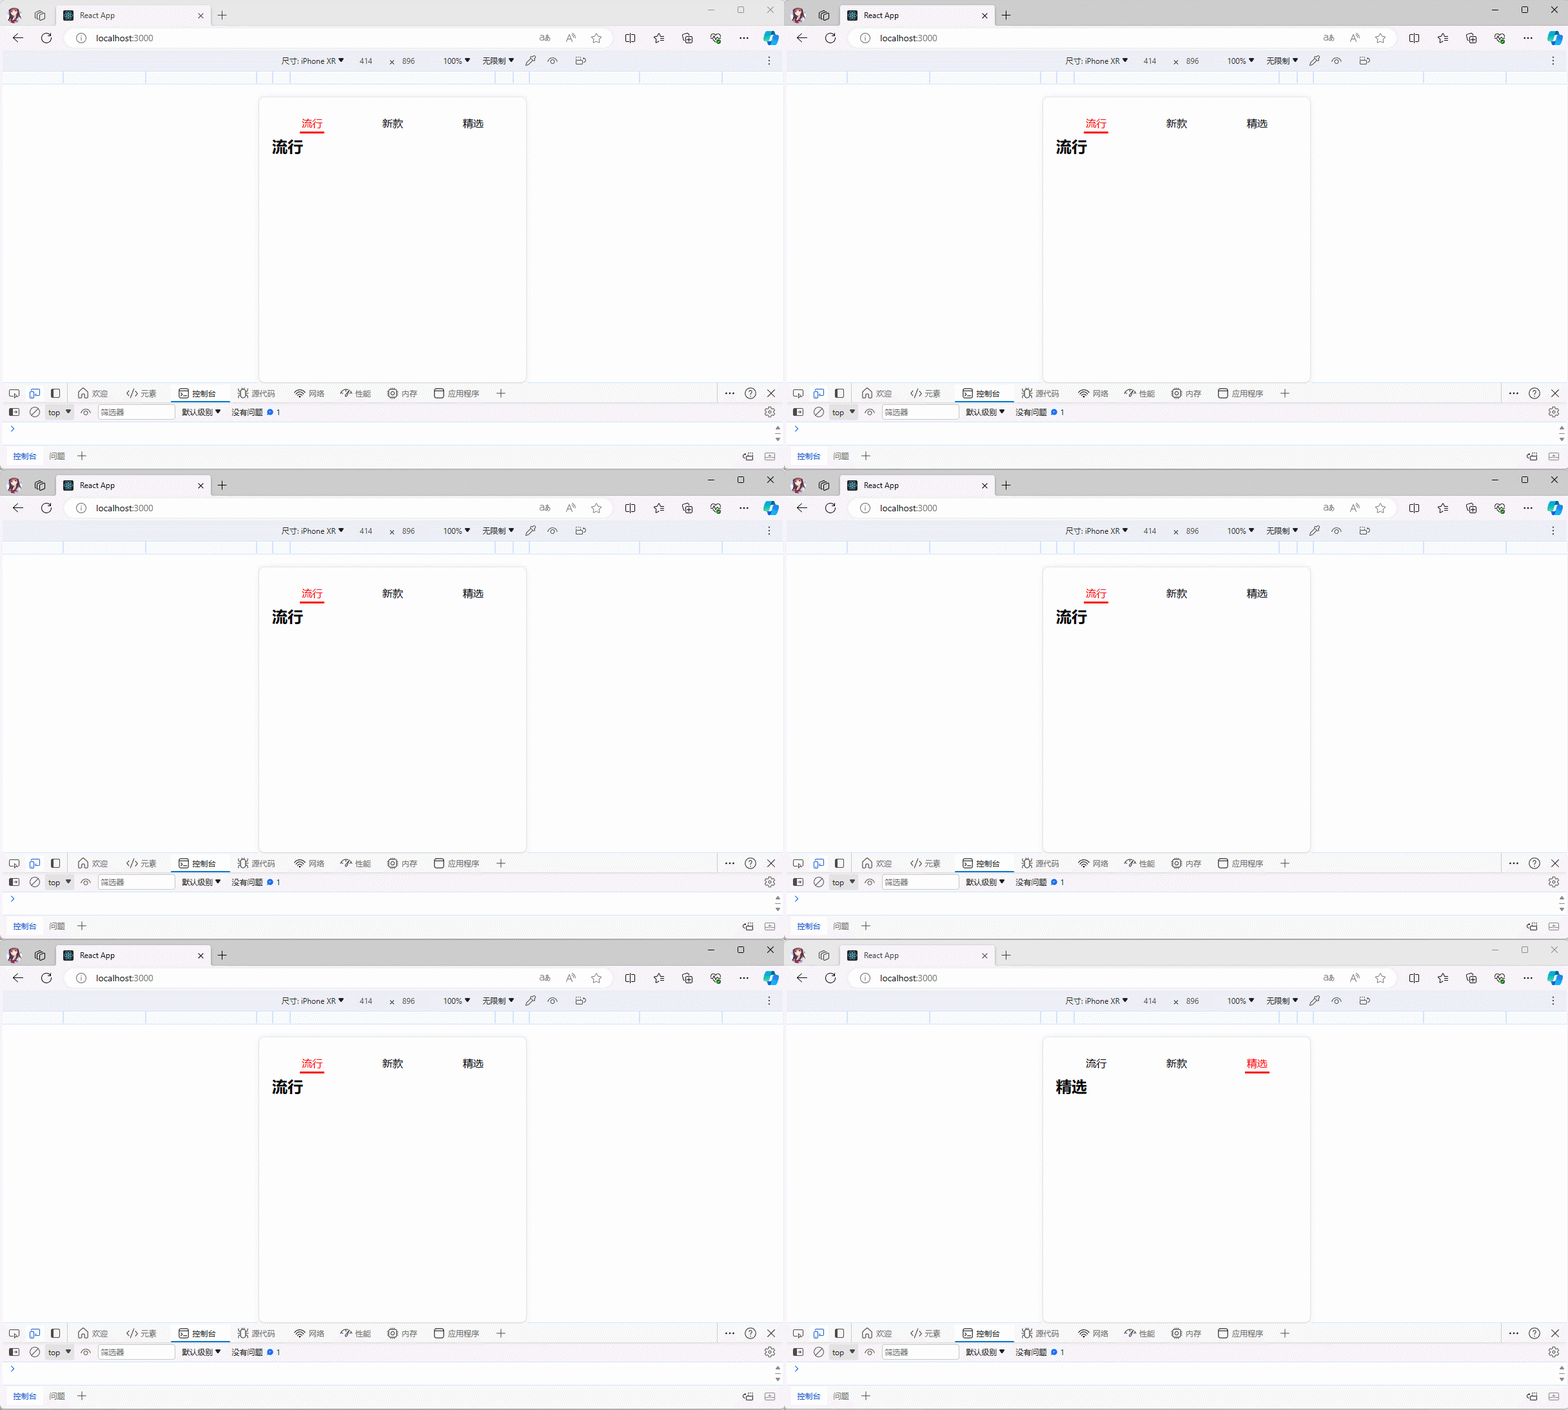
30
31
32
33
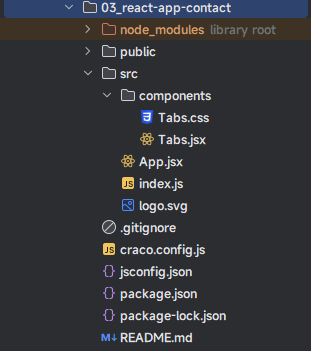
34
- 其中,App.jsx
import React from 'react'
import Clock from "@/components/Clock"


class App extends React.Component {
  constructor(props) {
    super(props)
    this.state = {
      isShow: true
    }
  }

  change() {
    this.setState({
      isShow: !this.state.isShow
    })
  }

  render() {
    const {isShow} = this.state
    return (
      <div>
        <button onClick={() => this.change()}>切换</button>
        {isShow && <Clock/>}
      </div>
    )
  }
}

export default App2
3
4
5
6
7
8
9
10
11
12
13
14
15
16
17
18
19
20
21
22
23
24
25
26
27
28
29
30
2.5 不常用的生命周期
shouldComponentUpdate(nextProps, nextState):根据方法的返回值,判断 React 组件的输出是否受当前 state 或 props 更改的影响。- 默认行为是 state 每次发生变化组件都会重新渲染。大部分情况下,我们应该遵循默认行为。
- 当 props 或 state 发生变化时,
shouldComponentUpdate()会在渲染执行之前被调用。返回值默认为 true。首次渲染或使用forceUpdate()时不会调用该方法。 - 此方法仅作为
性能优化的方式而存在。不要企图依靠此方法来“阻止”渲染,因为这可能会产生 bug。你应该考虑使用内置的PureComponent组件,而不是手动编写 shouldComponentUpdate()。PureComponent``会对 props 和 state 进行浅层比较,并减少了跳过必要更新的可能性`。
总之:
- 当我们在使用 this.setState() 更改 state 中的数据的时候;如果 shouldComponentUpdate 的返回值是 true ,就会再次执行 render 函数,去渲染页面;如果 shouldComponentUpdate 的返回值是 false,就不会再执行 render 函数,也就不会再去渲染页面了。
- 官方也说了,不建议我们去手动编写
shouldComponentUpdate(),而是希望我们使用内置的PureComponent组件。
- 示例:略。
2.6 生命周期函数的实际常见场景
2.6.1 constructor 构造函数
constructor()构造函数通常只做两件事情:- ① 通过 this.state 赋值对象来初始化内部的 state 。
- ② 为事件绑定 this 。
注意⚠️:如果不初始化 state 或不进行方法绑定,则不需要为 React 组件实现构造函数。
2.6.2 componentDidMount
componentDidMount()生命周期方法会在组件挂载后(插入到 DOM 树中)立即调用。componentDidMount()的通常应用场景:- ① 依赖于DOM 的操作都可以在这里进行。
- ② 发送网络请求。
- ③ 使用消息事件总线,在此进行订阅;需要注意的是,需要在
componentWillUnmount()取消订阅。
2.6.3 componentDidUpdate
componentDidUpdate()生命周期方法会被立即调用,首次渲染并不会执行此方法。componentDidUpdate() 的通常应用场景:- ① 当组件更新后,可以在此处对 DOM 进行操作。
- ② 如果对更新前后的 props 进行了比较,也可以选择在此处进行网络请求,如:当 props 未发生变化时,则不会执行网络请求 。
注意⚠️:实际开发中,
componentDidUpdate()生命周期方法用的并不是很多。
2.6.4 componentWillUnmount
componentWillUnmount()生命周期方法会在组件卸载及销毁之前直接调用。componentWillUnmount() 的通常应用场景:在此方法中执行必要的清理操作,如:清除定时器,取消网络请求,取消在componentDidMount()中创建的订阅。
第三章:React 组件之间的通信
3.1 组件的嵌套(⭐)
- 来看看 Vue 官方对组件的定义:
- ① 组件允许我们将 UI 划分为独立的、可重用的部分,并且可以对每个部分进行单独的思考。在实际应用中,组件常常被组织成层层嵌套的树状结构:
- ② 这和我们嵌套 HTML 元素的方式类似,Vue 实现了自己的组件模型,使我们可以在每个组件内封装自定义内容与逻辑。Vue 同样也能很好地配合原生 Web Component。如果你想知道 Vue 组件与原生 Web Components 之间的关系,可以阅读此章节。
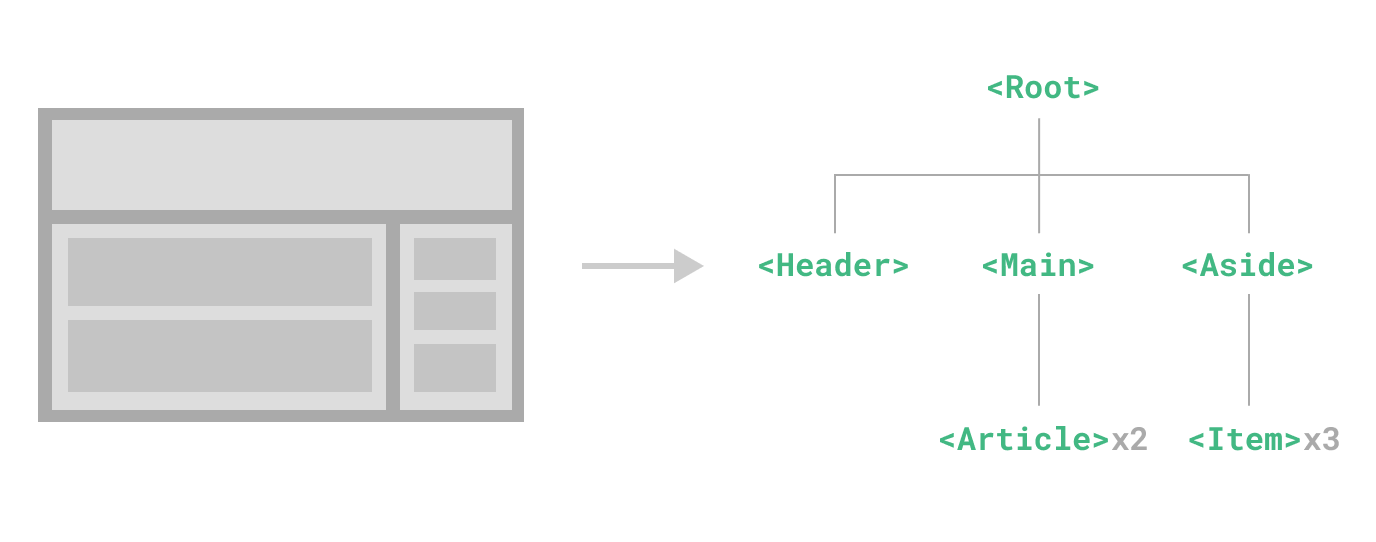
通过 Vue 官方对组件的定义,我们可以得出如下的结论:
- 如果将一个应用程序中的所有逻辑都放在一个组件中,那么这个组件将会变得非常臃肿和难以维护;
- 组件化的核心思想就是将应用程序拆分为一个个小的组件,然后组合在一起(分而治之)。
当然,我们从上面的图中,也可以看到组件和组件之间,既可以是
父子关系,也可以是兄弟关系;换言之,组件和组件之间是可以嵌套的。所以,我们就可以根据上面的
组件嵌套逻辑,形成如下的关系:
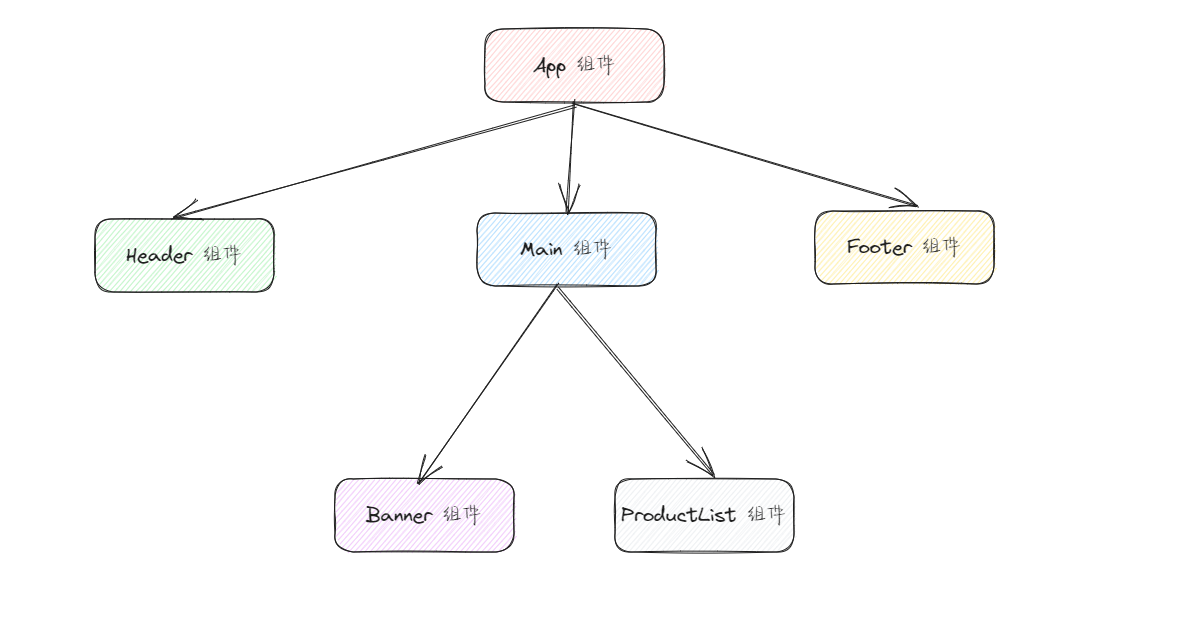
注意⚠️:
- ① App 组件是 Header 组件、Main 组件、Footer 组件的父组件。
- ② Main 组件是 Banner 组件和 ProductList 组件的父组件。
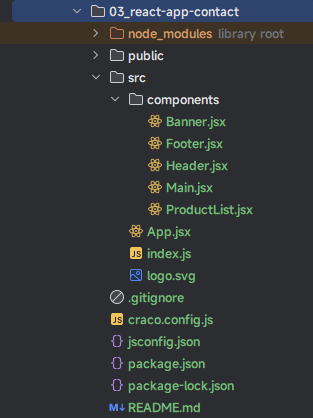
- 根据上述的图例,在项目中创建各个组件:
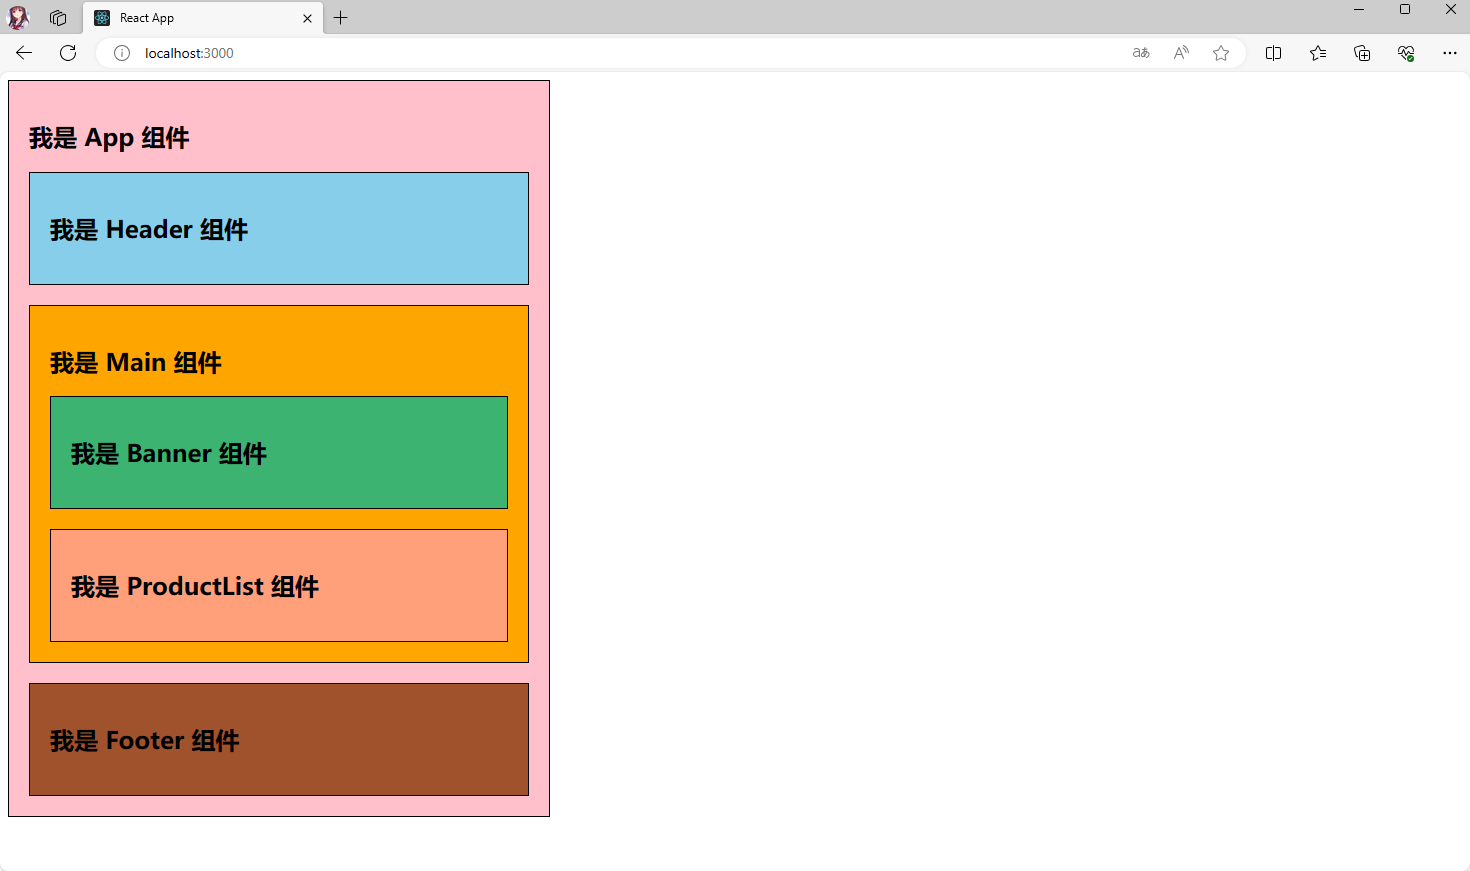
- 项目结构:
- 示例:
- 其中,App.jsx
import React from 'react'
import Header from "@/components/Header"
import Main from "@/components/Main"
import Footer from "@/components/Footer"

class App extends React.Component {

  constructor(props) {
    super(props);
    this.state = {
      message: "我是 App 组件"
    }
  }

  render() {
    const {message} = this.state
    return (
      <div style={{backgroundColor: 'pink', width: "500px", padding: '20px', border: "1px solid black"}}>
        <h2>{message}</h2>
        <Header/>
        <Main/>
        <Footer/>
      </div>
    )
  }
}

export default App2
3
4
5
6
7
8
9
10
11
12
13
14
15
16
17
18
19
20
21
22
23
24
25
26
27
28
- 其中,Header.jsx
import React from 'react'

class Header extends React.Component {

  constructor(props) {
    super(props);
    this.state = {
      message: "我是 Header 组件"
    }
  }

  render() {
    const {message} = this.state
    return (
      <div style={{backgroundColor: 'skyblue', padding: '20px', border: "1px solid black"}}>
        <h2>{message}</h2>
      </div>
    )
  }
}

export default Header2
3
4
5
6
7
8
9
10
11
12
13
14
15
16
17
18
19
20
21
22
- 其中,Main.jsx
import React from 'react'
import Banner from "@/components/Banner"
import ProductList from "@/components/ProductList"

class Main extends React.Component {

  constructor(props) {
    super(props);
    this.state = {
      message: "我是 Main 组件"
    }
  }

  render() {
    const {message} = this.state
    return (
      <div style={{backgroundColor: 'orange', padding: '20px',marginTop: '20px',marginBottom: '20px', border: "1px solid black"}}>
        <h2>{message}</h2>
        <Banner/>
        <ProductList/>
      </div>
    )
  }
}

export default Main2
3
4
5
6
7
8
9
10
11
12
13
14
15
16
17
18
19
20
21
22
23
24
25
26
- 其中,Footer.jsx
import React from 'react'

class Footer extends React.Component {

  constructor(props) {
    super(props);
    this.state = {
      message: "我是 Footer 组件"
    }
  }

  render() {
    const {message} = this.state
    return (
      <div style={{backgroundColor: 'sienna', padding: '20px', border: "1px solid black"}}>
        <h2>{message}</h2>
      </div>
    )
  }
}

export default Footer2
3
4
5
6
7
8
9
10
11
12
13
14
15
16
17
18
19
20
21
22
- 其中,Banner.jsx
import React from 'react'

class Banner extends React.Component {

  constructor(props) {
    super(props);
    this.state = {
      message: "我是 Banner 组件"
    }
  }

  render() {
    const {message} = this.state
    return (
      <div style={{backgroundColor: 'mediumseagreen',  padding: '20px',marginBottom: '20px', border: "1px solid black"}}>
        <h2>{message}</h2>
      </div>
    )
  }
}

export default Banner2
3
4
5
6
7
8
9
10
11
12
13
14
15
16
17
18
19
20
21
22
- 其中,ProductList.jsx
import React from 'react'

class ProductList extends React.Component {

  constructor(props) {
    super(props);
    this.state = {
      message: "我是 ProductList 组件"
    }
  }

  render() {
    const {message} = this.state
    return (
      <div style={{backgroundColor: 'lightsalmon',  padding: '20px', border: "1px solid black"}}>
        <h2>{message}</h2>
      </div>
    )
  }
}

export default ProductList2
3
4
5
6
7
8
9
10
11
12
13
14
15
16
17
18
19
20
21
22
3.2 组件间通信(⭐)
3.2.1 概述
- 在实际开发过程中,我们经常会遇到组件之间需要互相通信:
- 如:App 组件可能使用了多个 Header 组件,每个地方展示的 Header 的内容不同,那么我们就需要使用 Header 组件的地方,给 Header 组件传递一些数据,让其进行展示。
- 如:Main 组件中一次性的通过请求获取到了 Banner 数据和 ProductList 数据,那么就需要传递给 Banner 组件和 ProductList 组件,让其进行展示。
- 如:子组件中发生了事件,需要由父组件来完成某些操作,那么就需要子组件向父组件传递事件。
- 总而言之,在 React 项目中,组件之间的通信非常重要;并且,组件之间传递数据的方向有两种:父传子,子传父。
3.2.2 父传子
父组件在暂时子组件的时候,可能需要传递一些数据给子组件,需要如下的两个步骤:
- ① 父组件通过
属性=值的形式来传递给子组件数据。 - ② 子组件通过
props参数获取父组件传递过来的数据。
- ① 父组件通过
注意⚠️:在 JavaScript 中,如果一个父类有构造函数,子类可以选择不写构造函数。当子类没有显式定义构造函数时,它会继承父类的构造函数。
class Person {
  constructor(name) {
    this.name = name;
  }
}

class Student extends Person {
  // 子类没有显式定义构造函数
}

const student = new Student("Alice");
console.log(student.name); // 输出: Alice2
3
4
5
6
7
8
9
10
11
12
注意⚠️:
- 从前端的角度来讲,这个很好理解,毕竟 Person 就是用来代替 ES5 中的 function 构造函数的。
- 但是,Java 等开发者会感到很困惑;那是,因为 JavaScript 中是没有
构造函数重载的概念。
- 之前,我们写的组件是这么写的:
import React from 'react'

class Banner extends React.Component {

  constructor() {
    super();
    this.state = {
      message: "我是 Banner 组件"
    }
  }

  render() {
    const {message} = this.state
    return (
      <div style={{backgroundColor: 'mediumseagreen',  padding: '20px',marginBottom: '20px', border: "1px solid black"}}>
        <h2>{message}</h2>
      </div>
    )
  }
}

export default Banner2
3
4
5
6
7
8
9
10
11
12
13
14
15
16
17
18
19
20
21
22
- 那么,我们看下 React 的源码:
    class Component<P, S> {

        static contextType?: Context<any> | undefined;


        context: unknown;
		// 父类中只有一个构造器
        constructor(props: Readonly<P> | P);

        setState<K extends keyof S>(
            state: ((prevState: Readonly<S>, props: Readonly<P>) => Pick<S, K> | S | null) | (Pick<S, K> | S | null),
            callback?: () => void,
        ): void;

        forceUpdate(callback?: () => void): void;
        render(): ReactNode;

        readonly props: Readonly<P>;
        state: Readonly<S>;

        refs: {
            [key: string]: ReactInstance;
        };
}2
3
4
5
6
7
8
9
10
11
12
13
14
15
16
17
18
19
20
21
22
23
24
- 那么,最正规的写法就应该是下面的这种:
import React from 'react'

class ProductList extends React.Component {

  constructor(props) {
    super(props);
    this.state = {
      message: "我是 ProductList 组件"
    }
  }

  render() {
    const {message} = this.state
    return (
      <div style={{backgroundColor: 'lightsalmon',  padding: '20px', border: "1px solid black"}}>
        <h2>{message}</h2>
      </div>
    )
  }
}

export default ProductList2
3
4
5
6
7
8
9
10
11
12
13
14
15
16
17
18
19
20
21
22
- 又因为在 JavaScript 中,如果一个父类有构造函数,子类可以选择不写构造函数。当子类没有显式定义构造函数时,它会继承父类的构造函数,所以简化写法应该是这样的:
import React from 'react'

class ProductList extends React.Component {

  state = {
      message: "我是 ProductList 组件"
  }

  render() {
    const {message} = this.state
    return (
      <div style={{backgroundColor: 'lightsalmon',  padding: '20px', border: "1px solid black"}}>
        <h2>{message}</h2>
      </div>
    )
  }
}

export default ProductList2
3
4
5
6
7
8
9
10
11
12
13
14
15
16
17
18
19
- 此时,我们就可以改造下自己各个组件的代码了:
import React from 'react'
import Header from "@/components/Header"
import Main from "@/components/Main"
import Footer from "@/components/Footer"

class App extends React.Component {

  state = {
    message: "我是 App 组件"
  }

  render() {
    const {message} = this.state
    return (
      <div style={{backgroundColor: 'pink', width: "500px", padding: '20px', border: "1px solid black"}}>
        <h2>{message}</h2>
        <Header/>
        <Main/>
        <Footer/>
      </div>
    )
  }
}

export default App2
3
4
5
6
7
8
9
10
11
12
13
14
15
16
17
18
19
20
21
22
23
24
25
注意⚠️:只给出了一个 App 组件的改造示例,其余的都类似:略。
- 此时,又有疑惑?根据 JavaScript 的规则,我们将
constructor省略了,也没有地方在组件去接收props参数了,咋办? - 可以在
render函数中,打印下this看看:
import React from 'react'
import Header from "@/components/Header"
import Main from "@/components/Main"
import Footer from "@/components/Footer"

class App extends React.Component {

  state = {
    message: "我是 App 组件"
  }

  render() {
    console.log('App', this) // 注意此处
    const {message} = this.state
    return (
      <div style={{backgroundColor: 'pink', width: "500px", padding: '20px', border: "1px solid black"}}>
        <h2>{message}</h2>
        <Header/>
        <Main/>
        <Footer/>
      </div>
    )
  }
}

export default App2
3
4
5
6
7
8
9
10
11
12
13
14
15
16
17
18
19
20
21
22
23
24
25
26
- 在浏览器中,显示如下:
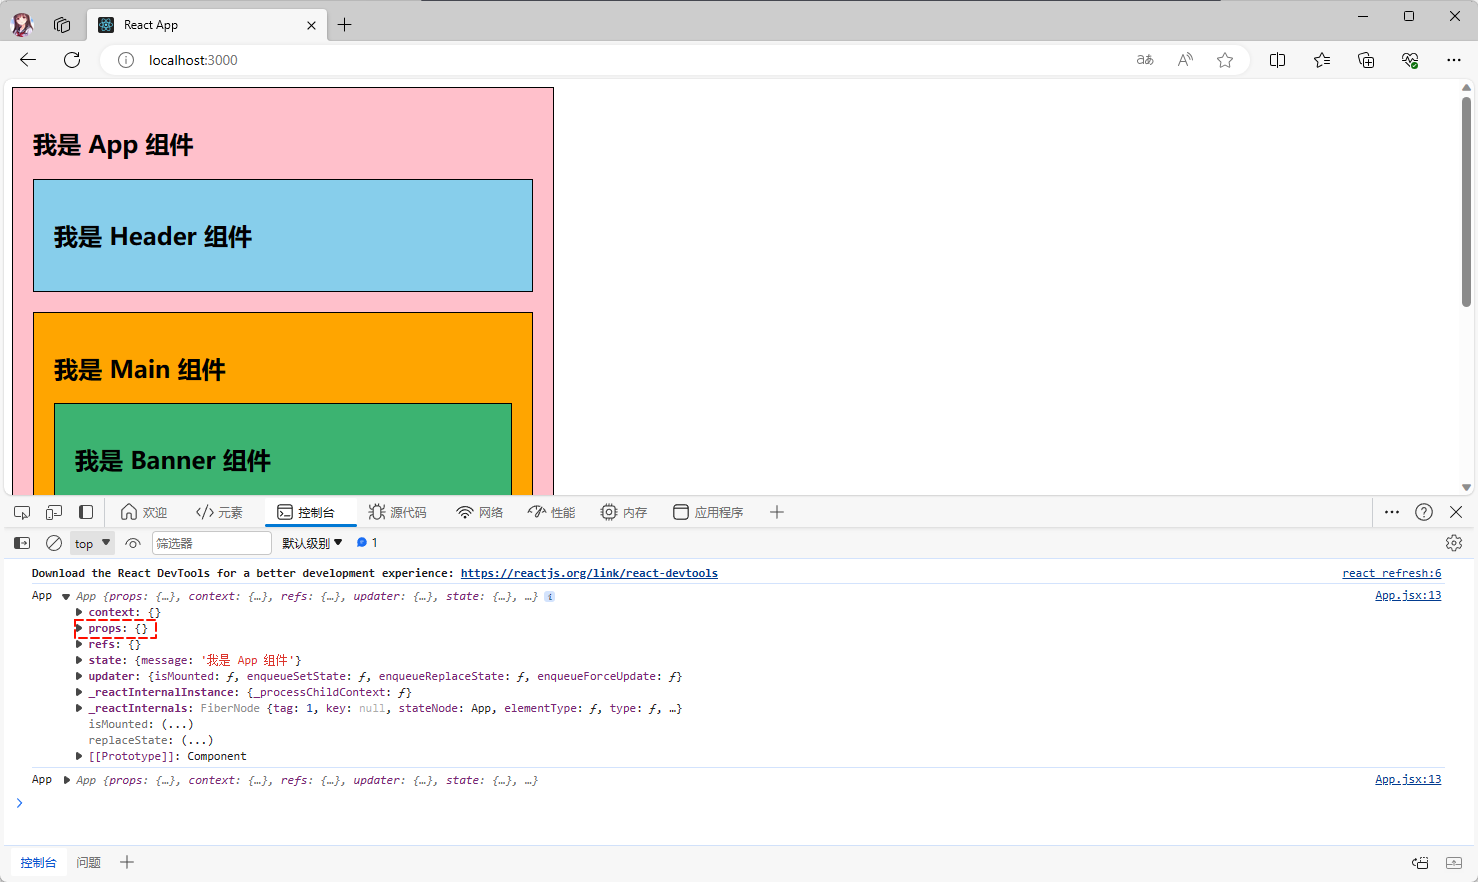
注意⚠️:我们可以在 this 实例身上获取 props 参数,props 参数值的类型是 object 。
- 需求:在 Main 组件中将 Banner 数据和 ProductList 数据,传递给 Banner 组件和 ProductList 组件。
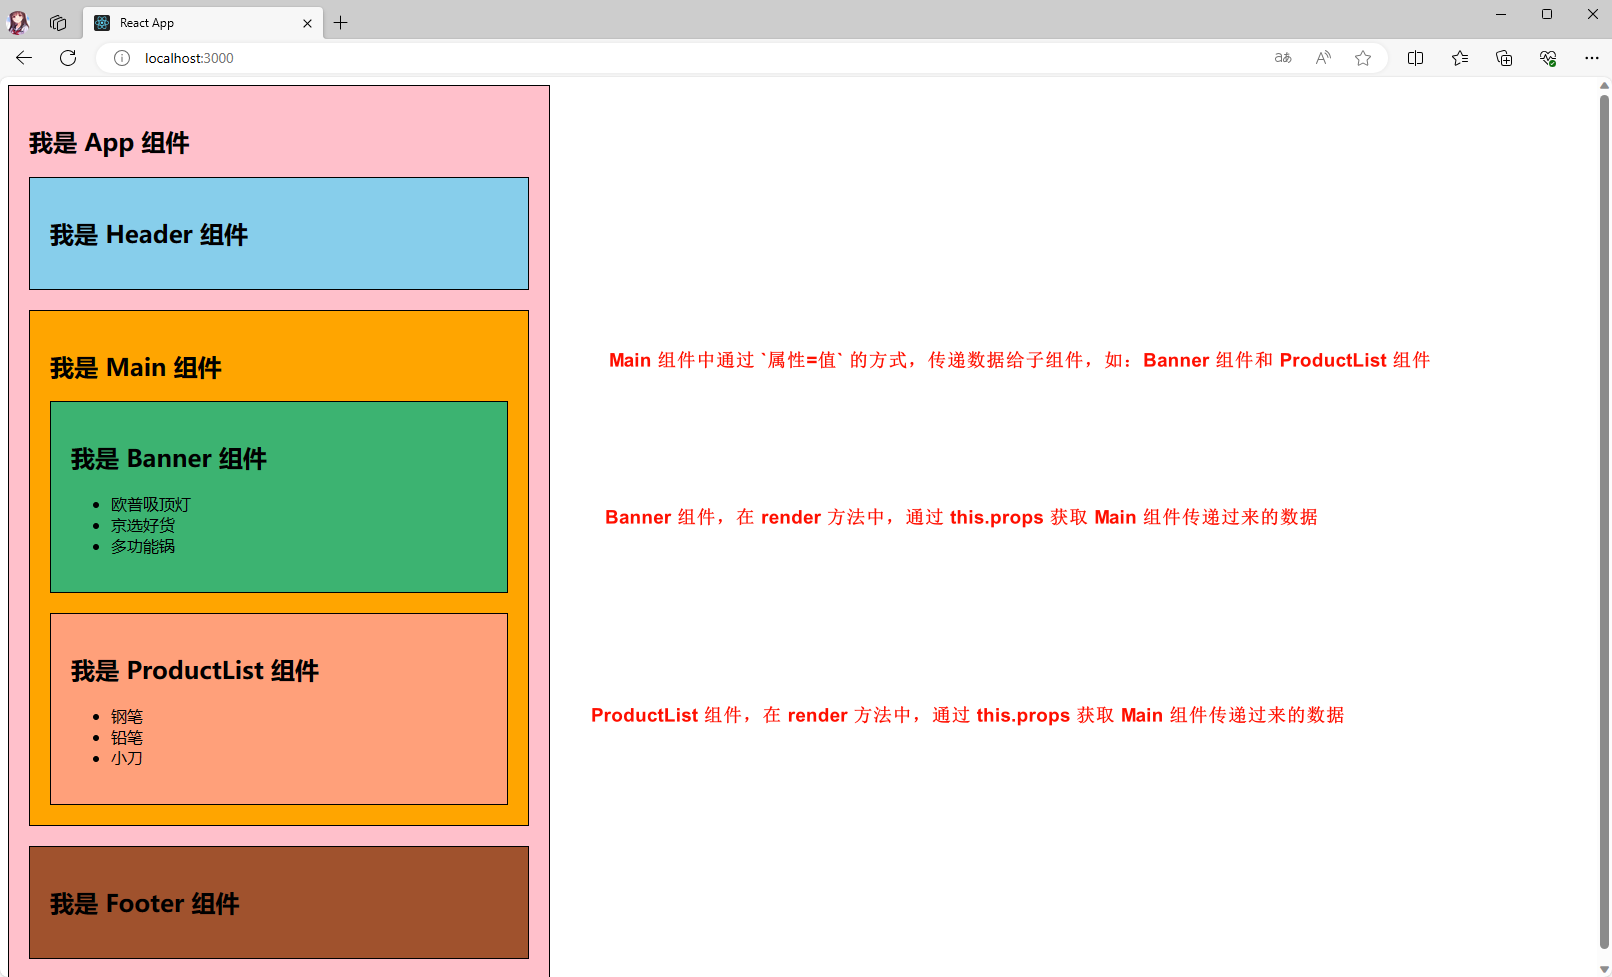
- 示例:
- 其中,Main.jsx
import React from 'react'
import Banner from "@/components/Banner"
import ProductList from "@/components/ProductList"

class Main extends React.Component {

  state = {
    message: "我是 Main 组件",
    bannerList: ["欧普吸顶灯", "京选好货", "多功能锅"],
    productList: ["钢笔", "铅笔", "小刀"]
  }

  render() {
    const {message, bannerList, productList} = this.state
    return (
      <div style={{
        backgroundColor: 'orange',
        padding: '20px',
        marginTop: '20px',
        marginBottom: '20px',
        border: "1px solid black"
      }}>
        <h2>{message}</h2>
        {/* 通过 属性=值 的方式传递数据给子组件 */}
        <Banner bannerList={bannerList}/>
        {/* 通过 属性=值 的方式传递数据给子组件 */}
        <ProductList productList={productList}/>
      </div>
    )
  }
}

export default Main2
3
4
5
6
7
8
9
10
11
12
13
14
15
16
17
18
19
20
21
22
23
24
25
26
27
28
29
30
31
32
33
- 其中,Banner.jsx
import React from 'react'

class Banner extends React.Component {

  state = {
    message: "我是 Banner 组件"
  }

  render() {
    console.log('Banner', this)
    const {message} = this.state
    /* 子组件中通过 this.props 获取 */
    const {bannerList} = this.props
    return (
      <div
        style={{backgroundColor: 'mediumseagreen', padding: '20px', marginBottom: '20px', border: "1px solid black"}}>
        <h2>{message}</h2>
        <ul>
          {
            bannerList.map(item => <li key={item}>{item}</li>)
          }
        </ul>
      </div>
    )
  }
}

export default Banner2
3
4
5
6
7
8
9
10
11
12
13
14
15
16
17
18
19
20
21
22
23
24
25
26
27
28
- 其中,ProductList.jsx
import React from 'react'

class ProductList extends React.Component {

  constructor(props) {
    super(props);
    this.state = {
      message: "我是 ProductList 组件"
    }
  }

  render() {
    console.log('ProductList', this)
    const {message} = this.state
    /* 子组件中通过 this.props 获取 */
    const {productList} = this.props
    return (
      <div style={{backgroundColor: 'lightsalmon', padding: '20px', border: "1px solid black"}}>
        <h2>{message}</h2>
        <ul>
          {
            productList.map(item => <li key={item}>{item}</li>)
          }
        </ul>
      </div>
    )
  }
}

export default ProductList2
3
4
5
6
7
8
9
10
11
12
13
14
15
16
17
18
19
20
21
22
23
24
25
26
27
28
29
30
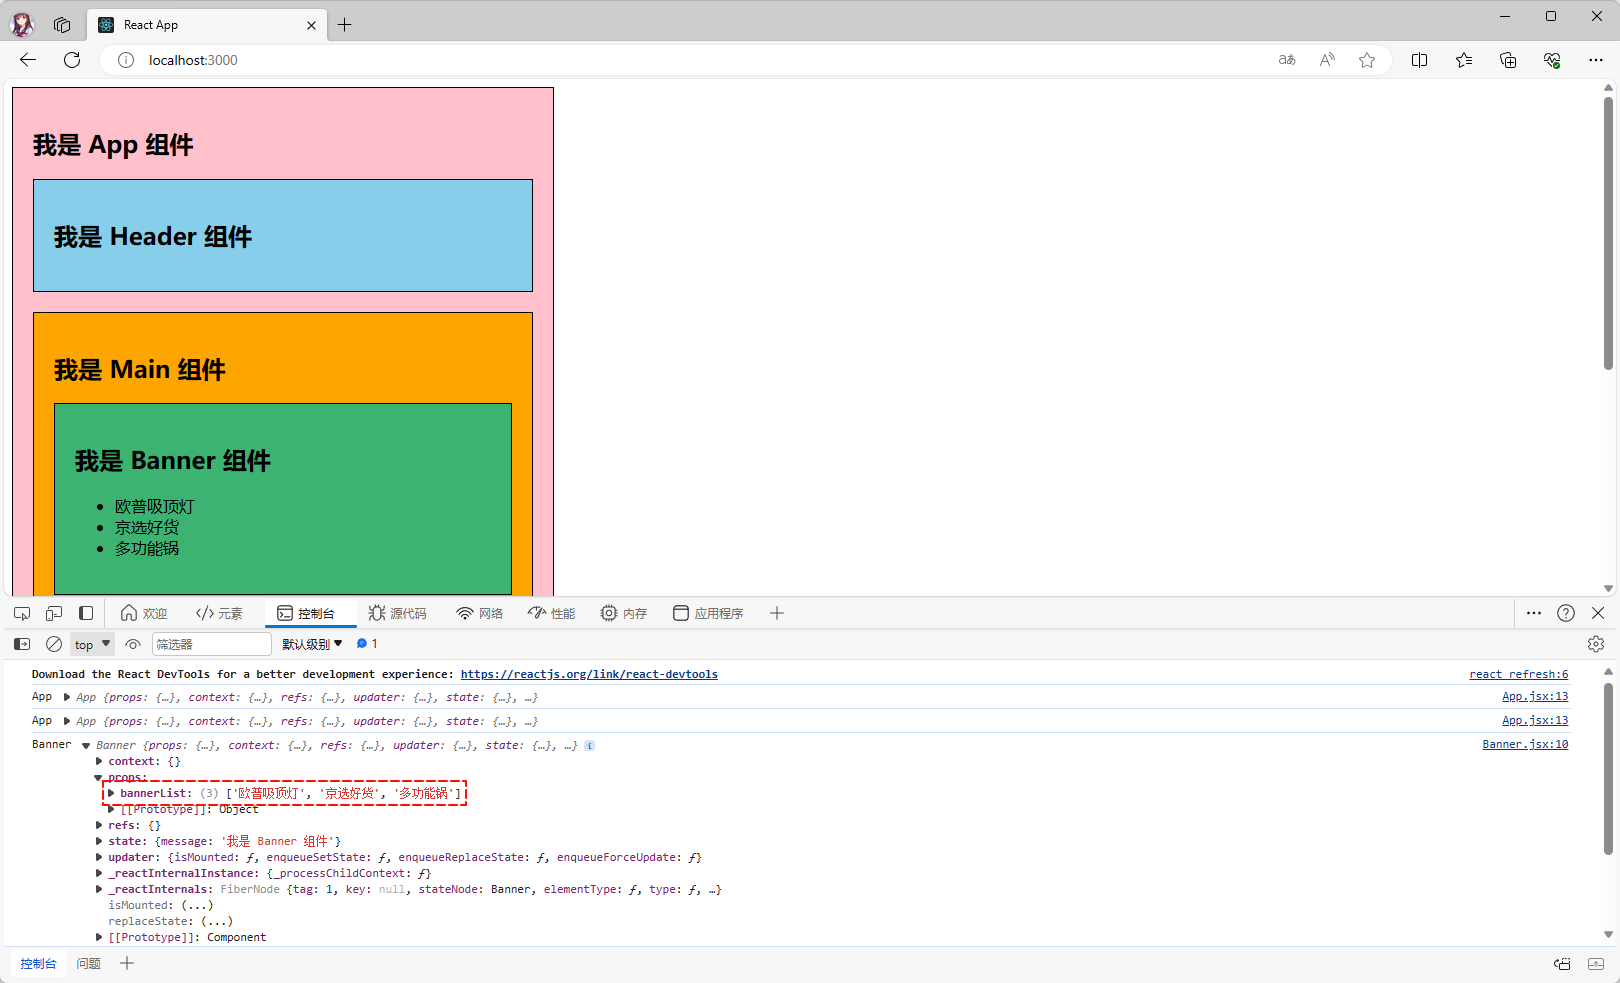
- 我们可以通过
浏览器的控制台来验证,是否子组件的this中的props属性中保存了父组件传递过来的数据:
- 我们也说了,React 支持
类组件和函数式组件;那么,在函数式组件中怎么写?函数式组件可没有 this 的,其实就是在函数式组件的方式中声明即可,改造下ProductList.jsx,如下所示:
import {useState} from "react";

function ProductList(props) {

  // 提前使用下 hooks ,可以忽略;暂时不重要
  const [message] = useState("我是ProductList组件")

  /* 函数式组件中通过 props 参数获取 */
  const {productList} = props

  console.log('ProductList', this)

  return (
    <div style={{backgroundColor: 'lightsalmon', padding: '20px', border: "1px solid black"}}>
      <h2>{message}</h2>
      <ul>
        {
          productList.map(item => <li key={item}>{item}</li>)
        }
      </ul>
    </div>
  )
}


export default ProductList2
3
4
5
6
7
8
9
10
11
12
13
14
15
16
17
18
19
20
21
22
23
24
25
26
- 我们可以通过
浏览器的控制台来验证,函数式组件可没有this的,或者this就是undefined:
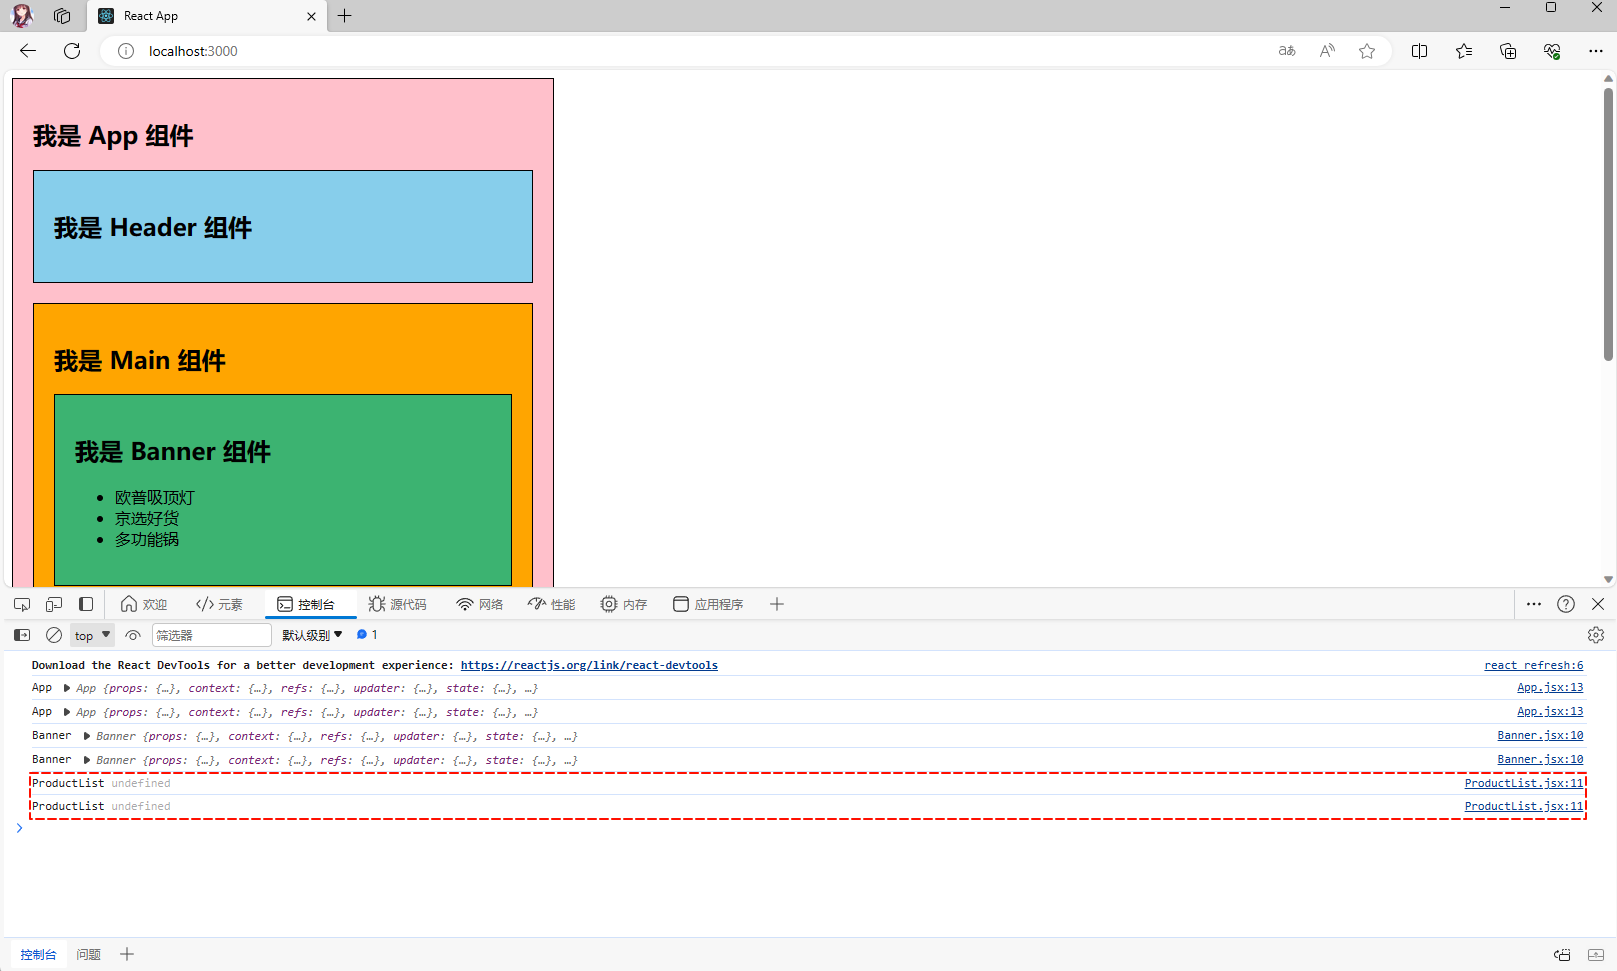
注意⚠️:在 React 中,函数式组件和类式组件的行为是不同的,因此它们对于
this的处理也不同。
- ① 在函数式组件中,
this是undefined。这是因为函数式组件是纯函数,它没有实例化过程,也没有自己的实例。因此,在函数式组件中,没有this关键字可用。- ② 相比之下,类式组件是通过类来定义的,它会被实例化为组件的对象。在类式组件中,
this指向当前组件的实例,可以用于访问组件的属性和方法。
- 总结:
- 在函数式组件中,可以使用
props参数来获取传递给组件的属性值,而不需要使用this.props。 - 类式组件中,可以通过
this.props来访问传递给组件的属性值。
- 在函数式组件中,可以使用
3.2.3 使用 PropTypes 进行类型检查(可选)
- 有的时候,我们需要对 props 进行类型检查,如果在没有 TypeScript 等类型系统的情况下,React 也内置了类型检查的功能。
- 为了解耦,React 在 v15.5 之后,将类型检查移入到了
prop-types包;所以,我们在项目中,需要手动导入:
npm i prop-types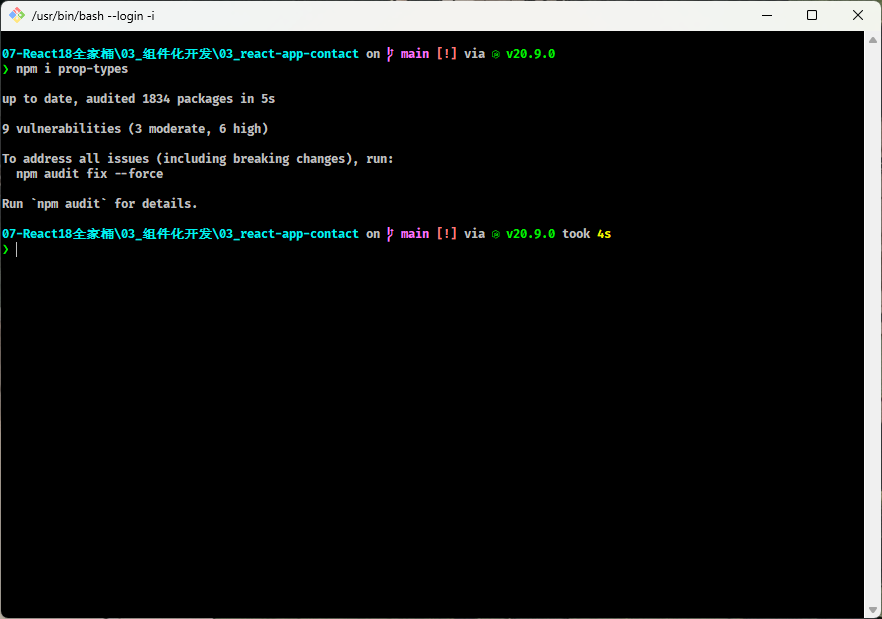
注意⚠️:处于性能方面的考虑,propTypes 仅仅在开发模式中进行检查。
- 如果要在组件上的 props 上进行类型检查,我们只需要配置
propTypes属性即可。 - 对于函数式组件而言,直接在函数身上添加
propTypes属性即可:
import {useState} from "react"
// 引入 PropTypes
import PropTypes from "prop-types"

function ProductList(props) {

  // 提前使用下 hooks ,可以忽略;暂时不重要
  const [message] = useState("我是ProductList组件")

  /* 函数式组件中通过 props 参数获取 */
  const {productList} = props

  console.log('ProductList', this)

  return (
    <div style={{backgroundColor: 'lightsalmon', padding: '20px', border: "1px solid black"}}>
      <h2>{message}</h2>
      <ul>
        {
          productList.map(item => <li key={item}>{item}</li>)
        }
      </ul>
    </div>
  )
}

// 对 props 进行类型显示
// 格式:函数名.propTypes = {}
ProductList.propTypes = {
  // props 的属性名: 内置类型
  productList: PropTypes.array
}


export default ProductList2
3
4
5
6
7
8
9
10
11
12
13
14
15
16
17
18
19
20
21
22
23
24
25
26
27
28
29
30
31
32
33
34
35
- 我们也知道,ES6 中的类本质上就是为了取代 ES5 中函数作为构造函数的;换言之,本质上 ES6 中的类就是构造函数;构造函数是可以在身上添加属性和方法的;所以,
类式组件和函数式组件的用法相同:
import React from 'react'
// 引入 PropTypes
import PropTypes from "prop-types"
class Banner extends React.Component {

  state = {
    message: "我是 Banner 组件"
  }

  render() {
    console.log('Banner', this)
    const {message} = this.state
    /* 子组件中通过 this.props 获取 */
    const {bannerList} = this.props
    return (
      <div
        style={{backgroundColor: 'mediumseagreen', padding: '20px', marginBottom: '20px', border: "1px solid black"}}>
        <h2>{message}</h2>
        <ul>
          {
            bannerList.map(item => <li key={item}>{item}</li>)
          }
        </ul>
      </div>
    )
  }
}

// 对 props 进行类型显示
// 格式:函数名.propTypes = {}
Banner.propTypes = {
  // props 的属性名: 内置类型
  bannerList: PropTypes.array
}

export default Banner2
3
4
5
6
7
8
9
10
11
12
13
14
15
16
17
18
19
20
21
22
23
24
25
26
27
28
29
30
31
32
33
34
35
36
- 有的时候,为了程序的严谨,在父组件没有传递 props 的时候,我们希望组件内部可以提供默认的 props 值,只需要配置
defaultProps属性即可,类式组件和函数式组件的用法相同:
import React from 'react'
// 引入 PropTypes
import PropTypes from "prop-types"
class Banner extends React.Component {

  state = {
    message: "我是 Banner 组件"
  }

  render() {
    console.log('Banner', this)
    const {message} = this.state
    /* 子组件中通过 this.props 获取 */
    const {bannerList,title} = this.props
    return (
      <div
        style={{backgroundColor: 'mediumseagreen', padding: '20px', marginBottom: '20px', border: "1px solid black"}}>
        <h2>{message}</h2>
        <h2>{title}</h2>
        <ul>
          {
            bannerList.map(item => <li key={item}>{item}</li>)
          }
        </ul>
      </div>
    )
  }
}

// 对 props 进行类型显示
// 格式:函数名.propTypes = {}
Banner.propTypes = {
  // props 的属性名: 内置类型
  bannerList: PropTypes.array
}

// 默认 Props 值
Banner.defaultProps = {
  title: "我是Banner的标题"
}

export default Banner2
3
4
5
6
7
8
9
10
11
12
13
14
15
16
17
18
19
20
21
22
23
24
25
26
27
28
29
30
31
32
33
34
35
36
37
38
39
40
41
42
import {useState} from "react"
// 引入 PropTypes
import PropTypes from "prop-types"

function ProductList(props) {

  // 提前使用下 hooks ,可以忽略;暂时不重要
  const [message] = useState("我是ProductList组件")

  /* 函数式组件中通过 props 参数获取 */
  const {productList,title} = props

  console.log('ProductList', this)

  return (
    <div style={{backgroundColor: 'lightsalmon', padding: '20px', border: "1px solid black"}}>
      <h2>{message}</h2>
      <h2>{title}</h2>
      <ul>
        {
          productList.map((item,index) => <li key={index}>{item}</li>)
        }
      </ul>
    </div>
  )
}

// 对 props 进行类型显示
// 格式:函数名.propTypes = {}
ProductList.propTypes = {
  // props 的属性名: 内置类型
  productList: PropTypes.array
}

// 默认 Props 值
ProductList.defaultProps = {
  title: "我是ProductList的标题"
}


export default ProductList2
3
4
5
6
7
8
9
10
11
12
13
14
15
16
17
18
19
20
21
22
23
24
25
26
27
28
29
30
31
32
33
34
35
36
37
38
39
40
41
- 在浏览器中,显示如下:
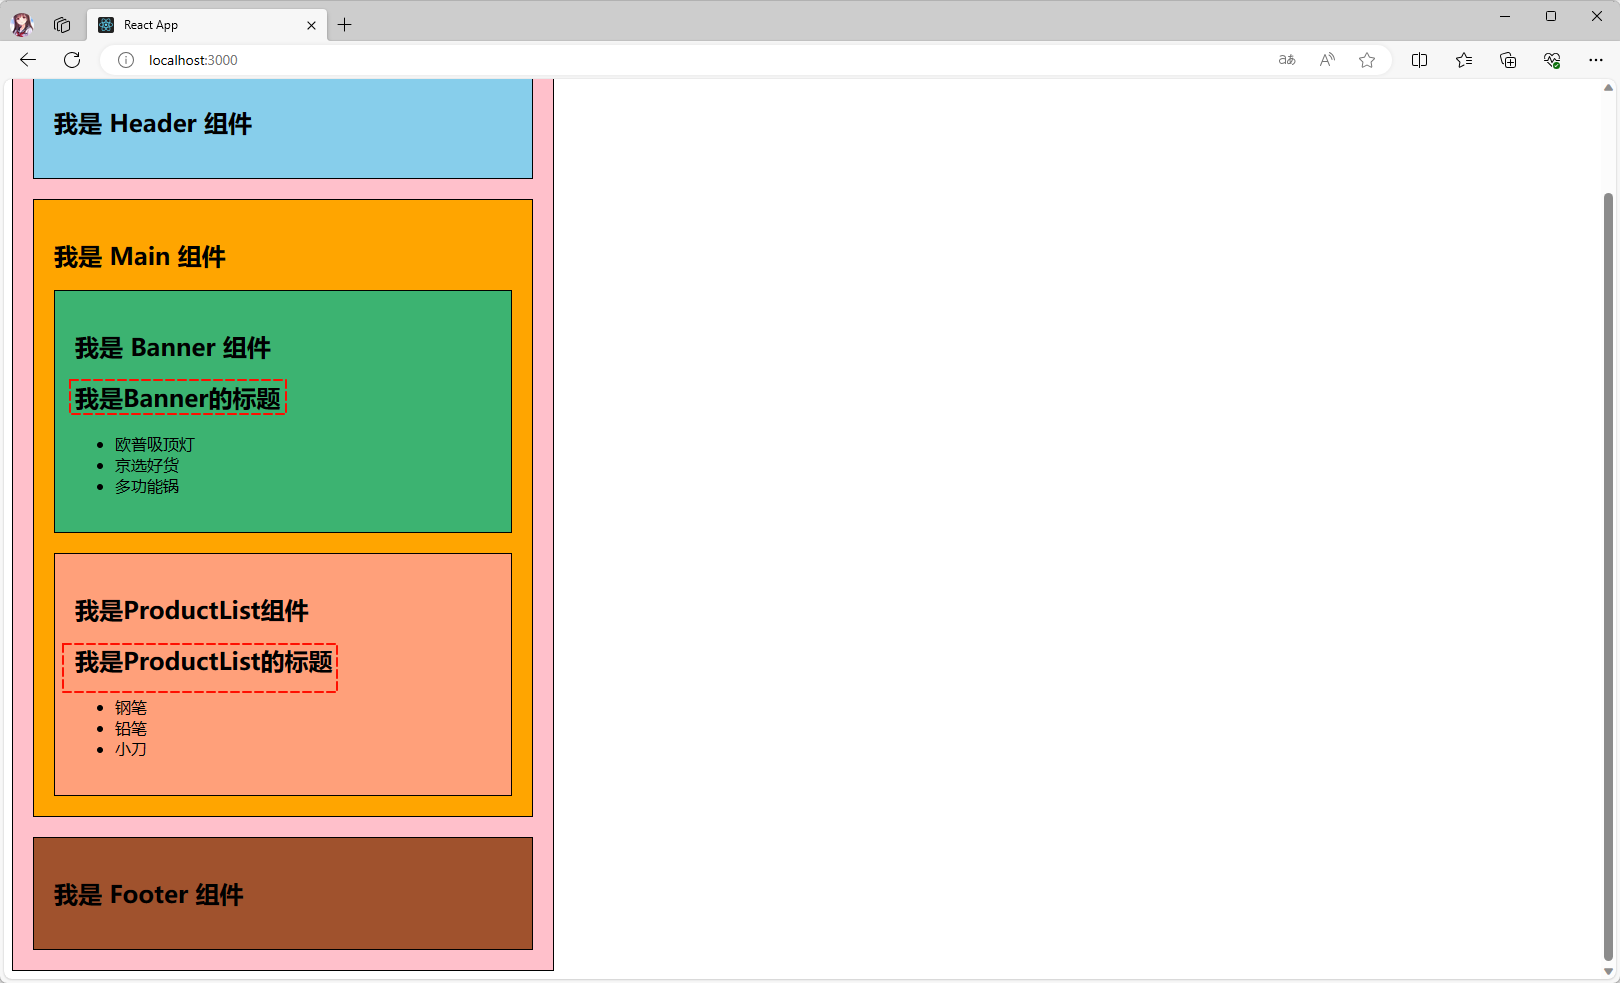
- 仅仅到这里,好像结束了;但是,不觉得下面的类组件,没有很好的体验类的封装性?
import React from 'react'
// 引入 PropTypes
import PropTypes from "prop-types"

class Banner extends React.Component {

  state = {
    message: "我是 Banner 组件"
  }

  render() {
    console.log('Banner', this)
    const {message} = this.state
    /* 子组件中通过 this.props 获取 */
    const {bannerList, title} = this.props
    return (
      <div
        style={{backgroundColor: 'mediumseagreen', padding: '20px', marginBottom: '20px', border: "1px solid black"}}>
        <h2>{message}</h2>
        <h2>{title}</h2>
        <ul>
          {
            bannerList.map((item, index) => <li key={index}>{item}</li>)
          }
        </ul>
      </div>
    )
  }
}

// 对 props 进行类型显示
// 格式:函数名.propTypes = {}
Banner.propTypes = {
  // props 的属性名: 内置类型
  bannerList: PropTypes.array
}

// 默认 Props 值
Banner.defaultProps = {
  title: "我是Banner的标题"
}

export default Banner2
3
4
5
6
7
8
9
10
11
12
13
14
15
16
17
18
19
20
21
22
23
24
25
26
27
28
29
30
31
32
33
34
35
36
37
38
39
40
41
42
43
- 根据面向对象的设计原则,一切都要以类为模板,为啥需要在类身上添加一些其他东西;换一种说法,这些的写法,在 Java、C++ 等语言上不支持。
- 从 ES2022 开始,ES 中的类也支持
静态属性(static);那么,我们就可以利用静态属性来优化代码:
import React from 'react'
// 引入 PropTypes
import PropTypes from "prop-types"

class Banner extends React.Component {

  static defaultProps = { // 默认 Props 值
    title: "我是Banner的标题"
  }

  static propTypes = { // 对 props 进行类型显示
    bannerList: PropTypes.array
  }

  state = {
    message: "我是 Banner 组件"
  }

  render() {
    console.log('Banner', this)
    const {message} = this.state
    /* 子组件中通过 this.props 获取 */
    const {bannerList, title} = this.props
    return (
      <div
        style={{backgroundColor: 'mediumseagreen', padding: '20px', marginBottom: '20px', border: "1px solid black"}}>
        <h2>{message}</h2>
        <h2>{title}</h2>
        <ul>
          {
            bannerList.map((item, index) => <li key={index}>{item}</li>)
          }
        </ul>
      </div>
    )
  }
}

export default Banner2
3
4
5
6
7
8
9
10
11
12
13
14
15
16
17
18
19
20
21
22
23
24
25
26
27
28
29
30
31
32
33
34
35
36
37
38
39
- 当然,PropTypes 提供了不同的验证器,如下所示:
import PropTypes from 'prop-types';

HelloWorld.propTypes = {
  // 你可以将属性声明为 JS 原生类型,默认情况下
  // 这些属性都是可选的。
  optionalArray: PropTypes.array,
  optionalBool: PropTypes.bool,
  optionalFunc: PropTypes.func,
  optionalNumber: PropTypes.number,
  optionalObject: PropTypes.object,
  optionalString: PropTypes.string,
  optionalSymbol: PropTypes.symbol,

  // 任何可被渲染的元素(包括数字、字符串、元素或数组)
  // (或 Fragment) 也包含这些类型。
  optionalNode: PropTypes.node,

  // 一个 React 元素。
  optionalElement: PropTypes.element,

  // 一个 React 元素类型(即,MyComponent)。
  optionalElementType: PropTypes.elementType,

  // 你也可以声明 prop 为类的实例,这里使用
  // JS 的 instanceof 操作符。
  optionalMessage: PropTypes.instanceOf(Message),

  // 你可以让你的 prop 只能是特定的值,指定它为
  // 枚举类型。
  optionalEnum: PropTypes.oneOf(['News', 'Photos']),

  // 一个对象可以是几种类型中的任意一个类型
  optionalUnion: PropTypes.oneOfType([
    PropTypes.string,
    PropTypes.number,
    PropTypes.instanceOf(Message)
  ]),

  // 可以指定一个数组由某一类型的元素组成
  optionalArrayOf: PropTypes.arrayOf(PropTypes.number),

  // 可以指定一个对象由某一类型的值组成
  optionalObjectOf: PropTypes.objectOf(PropTypes.number),

  // 可以指定一个对象由特定的类型值组成
  optionalObjectWithShape: PropTypes.shape({
    color: PropTypes.string,
    fontSize: PropTypes.number
  }),

  // An object with warnings on extra properties
  optionalObjectWithStrictShape: PropTypes.exact({
    name: PropTypes.string,
    quantity: PropTypes.number
  }),

  // 你可以在任何 PropTypes 属性后面加上 `isRequired` ,确保
  // 这个 prop 没有被提供时,会打印警告信息。
  requiredFunc: PropTypes.func.isRequired,

  // 任意类型的必需数据
  requiredAny: PropTypes.any.isRequired,

  // 你可以指定一个自定义验证器。它在验证失败时应返回一个 Error 对象。
  // 请不要使用 `console.warn` 或抛出异常,因为这在 `oneOfType` 中不会起作用。
  customProp: function(props, propName, componentName) {
    if (!/matchme/.test(props[propName])) {
      return new Error(
        'Invalid prop `' + propName + '` supplied to' +
        ' `' + componentName + '`. Validation failed.'
      );
    }
  },

  // 你也可以提供一个自定义的 `arrayOf` 或 `objectOf` 验证器。
  // 它应该在验证失败时返回一个 Error 对象。
  // 验证器将验证数组或对象中的每个值。验证器的前两个参数
  // 第一个是数组或对象本身
  // 第二个是他们当前的键。
  customArrayProp: PropTypes.arrayOf(function(propValue, key, componentName, location, propFullName) {
    if (!/matchme/.test(propValue[key])) {
      return new Error(
        'Invalid prop `' + propFullName + '` supplied to' +
        ' `' + componentName + '`. Validation failed.'
      );
    }
  })
};2
3
4
5
6
7
8
9
10
11
12
13
14
15
16
17
18
19
20
21
22
23
24
25
26
27
28
29
30
31
32
33
34
35
36
37
38
39
40
41
42
43
44
45
46
47
48
49
50
51
52
53
54
55
56
57
58
59
60
61
62
63
64
65
66
67
68
69
70
71
72
73
74
75
76
77
78
79
80
81
82
83
84
85
86
87
88
3.2.4 子传父
- 某些情况下,我们需要子组件向父组件中传入数据:
- 在 Vue 中是通过自定义事件来完成的。
- 但是,React 不一样,React 中依然是通过 props 来传递消息的;并且,React 让父组件给子组件传递一个回调函数,子组件调用这个回调函数即可。
- 需求:完成计数器的功能。
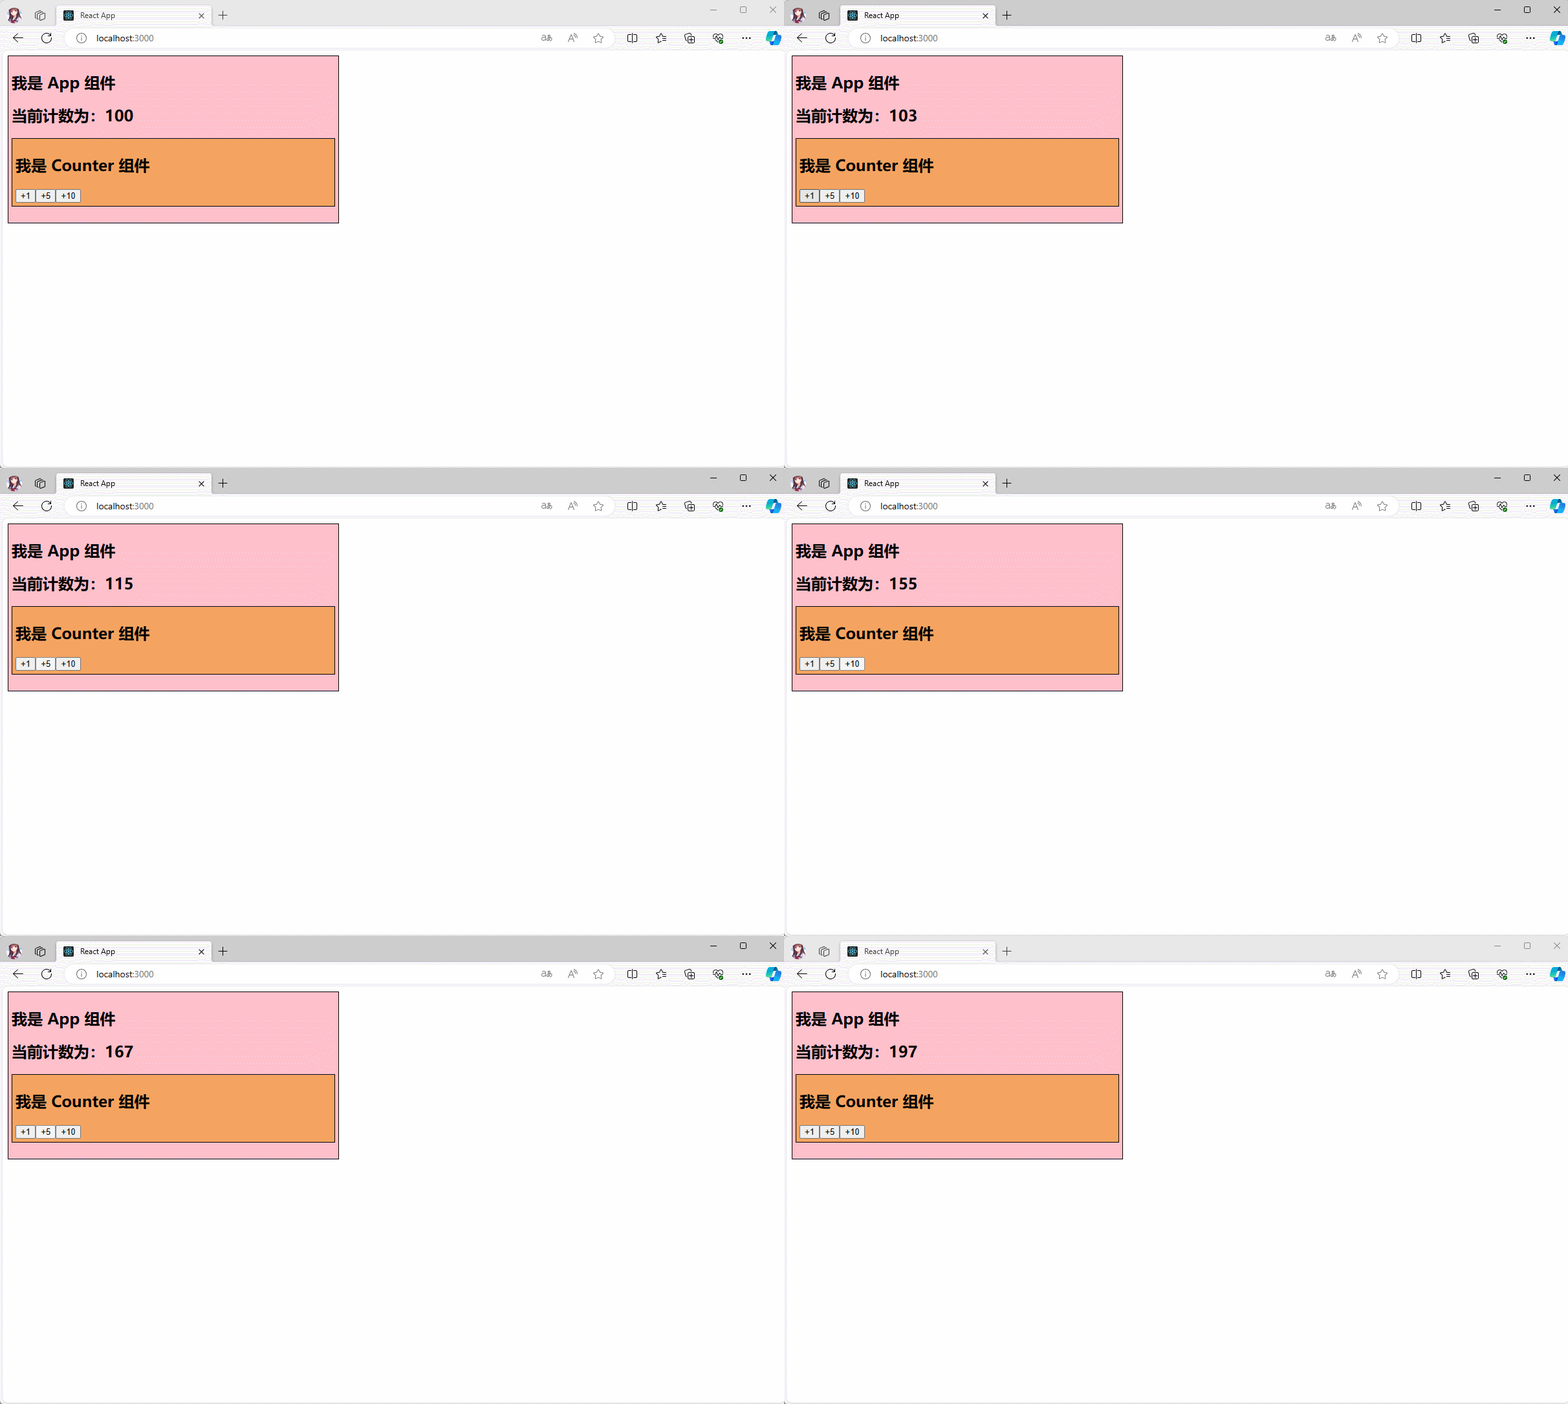
- 项目结构:
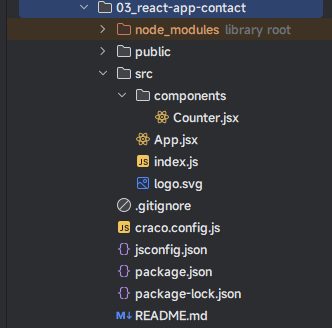
注意⚠️:在 App 组件中显示计数,在 Count 组件中实现点击按钮增加计数功能。
- ① 搭建基本结构,其中 App 组件和 Counter 组件的代码如下:
import React from 'react'
import Counter from "@/components/Counter"

class App extends React.Component {

  state = {
    message: "我是 App 组件",
    count: 100
  }

  render() {
    const {message, count} = this.state
    return (
      <div style={{backgroundColor: 'pink', width: "500px", padding: '5px', border: "1px solid black"}}>
        <h2>{message}</h2>
        <h2>{`当前计数为:${count}`}</h2>
        <Counter/>
      </div>
    )
  }
}

export default App2
3
4
5
6
7
8
9
10
11
12
13
14
15
16
17
18
19
20
21
22
23
import React from 'react'


class Counter extends React.Component {

  state = {
    message: "我是 Counter 组件"
  }

  render() {
    const {message} = this.state
    return (
      <div
        style={{backgroundColor: 'sandybrown', padding: '5px', marginBottom: '20px', border: "1px solid black"}}>
        <h2>{message}</h2>
        <button>+1</button>
        <button>+5</button>
        <button>+10</button>
      </div>
    )
  }
}

export default Counter2
3
4
5
6
7
8
9
10
11
12
13
14
15
16
17
18
19
20
21
22
23
24
- ② 在 React 中,props 非常灵活:
- 既可以传递普通数据,如:字符串、数值等:
import React from 'react'
import Counter from "@/components/Counter"

class App extends React.Component {

  state = {
    message: "我是 App 组件",
    count: 100
  }

  render() {
    const {message, count} = this.state
    return (
      <div style={{backgroundColor: 'pink', width: "500px", padding: '5px', border: "1px solid black"}}>
        <h2>{message}</h2>
        <h2>{`当前计数为:${count}`}</h2>
        {/* 通过 props 向子组件中传递普通值,如:字符串、数值和布尔类型等 */}
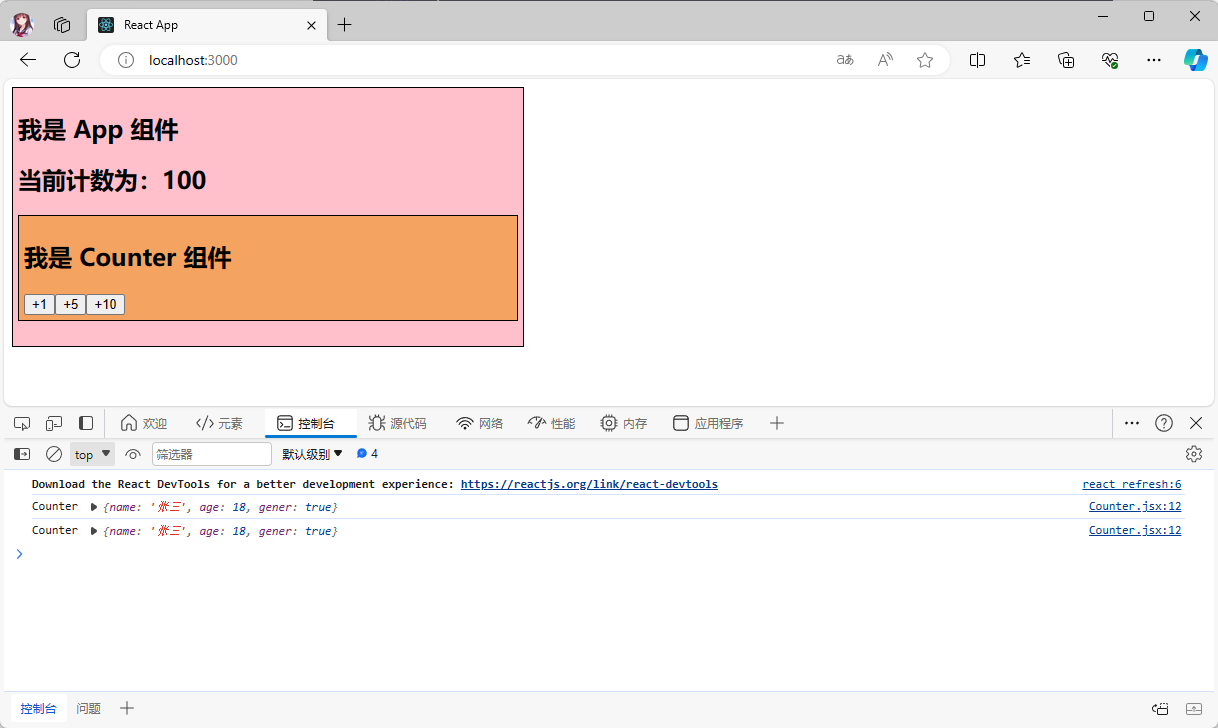
        <Counter name="张三" age={18} gener={true}/>
      </div>
    )
  }
}

export default App2
3
4
5
6
7
8
9
10
11
12
13
14
15
16
17
18
19
20
21
22
23
24
import React from 'react'


class Counter extends React.Component {

  state = {
    message: "我是 Counter 组件"
  }

  render() {
    const {message} = this.state
    console.log('Counter',this.props)
    return (
      <div
        style={{backgroundColor: 'sandybrown', padding: '5px', marginBottom: '20px', border: "1px solid black"}}>
        <h2>{message}</h2>
        <button>+1</button>
        <button>+5</button>
        <button>+10</button>
      </div>
    )
  }
}

export default Counter2
3
4
5
6
7
8
9
10
11
12
13
14
15
16
17
18
19
20
21
22
23
24
25
- 通过
浏览器的控制台,如下所示:
- 也可以传递函数:
import React from 'react'
import Counter from "@/components/Counter"

class App extends React.Component {

  state = {
    message: "我是 App 组件",
    count: 100
  }

  render() {
    const {message, count} = this.state
    return (
      <div style={{backgroundColor: 'pink', width: "500px", padding: '5px', border: "1px solid black"}}>
        <h2>{message}</h2>
        <h2>{`当前计数为:${count}`}</h2>
        {/* 通过 props 向子组件中传递函数*/}
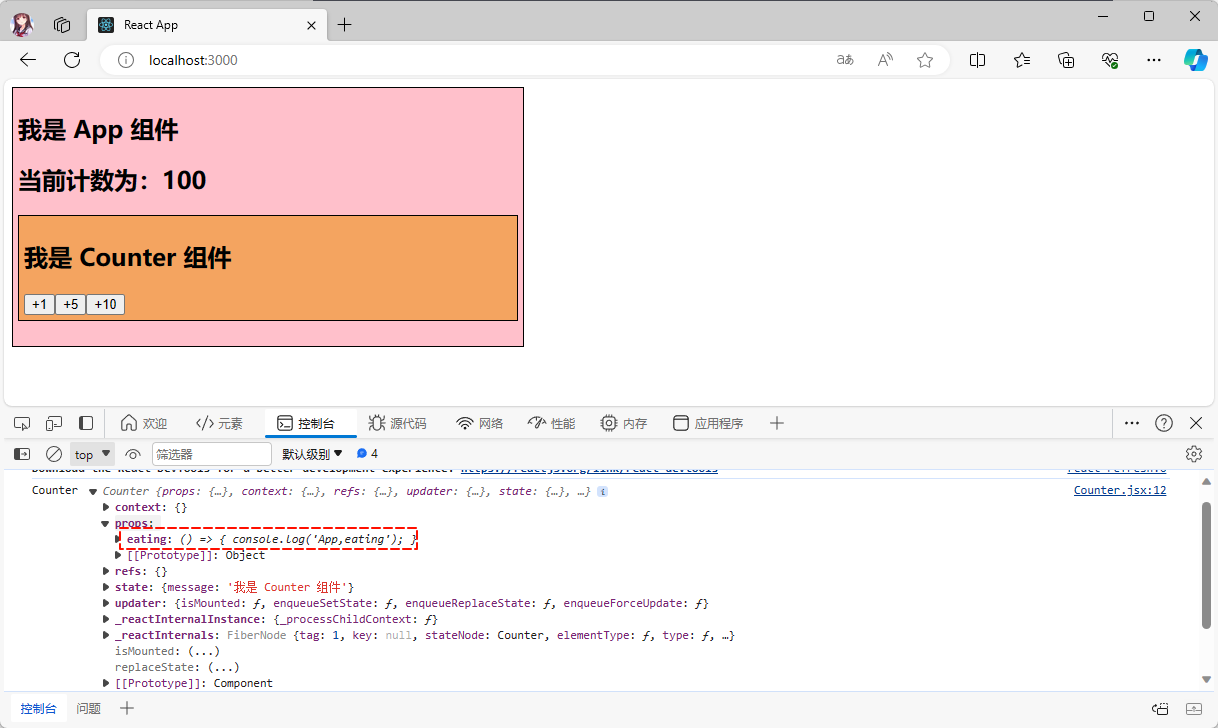
        <Counter eating={() => {console.log('App,eating')}}/>
      </div>
    )
  }
}

export default App2
3
4
5
6
7
8
9
10
11
12
13
14
15
16
17
18
19
20
21
22
23
24
import React from 'react'


class Counter extends React.Component {

  state = {
    message: "我是 Counter 组件"
  }

  render() {
    const {message} = this.state
    console.log('Counter',this)
    return (
      <div
        style={{backgroundColor: 'sandybrown', padding: '5px', marginBottom: '20px', border: "1px solid black"}}>
        <h2>{message}</h2>
        <button>+1</button>
        <button>+5</button>
        <button>+10</button>
      </div>
    )
  }
}

export default Counter2
3
4
5
6
7
8
9
10
11
12
13
14
15
16
17
18
19
20
21
22
23
24
25
- 通过
浏览器的控制台,如下所示:
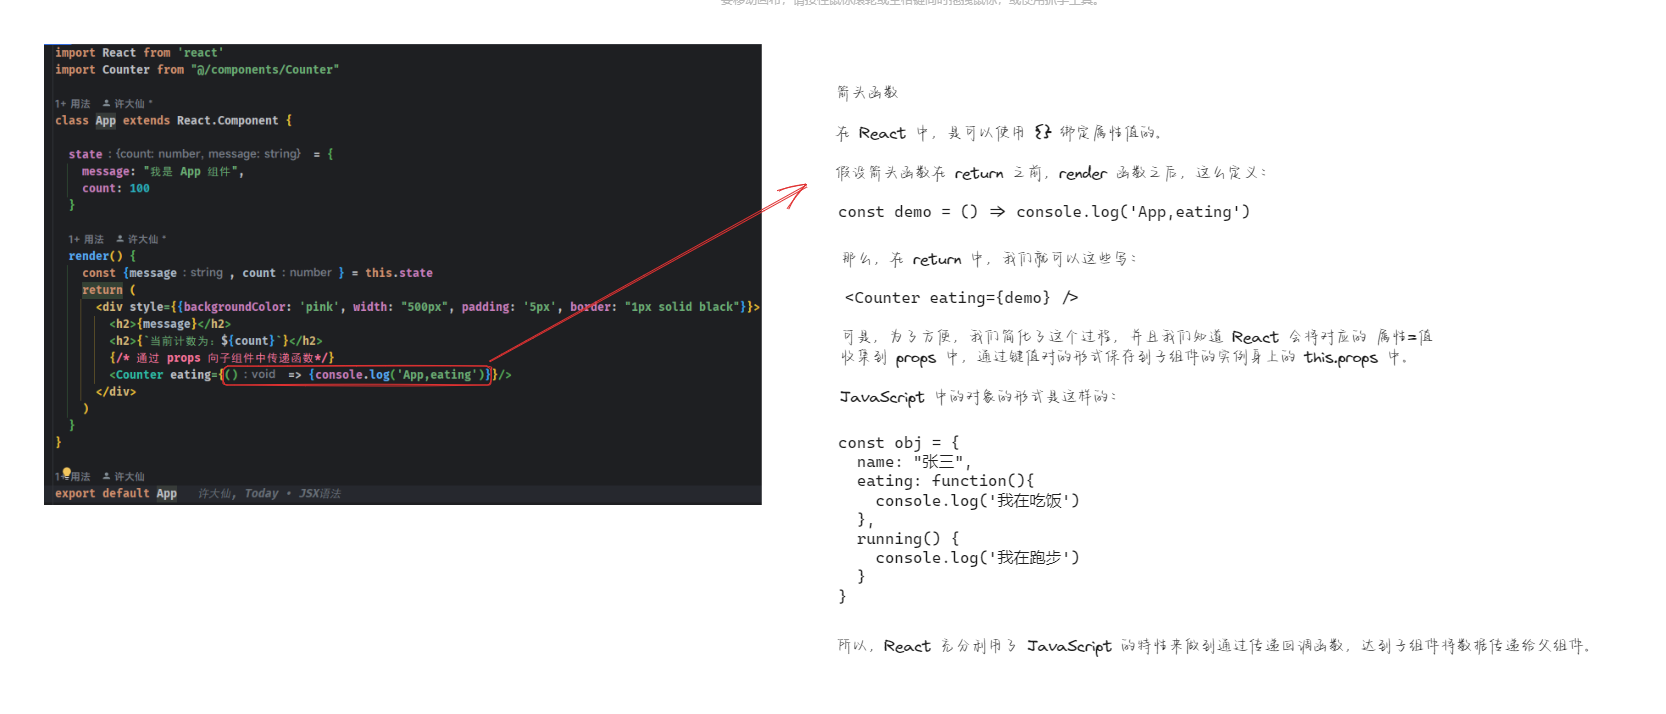
- 可能,会有人疑惑?为什么可以这么传递?请看我的解释:
- ③ 父组件传递的 props 的 eating 不够见名知意,我们修改下:
import React from 'react'
import Counter from "@/components/Counter"

class App extends React.Component {

  state = {
    message: "我是 App 组件",
    count: 100
  }

  render() {
    const {message, count} = this.state
    return (
      <div style={{backgroundColor: 'pink', width: "500px", padding: '5px', border: "1px solid black"}}>
        <h2>{message}</h2>
        <h2>{`当前计数为:${count}`}</h2>
        {/* 通过 props 向子组件中传递函数*/}
        <Counter addClick={() => {console.log('App,eating')}}/>
      </div>
    )
  }
}

export default App2
3
4
5
6
7
8
9
10
11
12
13
14
15
16
17
18
19
20
21
22
23
24
- 此时,我们就可以在子组件中,给按钮绑定事件:
import React from 'react'


class Counter extends React.Component {

  state = {
    message: "我是 Counter 组件"
  }

  addCount(num) {
    console.log('Counter addCount', num, this)
  }

  render() {
    const {message} = this.state
    console.log('Counter', this)
    return (
      <div
        style={{backgroundColor: 'sandybrown', padding: '5px', marginBottom: '20px', border: "1px solid black"}}>
        <h2>{message}</h2>
        {/* 给按钮绑定了点击事件 */}
        <button onClick={() => this.addCount(1)}>+1</button>
        <button onClick={() => this.addCount(5)}>+5</button>
        <button onClick={() => this.addCount(10)}>+10</button>
      </div>
    )
  }
}

export default Counter2
3
4
5
6
7
8
9
10
11
12
13
14
15
16
17
18
19
20
21
22
23
24
25
26
27
28
29
30
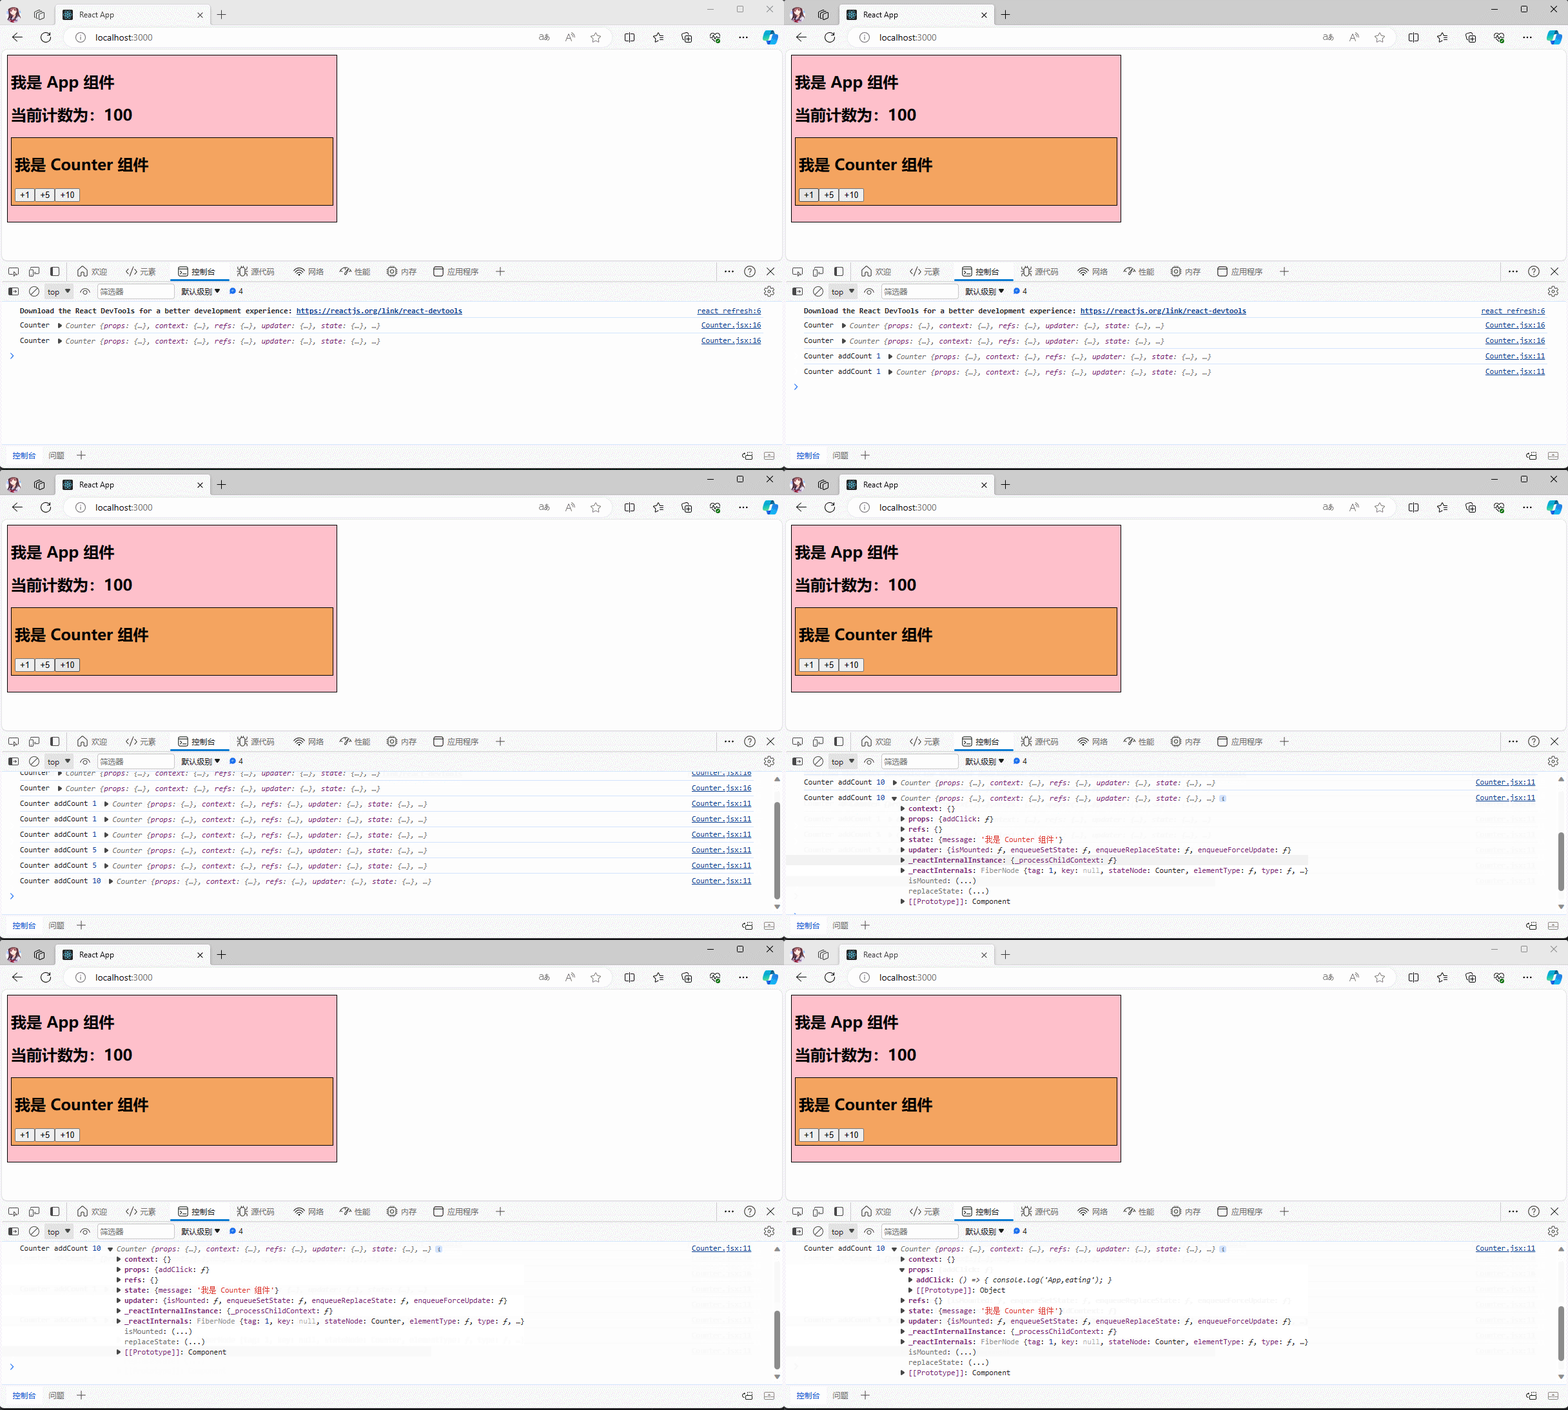
- 通过
浏览器的控制台,如下所示:
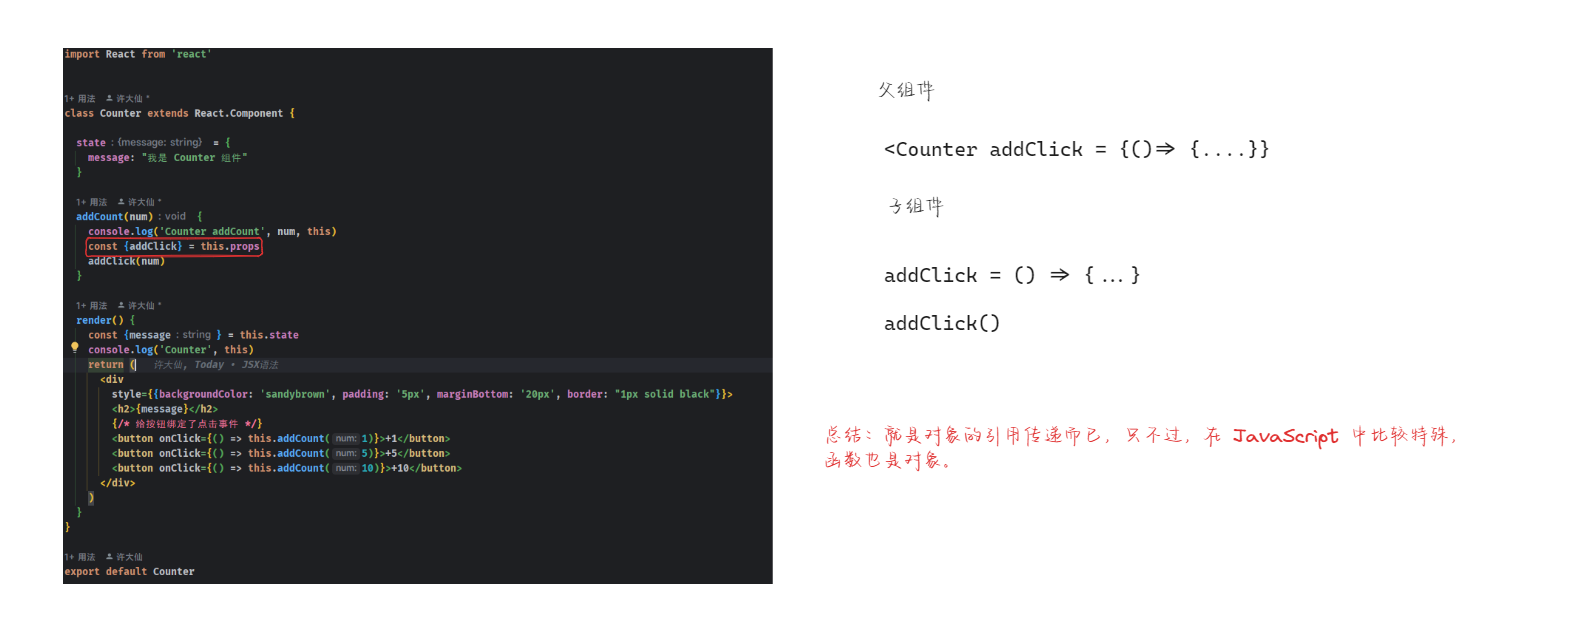
- ④ 我们知道,父组件是将回调函数通过 props 传递给子元素,子组件就可以通过回调函数来传递数值了:
import React from 'react'


class Counter extends React.Component {

  state = {
    message: "我是 Counter 组件"
  }

  addCount(num) {
    console.log('Counter addCount', num, this)
    const {addClick} = this.props
    addClick(num)
  }

  render() {
    const {message} = this.state
    console.log('Counter', this)
    return (
      <div
        style={{backgroundColor: 'sandybrown', padding: '5px', marginBottom: '20px', border: "1px solid black"}}>
        <h2>{message}</h2>
        {/* 给按钮绑定了点击事件 */}
        <button onClick={() => this.addCount(1)}>+1</button>
        <button onClick={() => this.addCount(5)}>+5</button>
        <button onClick={() => this.addCount(10)}>+10</button>
      </div>
    )
  }
}

export default Counter2
3
4
5
6
7
8
9
10
11
12
13
14
15
16
17
18
19
20
21
22
23
24
25
26
27
28
29
30
31
32
- 类似于:
- ④ 父组件,就可以修改代码,来获取子组件传递过来的数据了:
import React from 'react'
import Counter from "@/components/Counter"

class App extends React.Component {

  state = {
    message: "我是 App 组件",
    count: 100
  }

  render() {
    const {message, count} = this.state
    return (
      <div style={{backgroundColor: 'pink', width: "500px", padding: '5px', border: "1px solid black"}}>
        <h2>{message}</h2>
        <h2>{`当前计数为:${count}`}</h2>
        {/* 通过 props 向子组件中传递函数*/}
        <Counter addClick={(num) => {
          console.log(`App组件,${num}`)
        }}/>
      </div>
    )
  }
}

export default App2
3
4
5
6
7
8
9
10
11
12
13
14
15
16
17
18
19
20
21
22
23
24
25
26
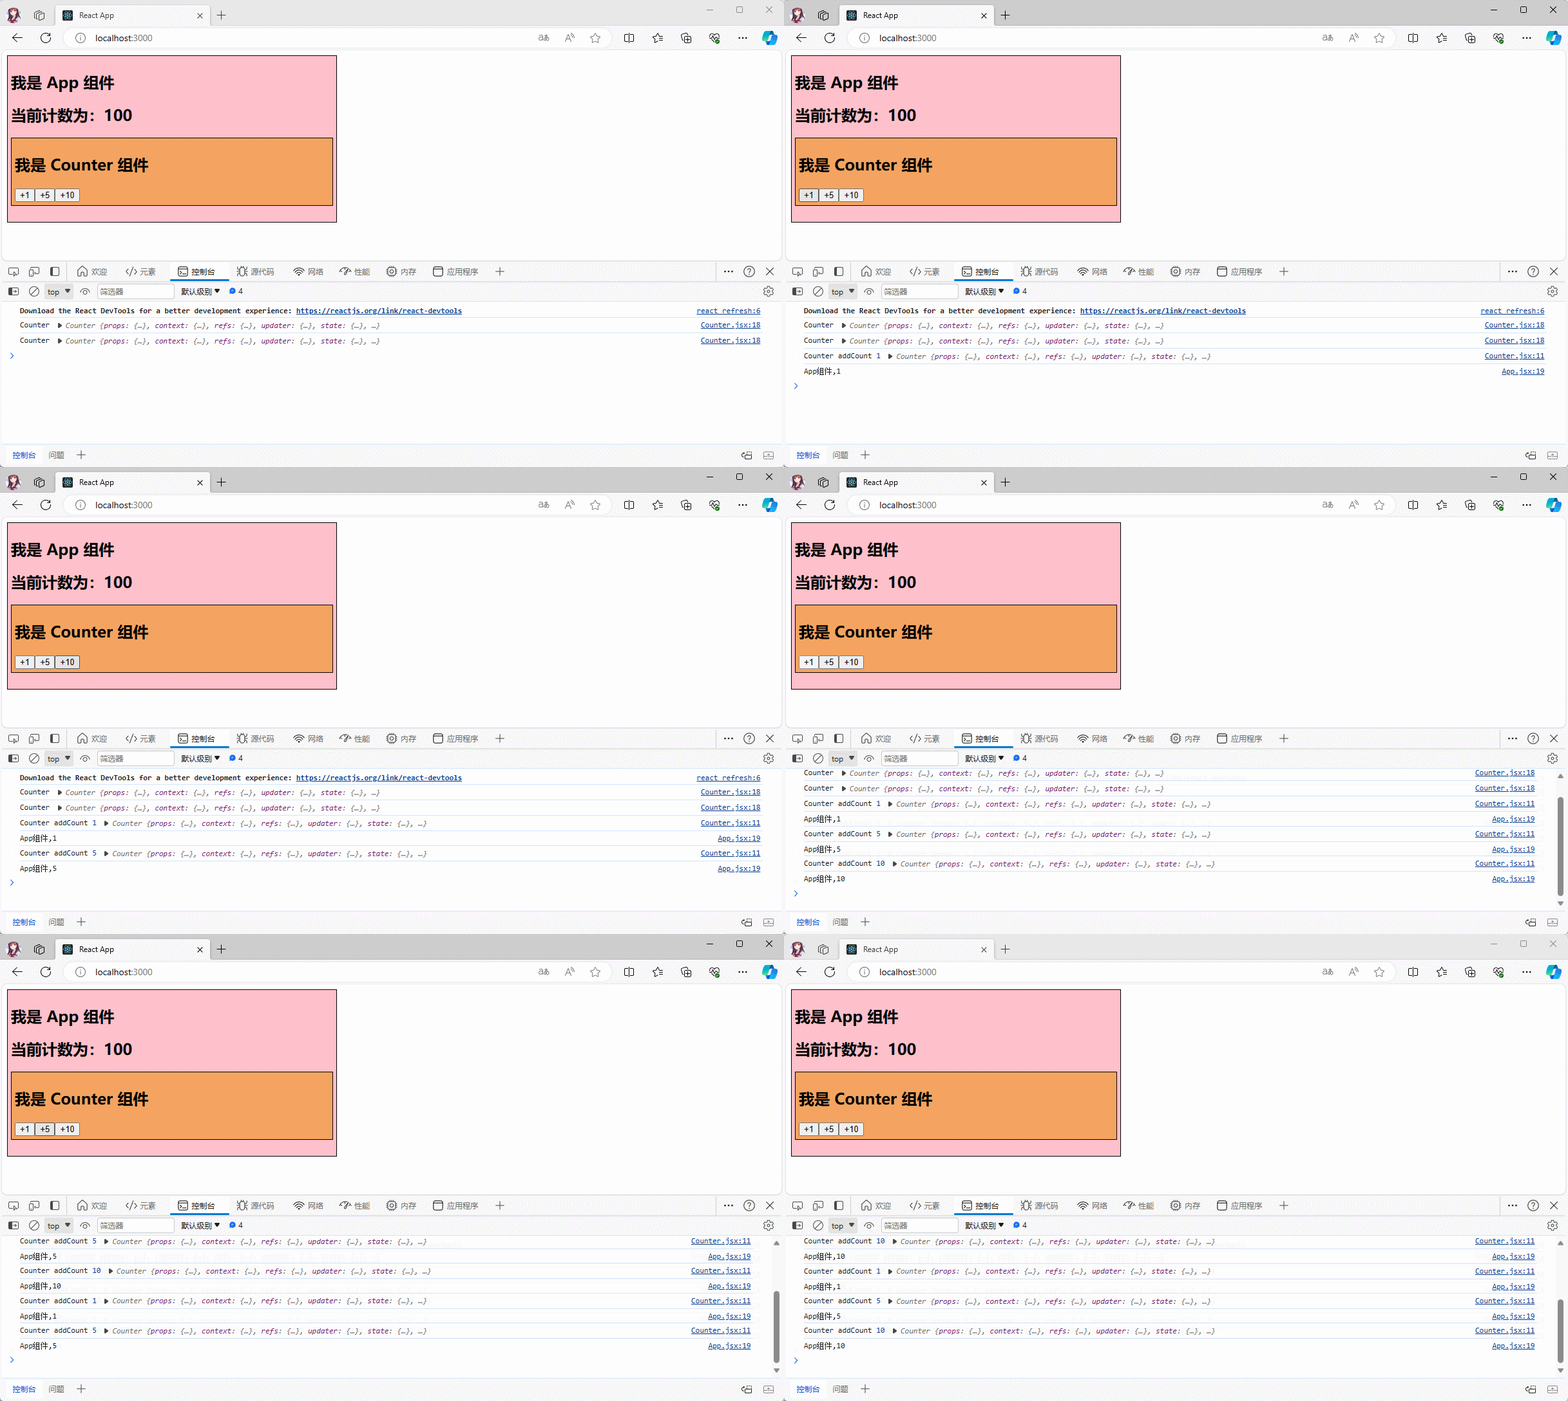
- 通过
浏览器的控制台,如下所示:
- ⑤ 修改父组件,让其在子组件传递数据的时候,修改 state 中的数据:
import React from 'react'
import Counter from "@/components/Counter"

class App extends React.Component {

  state = {
    message: "我是 App 组件",
    count: 100
  }

  increment(num) {
    this.setState({
      count: this.state.count + num
    })
  }

  render() {
    const {message, count} = this.state
    return (
      <div style={{backgroundColor: 'pink', width: "500px", padding: '5px', border: "1px solid black"}}>
        <h2>{message}</h2>
        <h2>{`当前计数为:${count}`}</h2>
        {/* 通过 props 向子组件中传递函数*/}
        <Counter addClick={(num) => this.increment(num)}/>
      </div>
    )
  }
}

export default App2
3
4
5
6
7
8
9
10
11
12
13
14
15
16
17
18
19
20
21
22
23
24
25
26
27
28
29
30
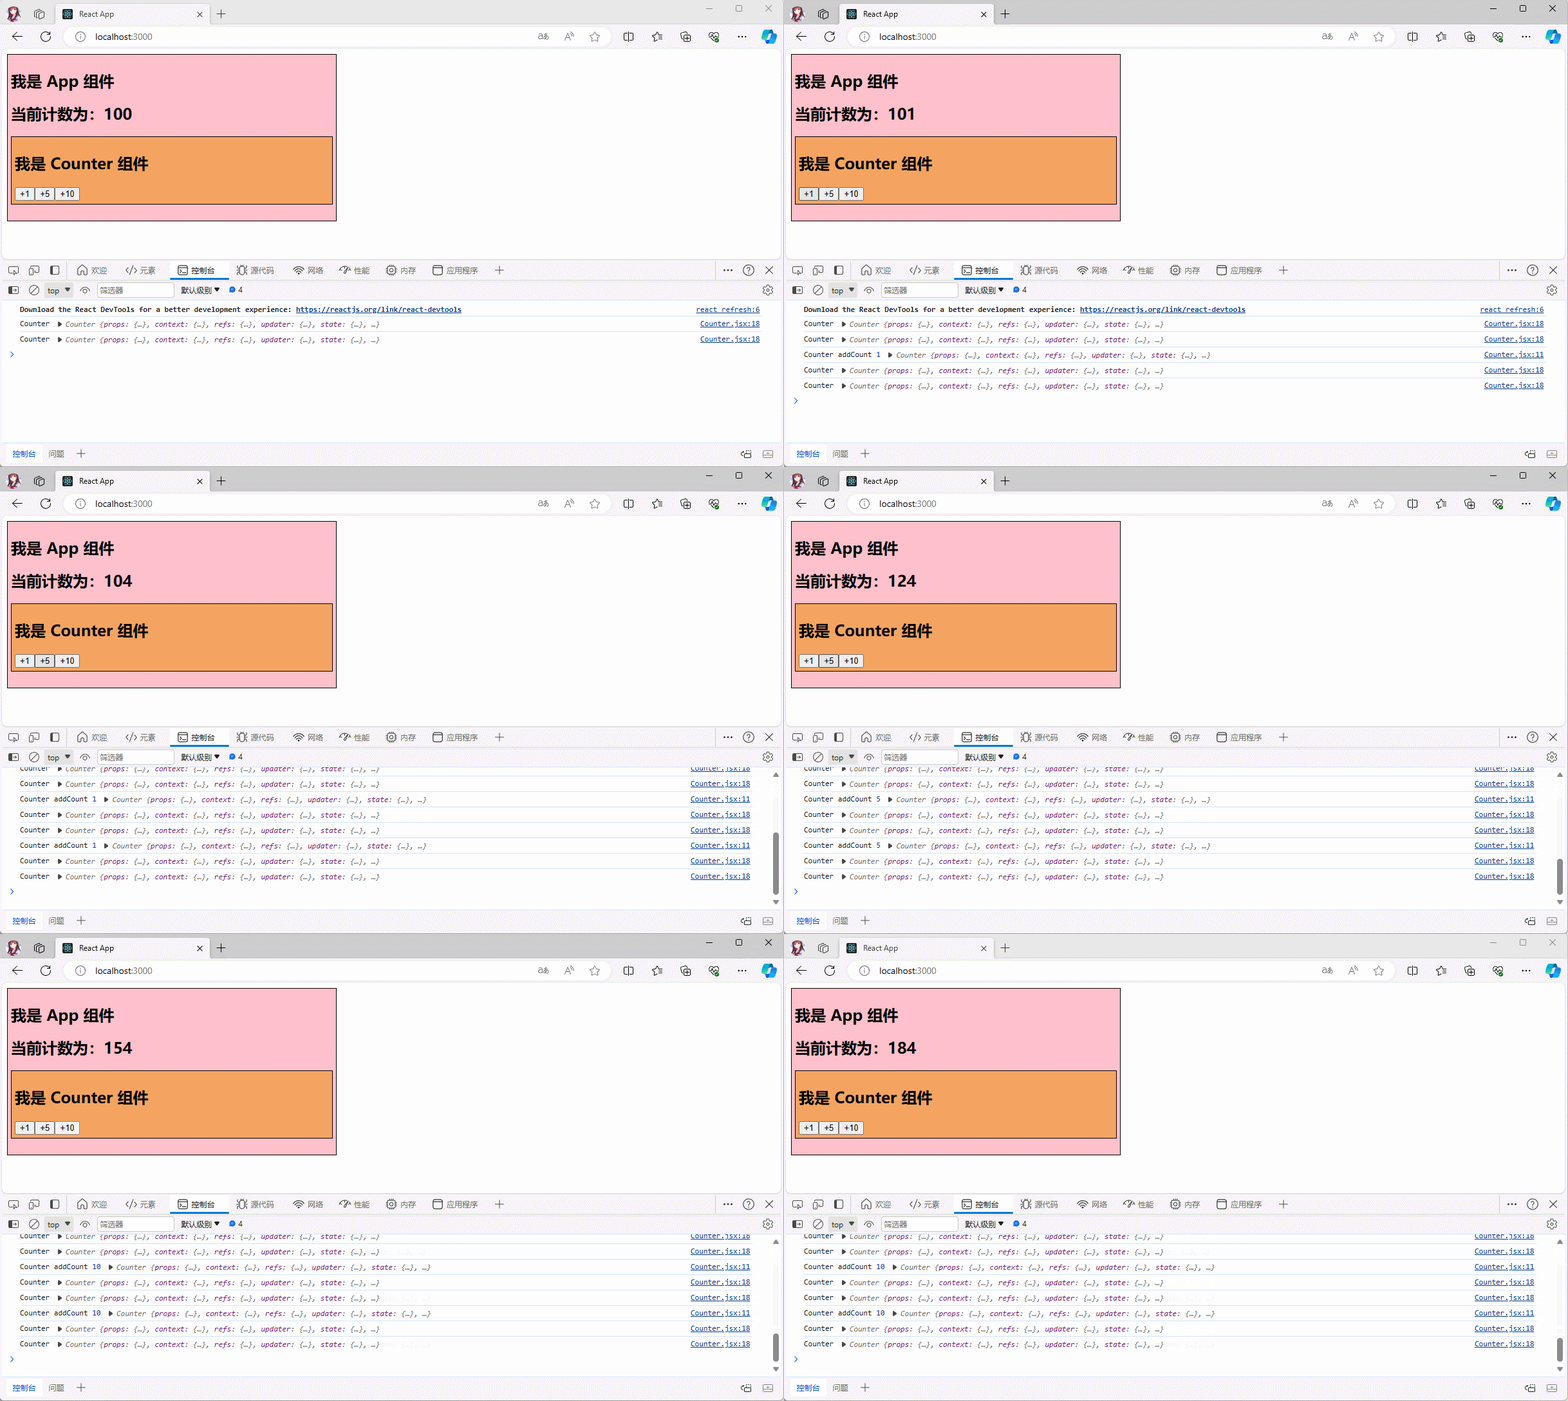
- 通过
浏览器的控制台,如下所示:
3.3 案例(⭐)
- 需求:实现 tabs 栏的切换。
- 要求:
- ① 数据在父组件中,通过 props 传递到子组件中,由子组件渲染数据。
- ② 当点击 tab 的时候,在父组件中,显示对应的标题。
- 项目结构:
- 示例:
- 其中,App.jsx
import React from 'react'
import Tabs from "@/components/Tabs";

class App extends React.Component {

  state = {
    titles: ['流行', '新款', '精选'],
    tabIndex: 0
  }

  activeTabIndex(index){
    this.setState({
      tabIndex: index
    })
  }

  render() {
    const {titles, tabIndex} = this.state
    return (
      <div style={{padding: '20px'}}>
        <Tabs titles={titles} tabClick={(index) => this.activeTabIndex(index)}/>
        <h2>{titles[tabIndex]}</h2>
      </div>
    )
  }
}

export default App2
3
4
5
6
7
8
9
10
11
12
13
14
15
16
17
18
19
20
21
22
23
24
25
26
27
28
- 其中,Tabs.jsx
import React from 'react'
import '@/components/Tabs.css'

class Tabs extends React.Component {

  state = {
    currentIndex: 0
  }

  itemClick(index){
    this.setState({
      currentIndex: index
    })

    const {tabClick} = this.props
    tabClick(index)
  }

  render() {
    const {titles} = this.props
    const {currentIndex} = this.state
    return (
      <div>
        <ul className="tabs">
          {
            titles.map((item, index) => <li key={index} className={currentIndex === index ? 'active' : ''} onClick={() => this.itemClick(index)}>
              <span className="text">{item}</span>
            </li>)
          }
        </ul>
      </div>
    )
  }
}

export default Tabs2
3
4
5
6
7
8
9
10
11
12
13
14
15
16
17
18
19
20
21
22
23
24
25
26
27
28
29
30
31
32
33
34
35
36
- 其中,Tabs.css
* {
    margin: 0;
    padding: 0;
}

ul, li {
    list-style: none;
}

.tabs {
    display: flex;
    align-content: center;
    height: 40px;
    line-height: 40px;
    text-align: center;
}

.tabs li {
    flex: 1;
}

.active {
    color: red;
}

.active .text {
    padding: 3px;
    border-bottom: 3px solid red;
}2
3
4
5
6
7
8
9
10
11
12
13
14
15
16
17
18
19
20
21
22
23
24
25
26
27
28
29
第四章:React 组件的插槽用法
4.1 概述
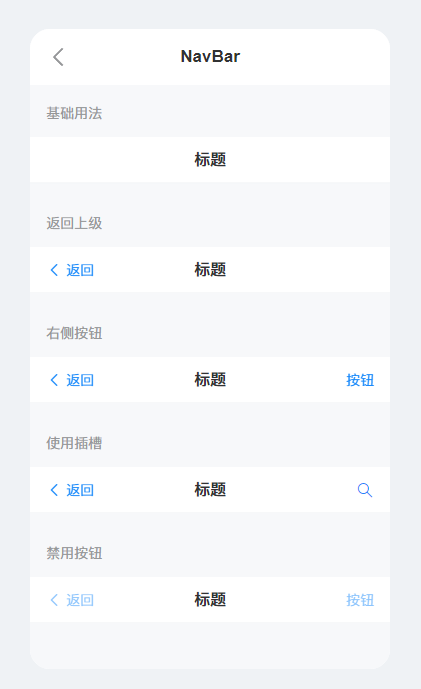
在之前的章节中,我们已经了解到组件能够接收任意类型的 JavaScript 值作为 props,但组件要如何接收模板内容呢?在某些场景中,我们可能想要为
子组件传递一些模板片段,让子组件在它们的组件中渲染这些片段。在移动端,最常见的就是
导航栏(NavBar)了:
- 我们应该让使用者决定某一块区域到底放什么内容;这种需求,在 Vue 中是通过
<slot></slot>固定的做法来完成的;那么,在 React 中如何实现? - 在 React 中实现插槽的情况非常灵活,有两种方案:
- ① 组件通过
props.children来获取组件的开始标签和结束标签之间的全部内容。 - ② 通过
props传递 React 元素。
- ① 组件通过
注意⚠️:其实,在 React 中是没有插槽的概念的;但是,在 React 中,我们可以模拟出插槽的效果;毕竟,React 太灵活了。
4.2 props.children 实现插槽(⭐)
4.2.1 概述
- 每个组件都可以获取到
props.children。它包含组件的开始标签和结束标签之间的内容。例如:
<Welcome>Hello world!</Welcome>- 在
Welcome组件中获取props.children,就可以得到字符串Hello world!:
class Welcome extends React.Component {
  render() {
    return <p>{this.props.children}</p>;
  }
}2
3
4
5
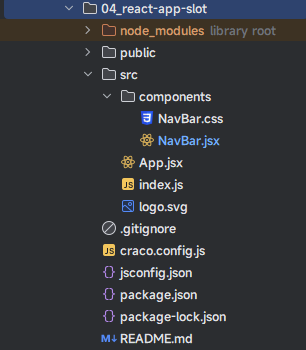
4.2.2 手动实现 NavBar
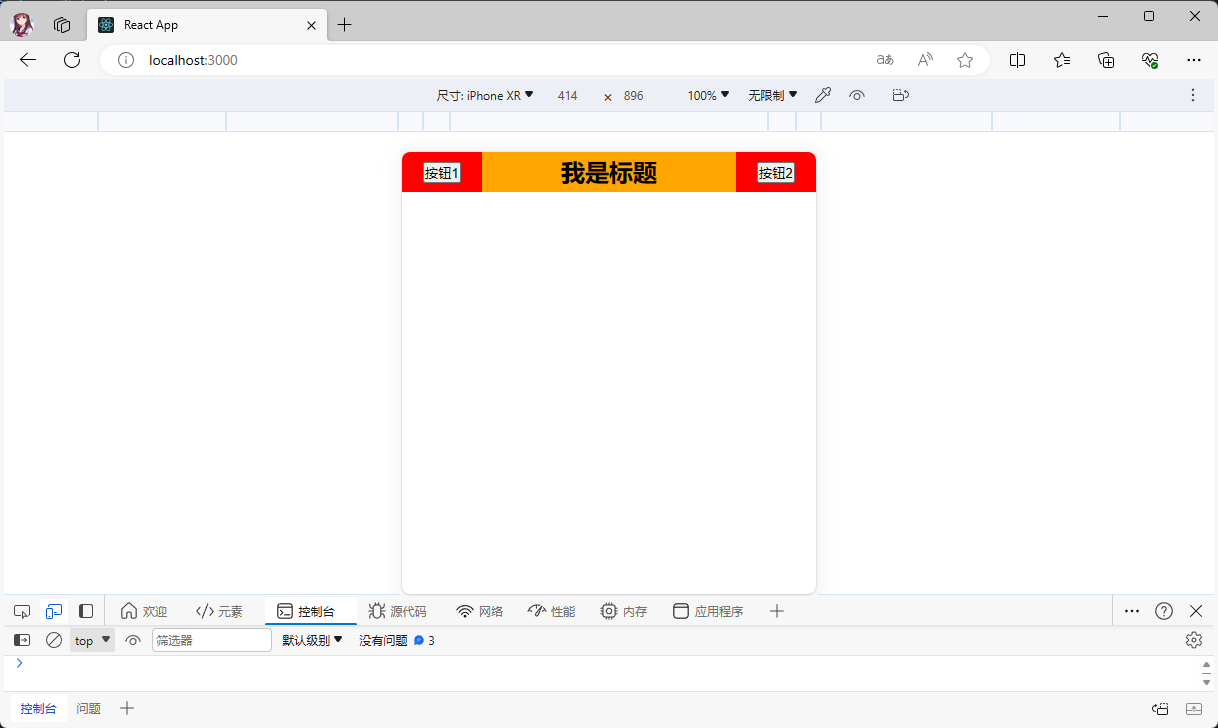
- 需求:在 App 组件中使用 NavBar 组件,并传入按钮和标题等元素。
- 项目结构:
- 基础功能搭建:
- 其中,App.jsx
import React from 'react'
import Navbar from "@/components/NavBar";

class App extends React.Component {

  state = {
    message: '我是App组件'
  }

  render() {
    console.log('App', this, this.state.message)
    return (
      <div>
        <Navbar></Navbar>
      </div>
    )
  }
}

export default App2
3
4
5
6
7
8
9
10
11
12
13
14
15
16
17
18
19
20
- 其中,NavBar.jsx
import React from 'react'
import '@/components/NavBar.css'

class Navbar extends React.Component {

  state = {
    message: '我是 NavBar 组件'
  }

  render() {
    console.log('Navbar', this, this.state.message, this.props)
    return (
      <div className={"nav-bar"}>
        <div className="left">左边</div>
        <div className="center">中间</div>
        <div className="right">右边</div>
      </div>
    )
  }
}

export default Navbar2
3
4
5
6
7
8
9
10
11
12
13
14
15
16
17
18
19
20
21
22
- 其中,Navbar.css
* {
    margin: 0;
    padding: 0;
}

.nav-bar {
    display: flex;
    height: 40px;
    line-height: 40px;
    text-align: center;
}

.nav-bar .left,.right {
    width: 80px;
    background-color: #f00;
}

.nav-bar .center {
    flex: 1;
    background-color: orange;
}2
3
4
5
6
7
8
9
10
11
12
13
14
15
16
17
18
19
20
21
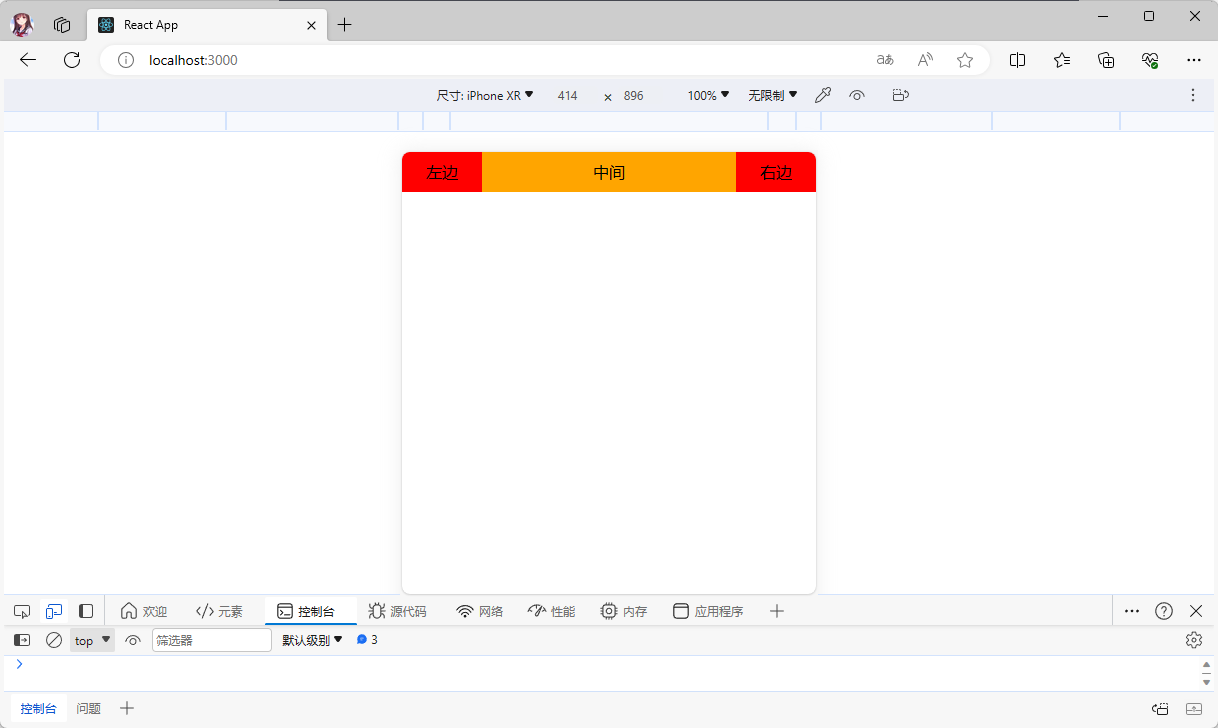
- 此时的效果如下:
- 在 App.jsx 中,使用 NavBar 组件的时候传入内容:
import React from 'react'
import Navbar from "@/components/NavBar";

class App extends React.Component {

  state = {
    message: '我是App组件'
  }

  render() {
    console.log('App', this, this.state.message)
    return (
      <div>
        {/* 使用 NavBar 组件,插入内容 */}
        <Navbar>
          <button>按钮1</button>
          <h2>我是标题</h2>
          <button>按钮2</button>
        </Navbar>
      </div>
    )
  }
}

export default App2
3
4
5
6
7
8
9
10
11
12
13
14
15
16
17
18
19
20
21
22
23
24
25
- 在 NavBar 组件中,通过 this.props 查看是否有 children 属性,并且 children 属性对应的类型是什么?
import React from 'react'
import '@/components/NavBar.css'

class Navbar extends React.Component {

  state = {
    message: '我是 NavBar 组件'
  }

  render() {
    console.log('Navbar', this, this.state.message, this.props)
    return (
      <div className={"nav-bar"}>
        <div className="left">左边</div>
        <div className="center">中间</div>
        <div className="right">右边</div>
      </div>
    )
  }
}

export default Navbar2
3
4
5
6
7
8
9
10
11
12
13
14
15
16
17
18
19
20
21
22
- 通过
浏览器的控制台,显示如下:
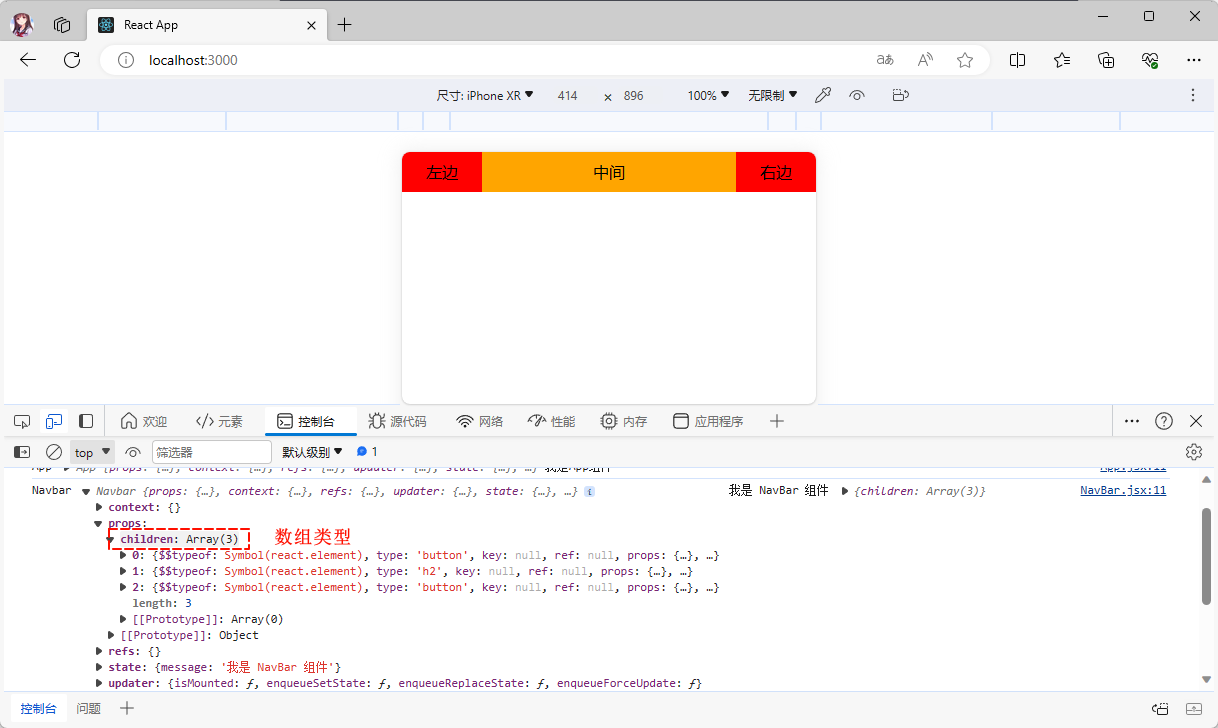
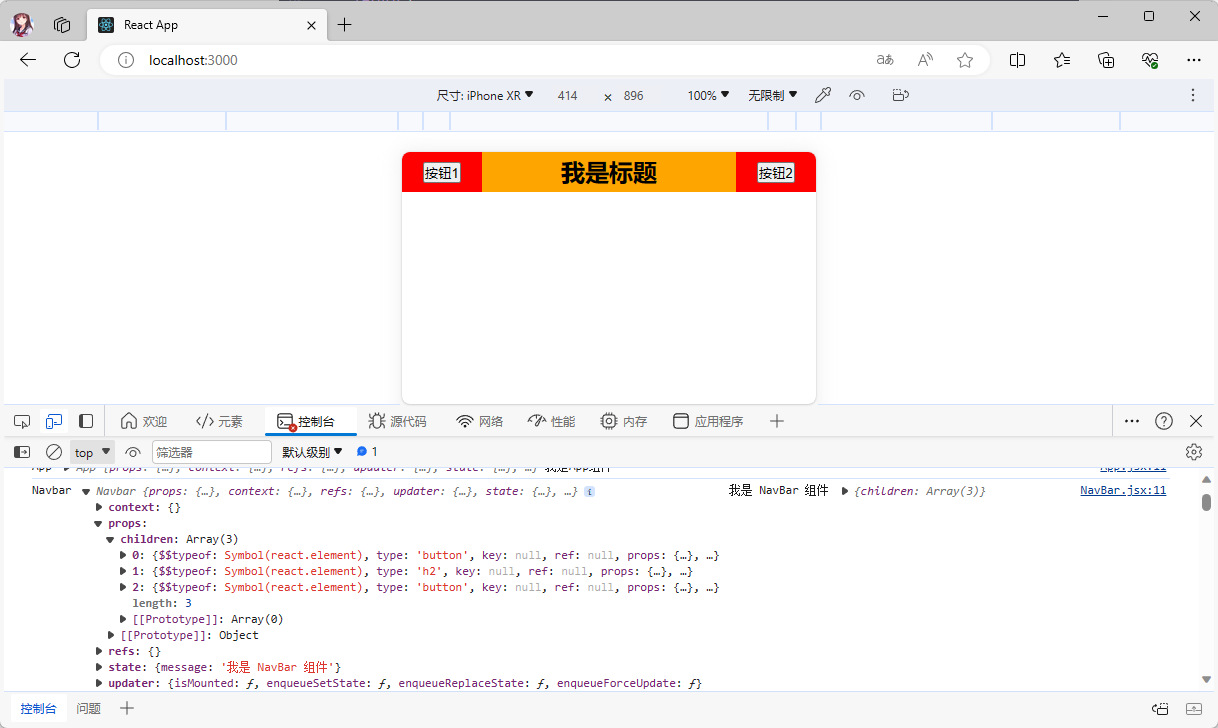
- 可以看到是数组类型,既然是数组类型,那么解构出来,插入到指定位置就可以了:
import React from 'react'
import '@/components/NavBar.css'

class Navbar extends React.Component {

  state = {
    message: '我是 NavBar 组件'
  }

  render() {
    console.log('Navbar', this, this.state.message, this.props)
    /* 解构 */
    const [button1, h2, button2] = this.props.children
    return (
      <div className={"nav-bar"}>
        <div className="left">{button1}</div>
        <div className="center">{h2}</div>
        <div className="right">{button2}</div>
      </div>
    )
  }
}

export default Navbar2
3
4
5
6
7
8
9
10
11
12
13
14
15
16
17
18
19
20
21
22
23
24
- 此时的效果如下:
- 到这里似乎就结束了;但是,如果在 App 组件中就传递一个 React 元素,那么实际情况会咋样?
import React from 'react'
import Navbar from "@/components/NavBar";

class App extends React.Component {

  state = {
    message: '我是App组件'
  }

  render() {
    console.log('App', this, this.state.message)
    return (
      <div>
        {/* 使用 NavBar 组件,插入内容 */}
        <Navbar>
          <button>按钮1</button>
        </Navbar>
      </div>
    )
  }
}

export default App2
3
4
5
6
7
8
9
10
11
12
13
14
15
16
17
18
19
20
21
22
23
- 通过
浏览器的控制台,显示如下:
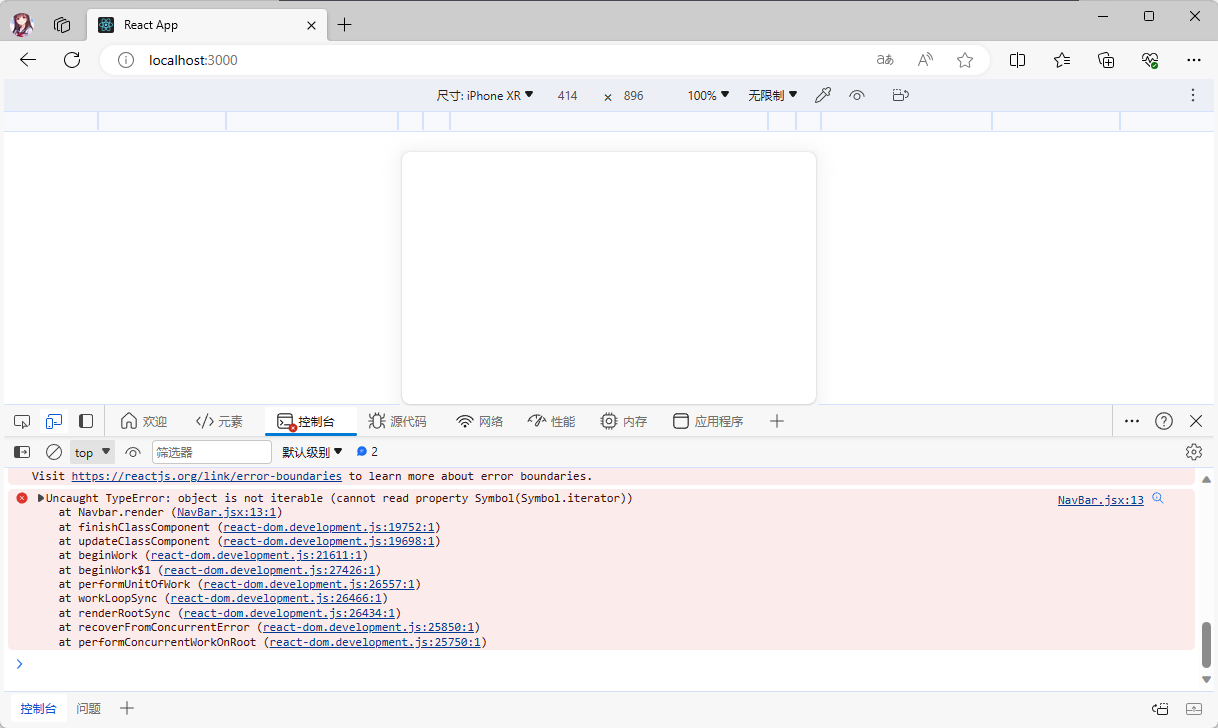
之所以报错的原因就在于 React 做了特殊的处理:
- ① 如果 App 组件中渲染
<Navbar></Navbar>组件的时候,只插入一个 React 元素,那么 this.props.children 值的类型是 Object,而我们之前是当做数组来解构的,当然会报错【类似于 Vue 中的默认插槽】。- ② 如果 App 组件中渲染
<Navbar></Navbar>组件的时候,插入多个 React 元素,那么 this.props.children 值的类型是数组。
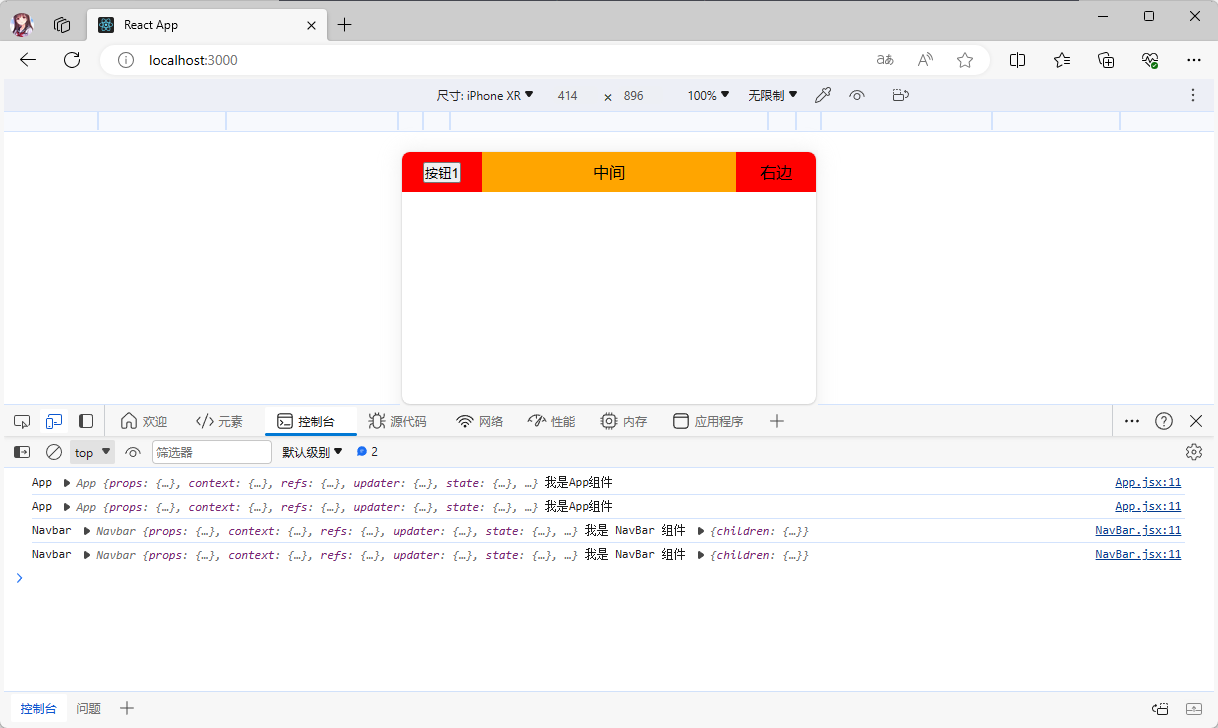
- 那么,只需要将其不当做数组来解构,就可以了:
import React from 'react'
import '@/components/NavBar.css'

class Navbar extends React.Component {

  state = {
    message: '我是 NavBar 组件'
  }

  render() {
    console.log('Navbar', this, this.state.message, this.props)
    return (
      <div className={"nav-bar"}>
        <div className="left">{this.props.children}</div>
        <div className="center">中间</div>
        <div className="right">右边</div>
      </div>
    )
  }
}

export default Navbar2
3
4
5
6
7
8
9
10
11
12
13
14
15
16
17
18
19
20
21
22
- 此时的效果如下:
4.3 通过 props 传递 React 元素实现插槽(⭐)
- 通过 props.children 实现插槽虽然可行,但是有下面的弊端:
- ① props.children 可能是数组,也可能是对象,需要判断。
- ② 如果 props.children 是数组,只能通过索引值来获取传入的 React 元素(解构就是 ES6+ 的语法糖而已),不够精准。
- 其实,也是可以通过
props传递 React 元素实现插槽的。
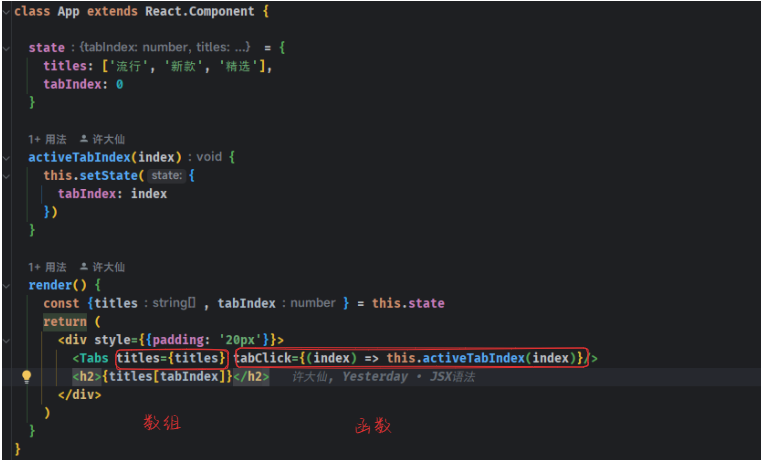
简单推理:之前的案例中,我们知道 props 可以传递字符串、数组等,甚至可以传递函数,难道不可以传递 React 元素?
- 此时,我们可以在 App.jsx 中,使用 NavBar 组件的时候通过 props 传入 React 元素:
import React from 'react'
import Navbar from "@/components/NavBar";

class App extends React.Component {

  state = {
    message: '我是App组件'
  }

  render() {
    console.log('App', this, this.state.message)
    return (
      <div>
        {/* 使用 NavBar 组件,通过 props 传递 React 元素 */}
        <Navbar left={<button>按钮1</button>} center={<h2>我是标题</h2>} right={<button>按钮2</button>}></Navbar>
      </div>
    )
  }
}

export default App2
3
4
5
6
7
8
9
10
11
12
13
14
15
16
17
18
19
20
21
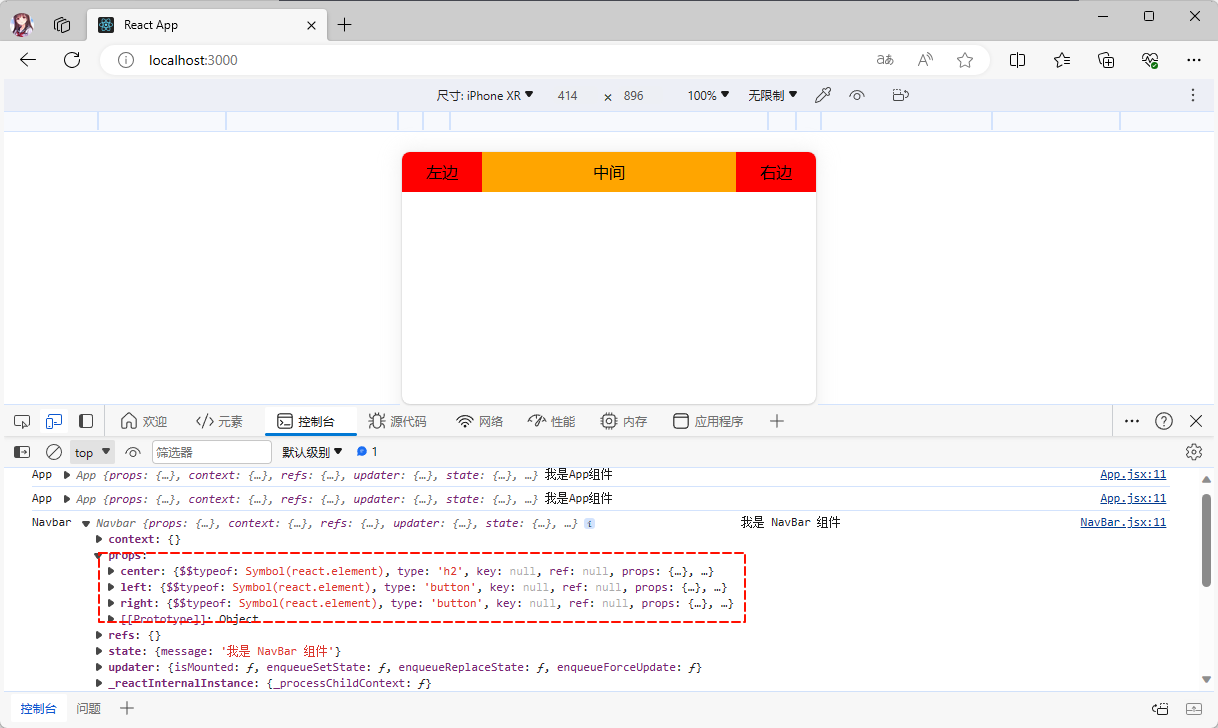
- 我们就可以查看 NavBar 组件中的 props 了:
import React from 'react'
import '@/components/NavBar.css'

class Navbar extends React.Component {

  state = {
    message: '我是 NavBar 组件'
  }

  render() {
    console.log('Navbar', this, this.state.message, this.props)
    return (
      <div className={"nav-bar"}>
        <div className="left">左边</div>
        <div className="center">中间</div>
        <div className="right">右边</div>
      </div>
    )
  }
}

export default Navbar2
3
4
5
6
7
8
9
10
11
12
13
14
15
16
17
18
19
20
21
22
- 通过
浏览器的控制台,显示如下:
- 此时,就可以在 NavBar 组件中精确的获取每个组件了:
import React from 'react'
import '@/components/NavBar.css'

class Navbar extends React.Component {

  state = {
    message: '我是 NavBar 组件'
  }

  render() {
    console.log('Navbar', this, this.state.message, this.props)
    const {left, center, right} = this.props
    return (
      <div className={"nav-bar"}>
        <div className="left">{left}</div>
        <div className="center">{center}</div>
        <div className="right">{right}</div>
      </div>
    )
  }
}

export default Navbar2
3
4
5
6
7
8
9
10
11
12
13
14
15
16
17
18
19
20
21
22
23
- 此时,效果如下:
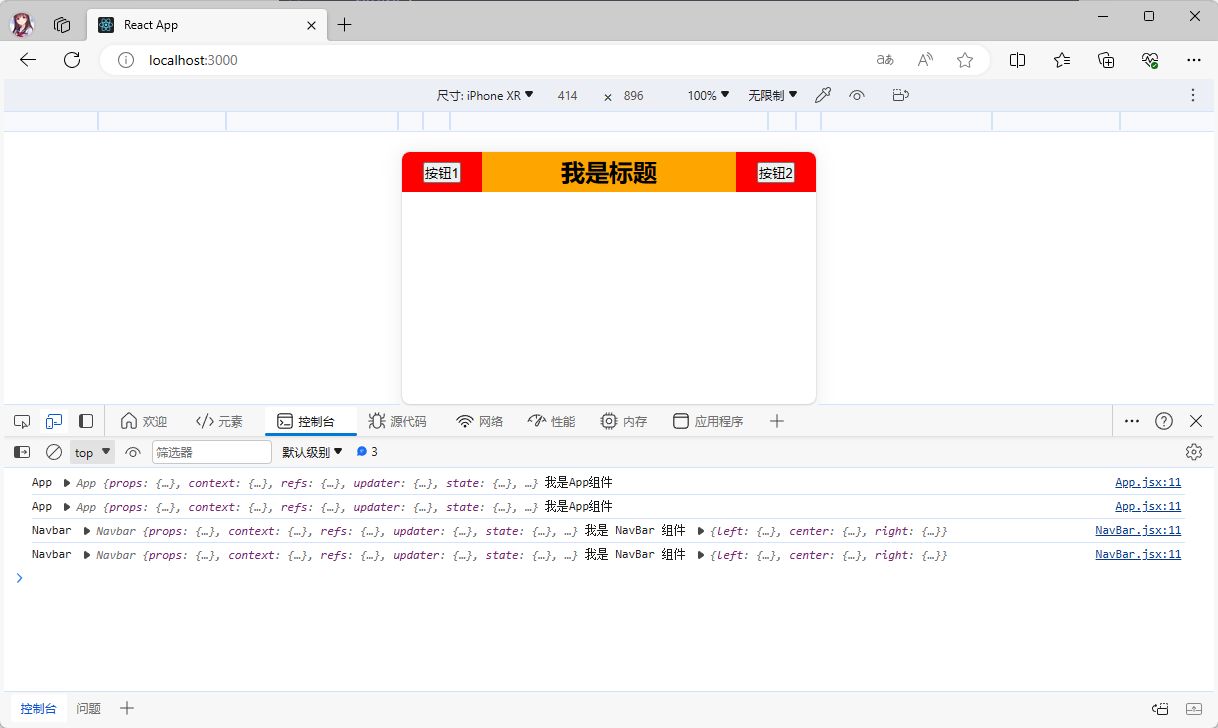
注意⚠️:通过
props传递 React 元素实现插槽,就类似于 Vue 中的具名插槽。
4.4 作用域插槽(⭐)
4.4.1 概述
- 在之前的实现插槽的方案中,我们都是通过各种手段将内容传递给子组件,让其渲染;换言之,我们无法在父组件中访问子组件的状态。
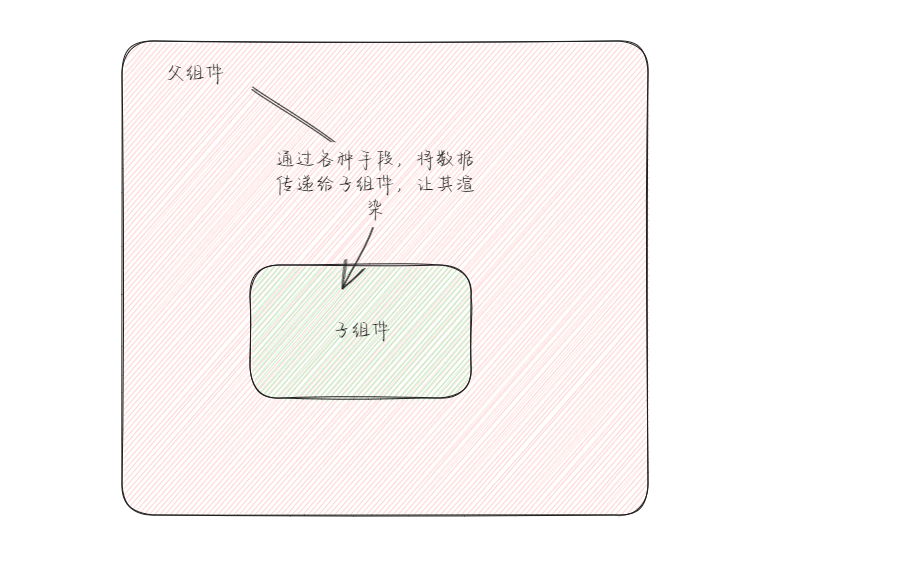
- 但是,在某些场景下,插槽的内容可能同时需要使用父组件和子组件中的数据。换言之,我们需要一种方案,能够让子组件在渲染的时候将数据提供给父组件,这就是作用域插槽。
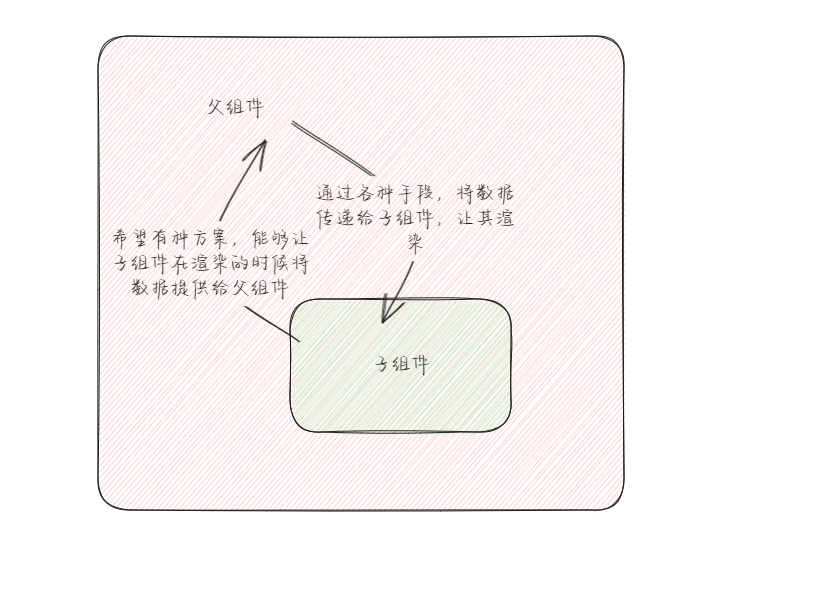
- 其实,React 中实现作用域操作和 React 中组件的子传父没有什么区别!!!
4.4.2 案例
- 需求:在 App 组件中渲染 NavBar 组件。
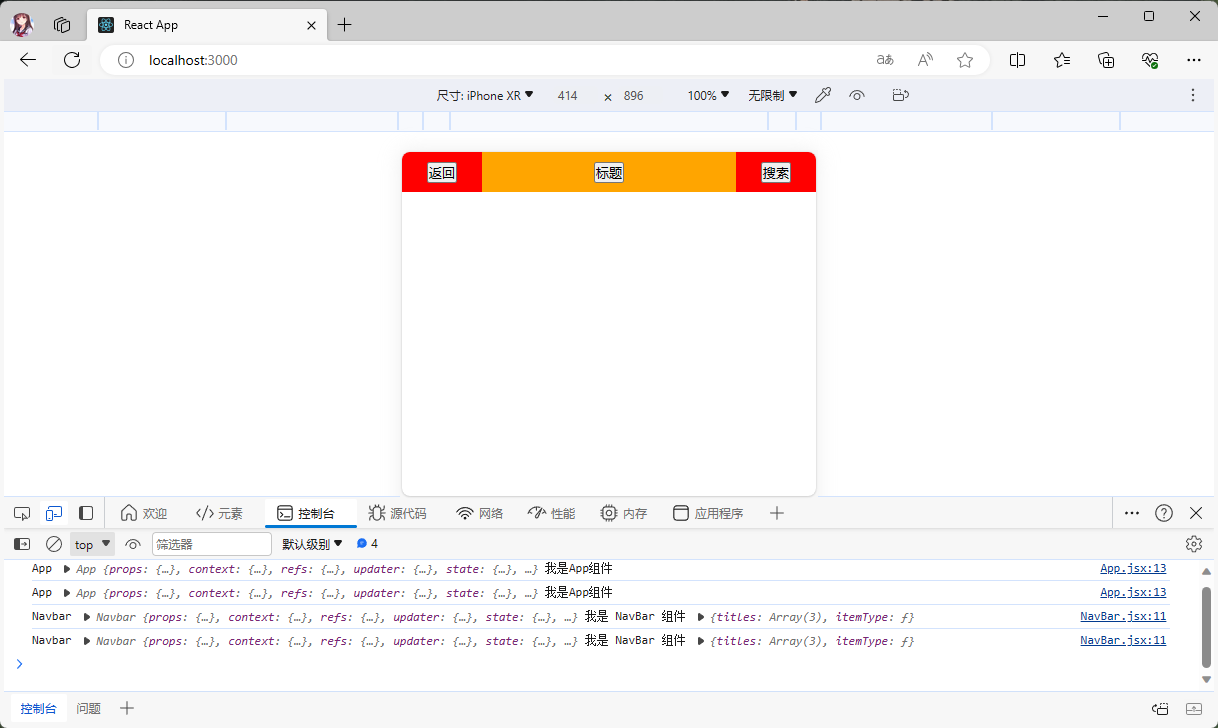
要求:
- ① 数据保存在 App 组件内,通过 props 传递给 NavBar 组件,让其在内部渲染。
- ② 到底显示什么元素,由 App 组件控制,可以是
h2、button或其它。
示例:
其中,App.jsx
import React from 'react'
import Navbar from "@/components/NavBar";

class App extends React.Component {

  state = {
    message: '我是App组件',
    titles: ['返回', '标题', '搜索']
  }

  render() {
    const {titles} = this.state
    console.log('App', this, this.state.message)
    return (
      <div>
        {/* 在 NavBar 组件通过 props 传递 React 元素 */}
        <Navbar titles={titles} itemType={(item) => <button>{item}</button>}></Navbar>
      </div>
    )
  }
}

export default App2
3
4
5
6
7
8
9
10
11
12
13
14
15
16
17
18
19
20
21
22
23
- 其中,NavBar.jsx
import React from 'react'
import '@/components/NavBar.css'

class Navbar extends React.Component {

  state = {
    message: '我是 NavBar 组件'
  }

  render() {
    console.log('Navbar', this, this.state.message, this.props)
    const {titles,itemType} = this.props
    return (
      <div className={"nav-bar"}>
        <div className="left">{itemType(titles[0])}</div>
        <div className="center">{itemType(titles[1])}</div>
        <div className="right">{itemType(titles[2])}</div>
      </div>
    )
  }
}

export default Navbar2
3
4
5
6
7
8
9
10
11
12
13
14
15
16
17
18
19
20
21
22
23
总结:
- React 中实现作用域操作和 React 中组件的子传父没有什么区别,就是在父组件中传递一个回调函数给子组件,让子组件回调,顺便将值带回给父组件。
- 上述的案例,也可以判断下,再返回不同的 React 元素,而不是都返回包含 button 的 React 元素。