第一章:初识盒子模型
1.1 概述
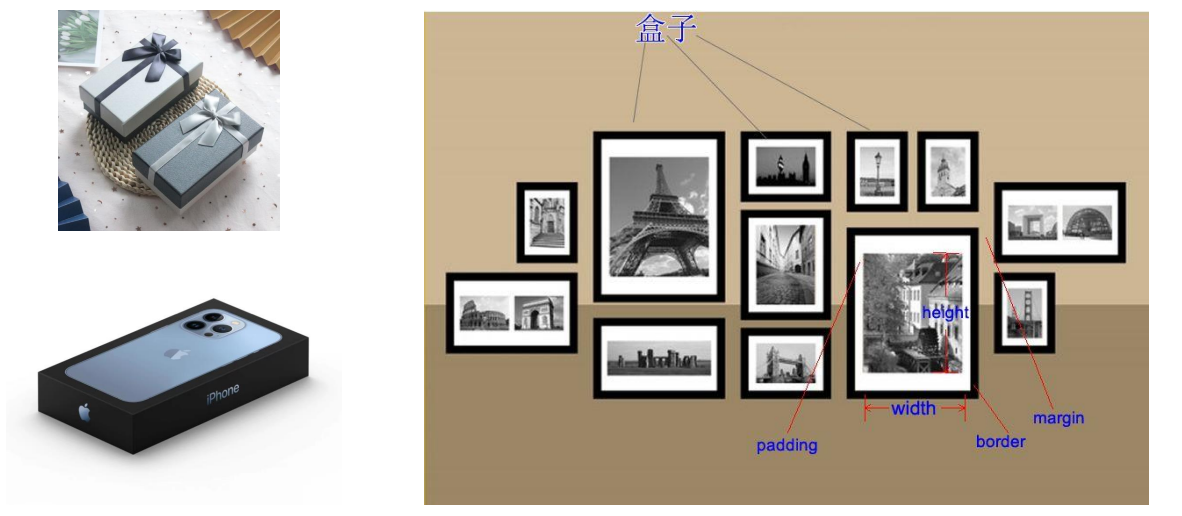
- 在生活中,我们经常会遇到各种各样的盒子:
1.2 HTML 中的盒子
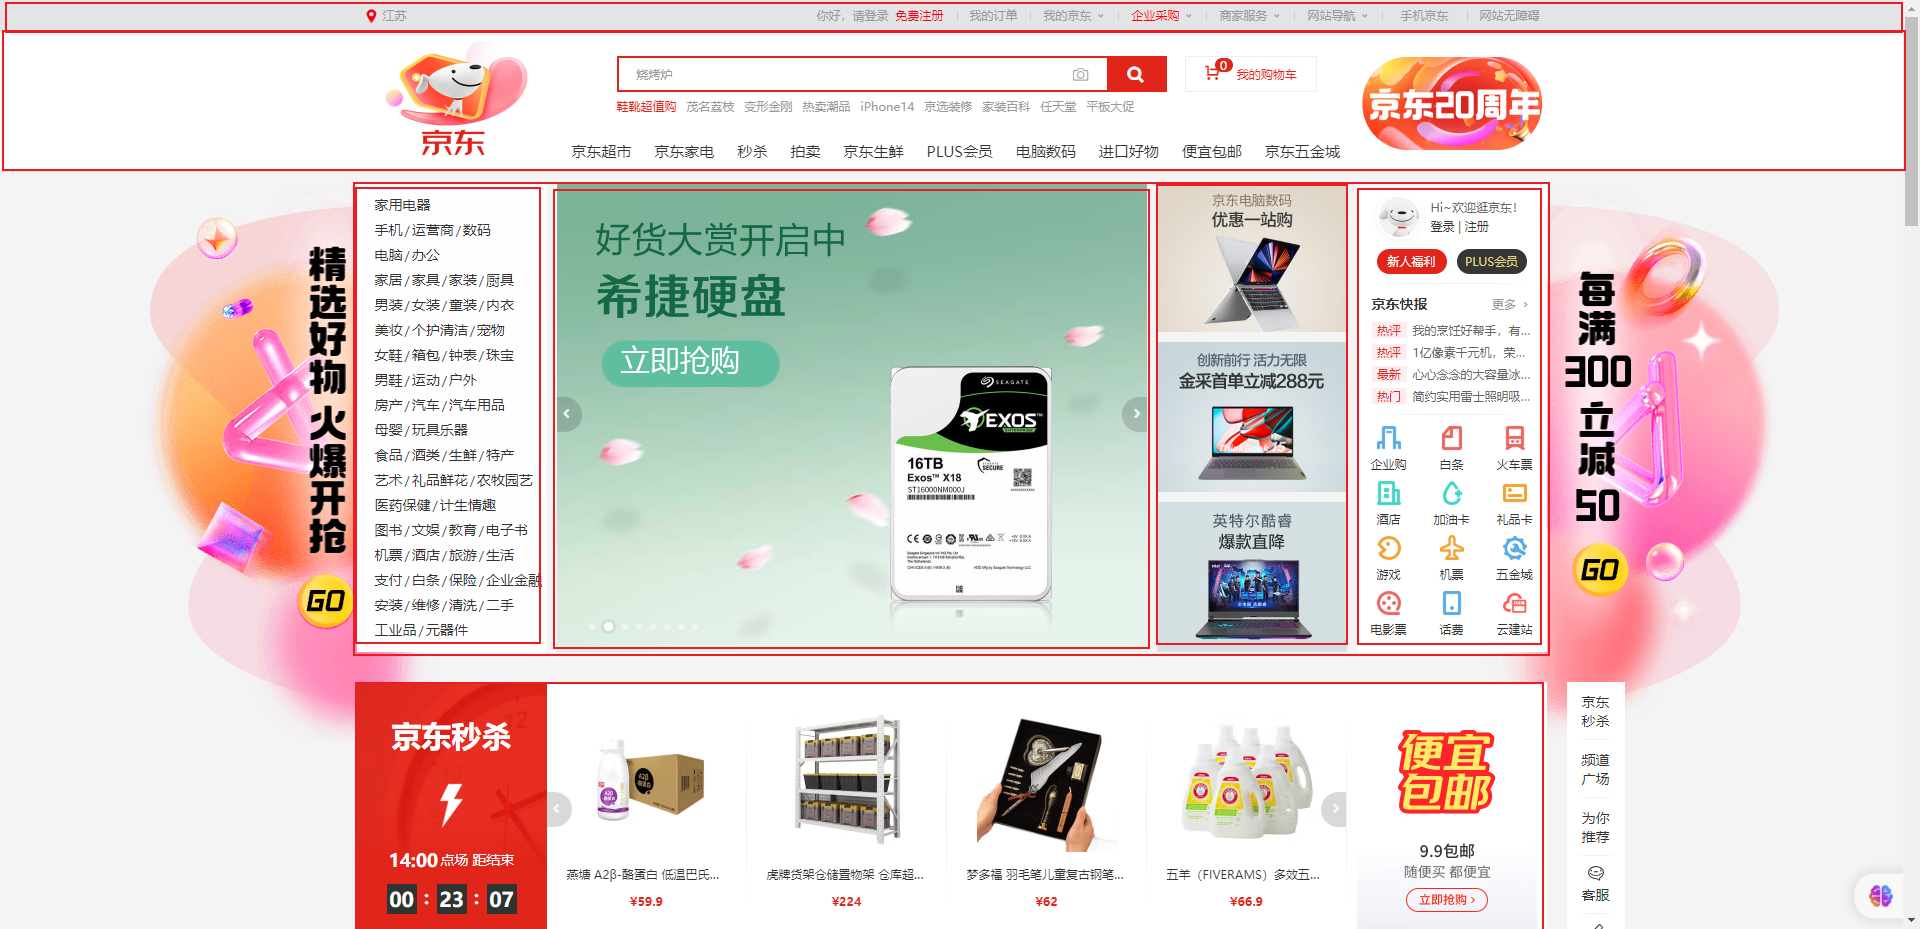
- 其实,我们可以将 HTML 中的每个元素都看成是一个盒子:
1.3 盒子模型
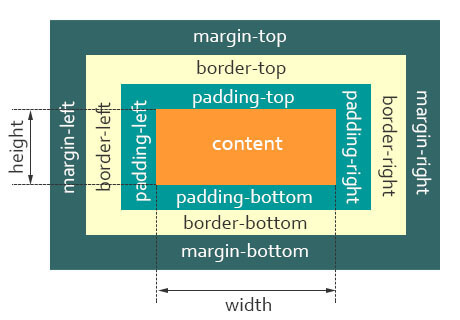
- CSS 中规定每个盒子分别由:内容区域(content)、内边距区域(padding)、边框区域(border)、外边距区域(margin)构成,这就是
盒子模型。
- 示例:
<!DOCTYPE html>
<html lang="en">
<head>
  <meta charset="UTF-8">
  <meta content="IE=edge" http-equiv="X-UA-Compatible">
  <meta content="width=device-width, initial-scale=1.0" name="viewport">
  <title>Title</title>
  <style>
    * {
      margin: 0;
      padding: 0;
    }

    .box {
      width: 200px;
      height: 200px;
      background-color: pink;
    }
  </style>
</head>
<body>
  <div class="box">我是div元素</div>
</body>
</html>2
3
4
5
6
7
8
9
10
11
12
13
14
15
16
17
18
19
20
21
22
23
24
第二章:内容区域的宽度和高度(⭐)
2.1 概述
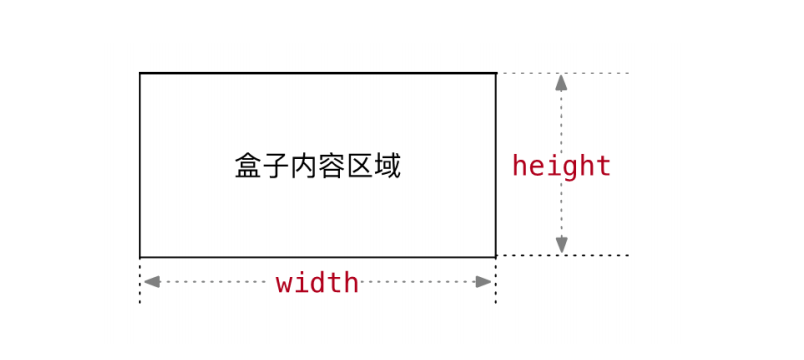
- 我们可以通过设置
width和height属性来设置内容区域的宽度和高度。
- width 和 height 的常见取值:
- ① 数字 + px 。
- ② 百分比,相对于包含块的百分比。
- ③ auto 。
PS:
width和height的默认值是auto,并且这两个属性不能被继承。- 对于
行内非替换元素而言,设置宽度和高度是无效的。
- 示例:
<!DOCTYPE html>
<html lang="en">
<head>
  <meta charset="UTF-8">
  <meta content="IE=edge" http-equiv="X-UA-Compatible">
  <meta content="width=device-width, initial-scale=1.0" name="viewport">
  <title>Title</title>
  <style>
    * {
      margin: 0;
      padding: 0;
    }

    .box {
      /* width: 200px; */
      /*
        auto 浏览器将会为指定的元素计算并选择一个宽度。
        块级元素:独占一行(父元素)
      */
      width: auto;
      height: 200px;
      background-color: pink;
    }

    .title {
      /* 行内级元素:包裹内容 */
      width: auto;
    }
  </style>
</head>
<body>
  <div class="box">我是div元素</div>
  <span class="title">我是span元素</span>
</body>
</html>2
3
4
5
6
7
8
9
10
11
12
13
14
15
16
17
18
19
20
21
22
23
24
25
26
27
28
29
30
31
32
33
34
35
2.2 其它
- 有的时候,我们可以还设置如下的属性:
min-width:最小宽度,无论内容多少,宽度都大于或等于min-width。max-width:最大宽度,无论内容多少,宽度都小于或等于max-width。
PS:
- 在做
移动端适配的时候,就可以设置最大宽度和最小宽度了。- 像
min-height、max-height和min-width、max-width类似,只不多是最小高度和最大高度;但是,不常用。
- 示例:
<!DOCTYPE html>
<html lang="en">
<head>
  <meta charset="UTF-8">
  <meta content="IE=edge" http-equiv="X-UA-Compatible">
  <meta content="width=device-width, initial-scale=1.0" name="viewport">
  <title>Title</title>
  <style>
    * {
      margin: 0;
      padding: 0;
    }

    .box {
      height: 2000px;
      /* 最大宽度 */
      max-width: 750px;
      /* 最小宽度 */
      min-width: 600px;

      margin: 0 auto;

      background-color: pink;
    }

  </style>
</head>
<body>
  <div class="box">我是div元素</div>
</body>
</html>2
3
4
5
6
7
8
9
10
11
12
13
14
15
16
17
18
19
20
21
22
23
24
25
26
27
28
29
30
31
第三章:边框(⭐)
3.1 边框(border)-- 单个属性(了解)
- 作用:设置边框粗细、边框样式、边框颜色效果。
- 属性:
| 属性名 | 作用 | 属性值 |
|---|---|---|
| border-width | 边框粗细 | 数字 + px |
| border-style | 边框样式 | 实线 solid 、虚线 dashed 、点线 dotted |
| border-color | 边框颜色 | 颜色取值 |
- 示例:
<!DOCTYPE html>
<html lang="en">

<head>
    <meta charset="UTF-8">
    <meta http-equiv="X-UA-Compatible" content="IE=edge">
    <meta name="viewport" content="width=device-width, initial-scale=1.0">
    <title>Document</title>
    <style>
        .box {
            width: 200px;
            height: 200px;
            background-color: pink;
            /* 边框(border)- 单个属性 */
            border-width: 10px;
            border-style: solid;
            border-color: red;
        }
    </style>
</head>

<body>
    <div class="box"></div>
</body>

</html>2
3
4
5
6
7
8
9
10
11
12
13
14
15
16
17
18
19
20
21
22
23
24
25
26
3.2 边框(border)-- 连写形式
- 属性名:border 。
- 属性值:单个取值的连写,取值之间以空格隔开,如:
border : 10px solid red;。
- 示例:
<!DOCTYPE html>
<html lang="en">

<head>
    <meta charset="UTF-8">
    <meta http-equiv="X-UA-Compatible" content="IE=edge">
    <meta name="viewport" content="width=device-width, initial-scale=1.0">
    <title>Document</title>
    <style>
        .box {
            width: 200px;
            height: 200px;
            background-color: pink;
            border: 10px solid red;
        }
    </style>
</head>

<body>
    <div class="box"></div>
</body>

</html>2
3
4
5
6
7
8
9
10
11
12
13
14
15
16
17
18
19
20
21
22
23
3.3 边框(border)-- 单方向设置
- 场景:只给盒子的某个方向单独设置边框。
属性名:
border-方位名词。属性值:连写的形式。
- 示例:
<!DOCTYPE html>
<html lang="en">

<head>
    <meta charset="UTF-8">
    <meta http-equiv="X-UA-Compatible" content="IE=edge">
    <meta name="viewport" content="width=device-width, initial-scale=1.0">
    <title>Document</title>
    <style>
        .box{
            width: 200px;
            height: 200px;
            background-color: pink;
            /* 边框(border)- 单方向设置 */
            border-right: 10px solid red;
        }
    </style>
</head>

<body>
    <div class="box"></div>
</body>

</html>2
3
4
5
6
7
8
9
10
11
12
13
14
15
16
17
18
19
20
21
22
23
24
3.4 盒子实际大小初级计算公式
- 需求:盒子尺寸 400*400 ,背景绿色,边框 10px 实线 黑色,如何完成?
PS:
- ① 设置 width 和 height 是内容区域的宽度和高度。
- ② 设置 border 会撑大盒子。
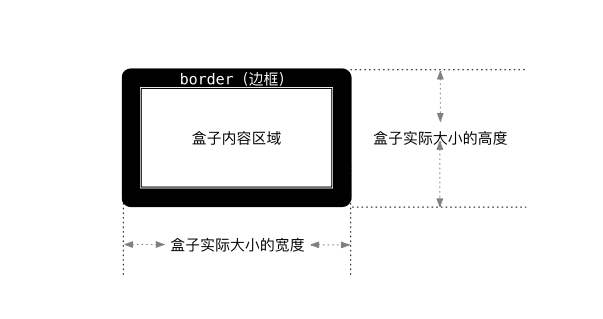
盒子实际大小初级计算公式:
- 盒子的宽度 = 左边框 + 内容宽度 + 右边框。
- 盒子的高度 = 上边框 + 内容高度 + 下边框。
解决:当盒子被 border 撑大后,计算多余大小,手动在内容区域中减去(手动内减)。
- 示例:
<!DOCTYPE html>
<html lang="en">

<head>
    <meta charset="UTF-8">
    <meta http-equiv="X-UA-Compatible" content="IE=edge">
    <meta name="viewport" content="width=device-width, initial-scale=1.0">
    <title>Document</title>
    <style>
        .box {
            width: 380px;
            height: 380px;
            background-color: green;
            border: 10px solid #000;
        }
    </style>
</head>

<body>
    <div class="box"></div>
</body>

</html>2
3
4
5
6
7
8
9
10
11
12
13
14
15
16
17
18
19
20
21
22
23
第四章:内边距(⭐)
4.1 内边距(padding)-- 取值
padding属性用于设置盒子的内边距,通常用于设置边框和内容之间的间距。padding属性包括四个方向,所以有如下的取值:padding-top:上内边距。padding-right:右内边距。padding-bottom:下内边距。padding-left:左内边距。
padding属性是一个缩写属性,即padding-top、padding-right、padding-bottom、padding-left的简写属性。padding缩写属性是从零(12)点钟方向开始,沿着顺时针转动的,也就是上右下左。
- padding 属性的常见取值:
| 取值 | 示例 | 含义 |
|---|---|---|
| 一个值 | padding:10px; | 上右下左 都设置为 10px |
| 两个值 | padding:10px 20px; | 上下 设置为 10px,左右 设置为 20px |
| 三个值 | padding:10px 20px 30px; | 上 设置为10px,左右 设置为 20px,下 设置为 30px |
| 四个值 | padding:10px 20px 30px 40px; | 上 设置为10px,左右设置为20px,下设置为30px,左设置为 40px |
PS:
从上开始赋值,然后顺时针赋值,如果没有设置赋值的,看对面的!!。
- 示例:
  <!DOCTYPE html>
<html lang="en">

<head>
    <meta charset="UTF-8">
    <meta http-equiv="X-UA-Compatible" content="IE=edge">
    <meta name="viewport" content="width=device-width, initial-scale=1.0">
    <title>Document</title>
    <style>
        .box {
            width: 200px;
            height: 200px;
            background-color: pink;
            /* 添加了 4个方向的内边距 */
            padding: 50px;
            /* padding 属性可以当做复合属性使用,也可以单独设置某个方向的内边距 */

            /* 四个值:上 右 下 左 */
            /* padding: 10px 20px 30px 40px; */

            /* 三个值:上 左右 下 */
            /* padding: 10px 20px 30px; */

            /* 三个值:上下 左右 */
            /* padding: 10px 20px; */
        }
    </style>
</head>

<body>
    <div class="box">文字</div>
</body>

</html>2
3
4
5
6
7
8
9
10
11
12
13
14
15
16
17
18
19
20
21
22
23
24
25
26
27
28
29
30
31
32
33
34
4.2 内边距(padding)-- 单方向设置
也可以只给盒子的某个方向单独设置内边距。
示例:
<!DOCTYPE html>
<html lang="en">

<head>
    <meta charset="UTF-8">
    <meta http-equiv="X-UA-Compatible" content="IE=edge">
    <meta name="viewport" content="width=device-width, initial-scale=1.0">
    <title>Document</title>
    <style>
        .box {
            width: 200px;
            height: 200px;
            background-color: pink;
            padding-left: 20px;
        }
    </style>
</head>

<body>
    <div class="box">文字</div>
</body>

</html>2
3
4
5
6
7
8
9
10
11
12
13
14
15
16
17
18
19
20
21
22
23
4.3 盒子实际大小终极计算公式
- 需求:盒子尺寸 300*300,背景粉色,边框 10px 实线黑色,上下左右 20px 的内边距,如何完成?
PS:
- ① 设置 width 和 height 是内容的宽高!
- ② 设置 border 会撑大盒子。
- ③ 设置 padding 会撑大盒子。
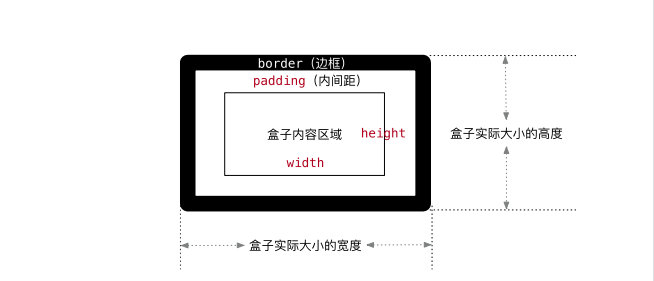
- 盒子实际大小终极计算公式:
- 盒子宽度 = 左边框 + 左 padding + 内容宽度 + 右 padding + 右边框。
- 盒子高度 = 上边框 + 上 padding + 内容宽度 + 下 padding + 下边框。
- 示例:
<!DOCTYPE html>
<html lang="en">

<head>
    <meta charset="UTF-8">
    <meta http-equiv="X-UA-Compatible" content="IE=edge">
    <meta name="viewport" content="width=device-width, initial-scale=1.0">
    <title>Document</title>
    <style>
        .box {
            width: 240px;
            height: 240px;
            background-color: pink;
            border: 10px solid #000;
            padding: 20px;
        }
    </style>
</head>

<body>
    <div class="box"></div>
</body>

</html>2
3
4
5
6
7
8
9
10
11
12
13
14
15
16
17
18
19
20
21
22
23
24
4.4 CSS3 盒子模型(自动内减,推荐)
- 需求:盒子尺寸 300*300,背景粉色,边框 10px 实线黑色,上下左右 20px 的内边距,如何完成?
PS:给盒子设置 border 或 padding 时,盒子会被撑大,如果不想盒子被撑大?
- 解决方法 ① :手动内减
- 操作:自己计算多余大小,手动在内容中减去。
- 缺点:项目中计算量太大,很麻烦。
- 解决方法 ② :自动内减
- 操作:给盒子设置属性
box-sizing : border-box ;即可。 - 优点:浏览器会自动计算多余大小,自动在内容中减去。
- 操作:给盒子设置属性
- 示例:
<!DOCTYPE html>
<html lang="en">

<head>
    <meta charset="UTF-8">
    <meta http-equiv="X-UA-Compatible" content="IE=edge">
    <meta name="viewport" content="width=device-width, initial-scale=1.0">
    <title>Document</title>
    <style>
        body {
            /* 内减模式 */
            box-sizing: border-box;
        }

        div {
            width: 300px;
            height: 300px;
            background-color: pink;
            border: 10px solid #000;
            padding: 20px;
        }
    </style>
</head>

<body>
    <div class="box"></div>
</body>

</html>2
3
4
5
6
7
8
9
10
11
12
13
14
15
16
17
18
19
20
21
22
23
24
25
26
27
28
29
4.5 圆角(border-radius)
border-radius用于设置盒子的圆角。
常见取值:
数值:通常用来设置小的圆角,如:6px。百分比:通常用来设置一定的弧度或圆形。
其实,border-radius 是一个缩写属性:
- 将这四个属性 border-top-left-radius、border-top-right-radius、border-bottom-right-radius,和 border-bottom-left-radius 简写为一个属性。
- 实际开发中,很少一个个圆角设置。
示例:
<!DOCTYPE html>
<html lang="en">
<head>
  <meta charset="UTF-8">
  <meta content="IE=edge" http-equiv="X-UA-Compatible">
  <meta content="width=device-width, initial-scale=1.0" name="viewport">
  <title>Title</title>
  <style>
    .box {
      width: 100px;
      height: 100px;
      background-color: pink;
      border: 5px solid red;
      border-radius: 50%;
    }
  </style>
</head>
<body>
  <div class="box"></div>
</body>
</html>2
3
4
5
6
7
8
9
10
11
12
13
14
15
16
17
18
19
20
21
第五章:外边距(⭐)
5.1 外边距(margin)-- 取值
作用:设置边框以外,
盒子和盒子之间的距离。属性名:margin 。
常见取值:
| 取值 | 示例 | 含义 |
|---|---|---|
| 一个值 | margin:10px; | 上右下左 都设置为 10px |
| 两个值 | margin:10px 20px; | 上下 设置为 10px,左右 设置为 20px |
| 三个值 | margin:10px 20px 30px; | 上 设置为10px,左右 设置为 20px,下 设置为 30px |
| 四个值 | margin:10px 20px 30px 40px; | 上 设置为10px,左右设置为20px,下设置为30px,左设置为 40px |
PS:
从上开始赋值,然后顺时针赋值,如果没有设置赋值的,看对面的!!。
- 示例:
<!DOCTYPE html>
<html lang="en">

<head>
    <meta charset="UTF-8">
    <meta http-equiv="X-UA-Compatible" content="IE=edge">
    <meta name="viewport" content="width=device-width, initial-scale=1.0">
    <title>Document</title>
    <style>
        .box {
            width: 100px;
            height: 100px;
            background-color: pink;

            margin: 50px;
        }
    </style>
</head>

<body>
    <div class="box"></div>
</body>

</html>2
3
4
5
6
7
8
9
10
11
12
13
14
15
16
17
18
19
20
21
22
23
24
5.2 外边距(margin)-- 单方向设置
- 场景:只给盒子的某个方向单独设置外边距
属性名:margin - 方位名词。
属性值:数字 + px 。
- 示例:
<!DOCTYPE html>
<html lang="en">

<head>
    <meta charset="UTF-8">
    <meta http-equiv="X-UA-Compatible" content="IE=edge">
    <meta name="viewport" content="width=device-width, initial-scale=1.0">
    <title>Document</title>
    <style>
        .box {
            width: 100px;
            height: 100px;
            background-color: pink;

            margin-left: 50px;
        }
    </style>
</head>

<body>
    <div class="box"></div>
</body>

</html>2
3
4
5
6
7
8
9
10
11
12
13
14
15
16
17
18
19
20
21
22
23
24
5.3 清除默认内外边距
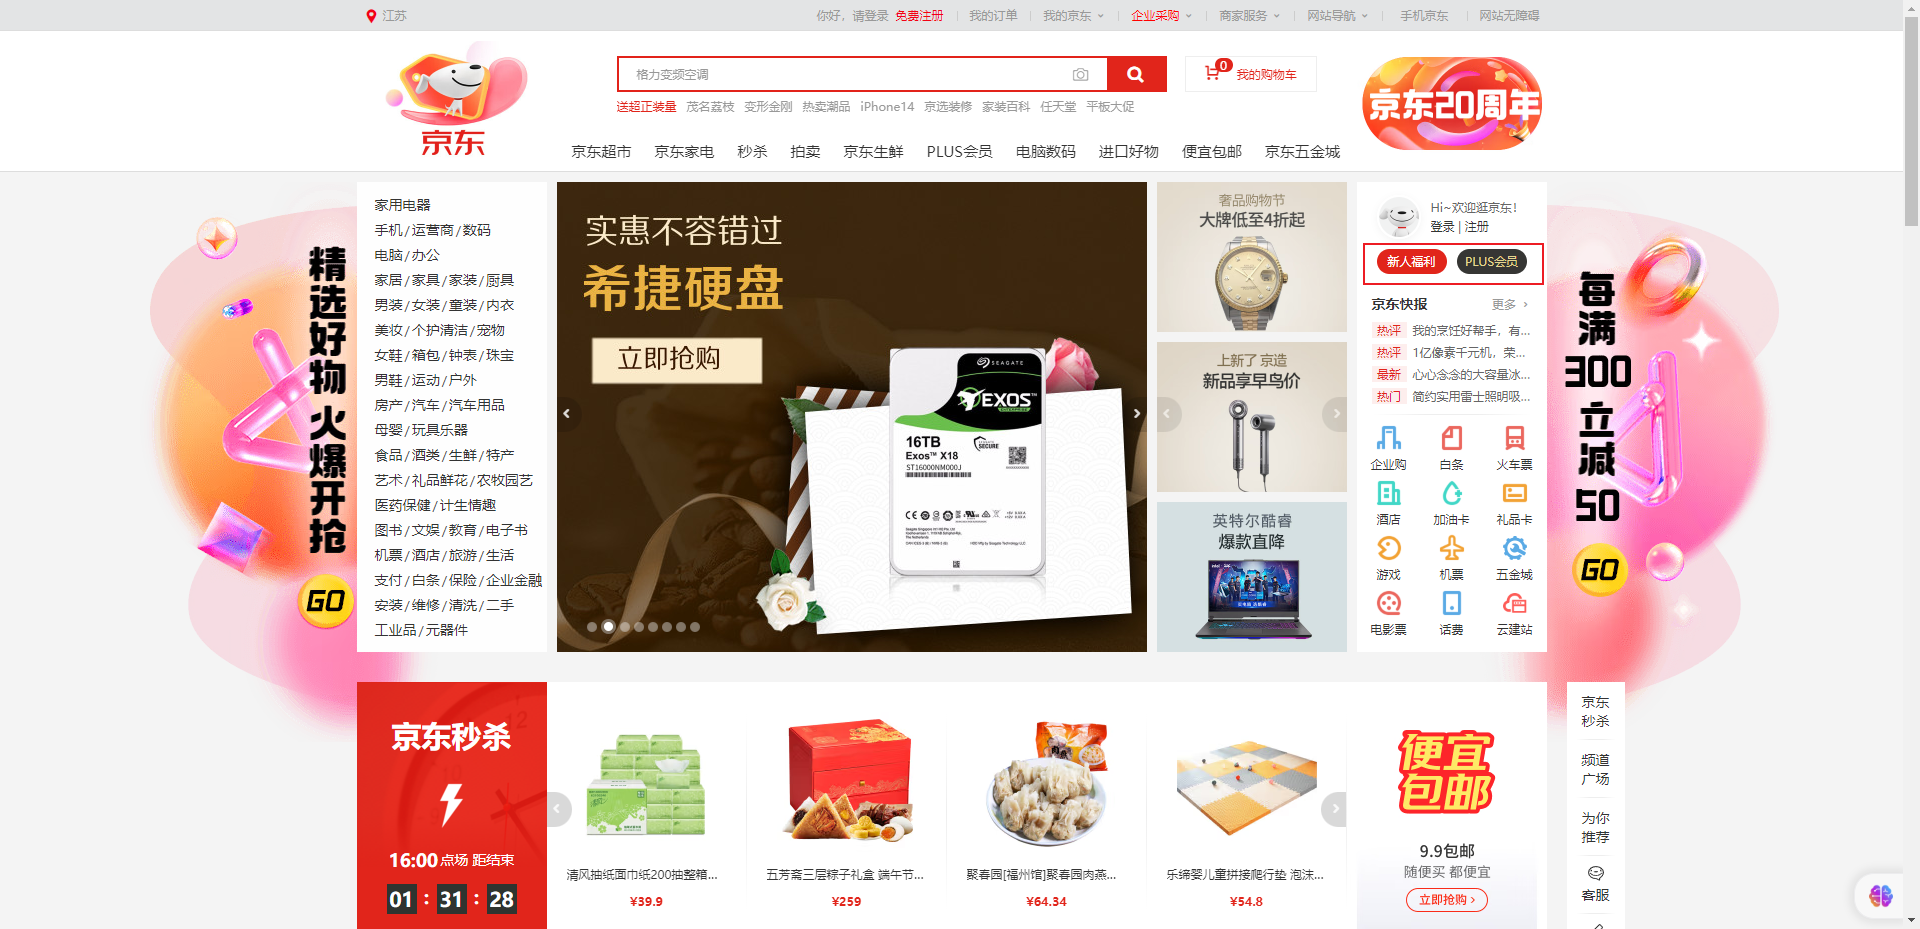
场景:浏览器会默认给部分标签设置默认的 margin 和 padding ,但一般在项目开始前需要先清除这些标签默认的 margin 和 padding ,后续自己设置。
- 如:body 标签默认有
margin:8px;。 - 如:p 标签默认有上下的 margin 。
- ……
- 如:body 标签默认有
淘宝的解决方案:
blockquote, body, button, dd, dl, dt, fieldset, form, h1, h2, h3, h4, h5, h6, hr, input, legend, li, ol, p, pre, td, textarea, th, ul {
    margin: 0;
    padding: 0;
}2
3
4
- 京东的解决方案:
* {
    margin: 0;
    padding: 0;
}2
3
4
5.4 外边距折叠问题 -- 合并现象
场景:
垂直布局的块级元素,上下的margin会合并。结果:最终两者距离为 margin 的最大值。
解决方法:只给其中一个盒子设置 margin 即可。
- 示例:
<!DOCTYPE html>
<html lang="en">

<head>
  <meta charset="UTF-8">
  <meta http-equiv="X-UA-Compatible" content="IE=edge">
  <meta name="viewport" content="width=device-width, initial-scale=1.0">
  <title>Document</title>
  <style>
    div {
      width: 200px;
      height: 200px;
    }

    .box1 {
      background-color: pink;
      margin-bottom: 50px;
    }

    .box2 {
      background-color: red;

      /* 这个大点,生效。 */
      margin-top: 80px;
    }
  </style>
</head>

<body>
  <div class="box1">div1</div>
  <div class="box2">div2</div>
</body>

</html>2
3
4
5
6
7
8
9
10
11
12
13
14
15
16
17
18
19
20
21
22
23
24
25
26
27
28
29
30
31
32
33
34
5.5 外边距折叠问题 -- 塌陷问题
场景:
互相嵌套的块级元素,子元素的margin-top会作用在父元素上。结果:导致父元素一起向下移动。
解决方法:
- ① 给父元素的设置 border-top 或者 padding-top (分隔父子元素的 margin-top)。
- ② 给父元素设置
overflow:hidden;。
- ② 给父元素设置
- ③ 转换成行内块元素。
- ④ 设置浮动。
- 示例:
<!DOCTYPE html>
<html lang="en">

<head>
  <meta charset="UTF-8">
  <meta http-equiv="X-UA-Compatible" content="IE=edge">
  <meta name="viewport" content="width=device-width, initial-scale=1.0">
  <title>Document</title>
  <style>
    * {
      box-sizing: border-box;
    }

    .box1 {
      width: 300px;
      height: 300px;
      background-color: pink;
      /* 解决方法 */
      overflow: hidden;
    }

    .box2 {
      width: 100px;
      height: 100px;
      background-color: skyblue;
      /* `互相嵌套` 的 `块级元素`,子元素的 `margin-top` 会作用在父元素上,导致父元素一起向下移动。 */
      margin-top: 50px;
    }
  </style>
</head>

<body>
  <div class="box1">
    <div class="box2">div2</div>
  </div>
</body>

</html>2
3
4
5
6
7
8
9
10
11
12
13
14
15
16
17
18
19
20
21
22
23
24
25
26
27
28
29
30
31
32
33
34
35
36
37
38
第六章:块级盒子水平居中问题分析(⭐)
6.1 概述
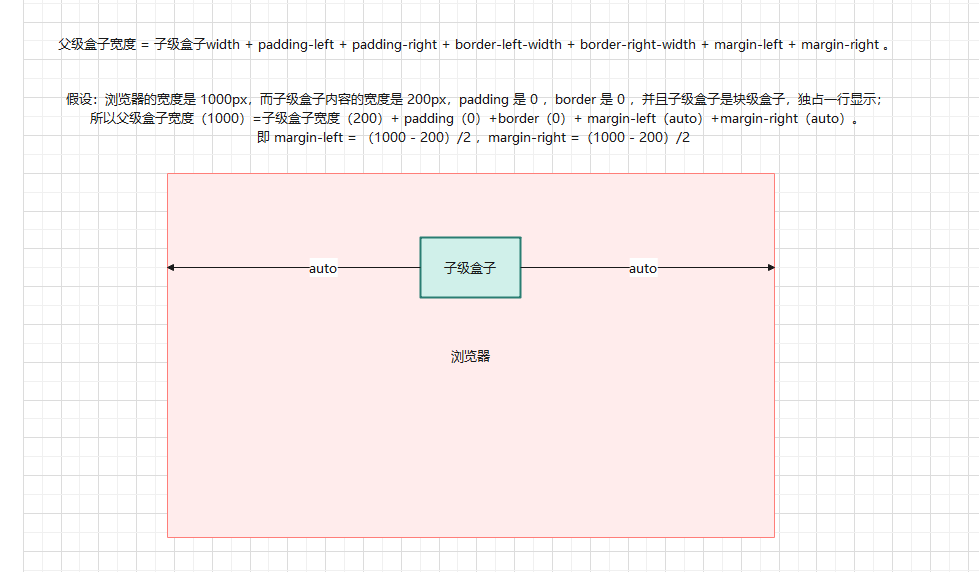
- 父级盒子的宽度 = 块级盒子内容区的width + padding-left + padding-right + border-left-width + border-right-width + margin-left + margin-right 。
PS:这些属性的值可以是具体的像素值、百分比值或者其他单位,因此在计算盒子的宽度和高度时需要将它们转换为相同的单位。
6.2 应用示例
- 示例:
<!DOCTYPE html>
<html lang="en">
<head>
  <meta charset="UTF-8">
  <meta content="IE=edge" http-equiv="X-UA-Compatible">
  <meta content="width=device-width, initial-scale=1.0" name="viewport">
  <title>Title</title>
  <style>
    .box {
      width: 200px;
      height: 200px;
      background-color: pink;
      /*
        水平居中

        块级元素盒子的宽度和高度计算公式取决于盒子的盒模型属性,包括盒子的内边距、边框和外边距。一般来说,盒子的宽度和高度可以通过以下公式计算:
        盒子宽度 = width + padding-left + padding-right + border-left-width + border-right-width + margin-left + margin-right
        盒子高度 = height + padding-top + padding-bottom + border-top-width + border-bottom-width + margin-top + margin-bottom
        其中,width 和 height 分别表示盒子的宽度和高度,padding-left 和 padding-right 表示盒子的左右内边距,padding-top 和 padding-bottom 表示盒子的上下内边距,border-left-width 和 border-right-width 表示盒子的左右边框宽度,border-top-width 和 border-bottom-width 表示盒子的上下边框宽度,margin-left 和 margin-right 表示盒子的左右外边距,margin-top 和 margin-bottom 表示盒子的上下外边距。
        需要注意的是,这些属性的值可以是具体的像素值、百分比值或者其他单位,因此在计算盒子的宽度和高度时需要将它们转换为相同的单位。
      */
      margin: 0 auto;
    }
  </style>
</head>
<body>
  <div class="box"></div>
</body>
</html>2
3
4
5
6
7
8
9
10
11
12
13
14
15
16
17
18
19
20
21
22
23
24
25
26
27
28
29
第七章:行内非替换元素的特殊性
7.1 概述
- 行内非替换元素(如:span 等),width 和 height 压根不生效。
- 行内非替换元素(如:span 等),水平方向的 margin 和 padding 布局有效;但是,垂直方向的 margin 和 padding 布局无效。
7.2 应用示例
- 示例:
<!DOCTYPE html>
<html lang="en">

<head>
    <meta charset="UTF-8">
    <meta http-equiv="X-UA-Compatible" content="IE=edge">
    <meta name="viewport" content="width=device-width, initial-scale=1.0">
    <title>Document</title>
    <style>
        span {
            /* margin: 100px; */
            /* padding: 100px; */
            /* 可以通过 行高 来改变行内元素的垂直位置 */
            line-height: 100px;
        }
    </style>
</head>

<body>
    <!-- 行内元素,内外边距 margin 和 padding -->
    <!-- 如果想要通过 margin 或 padding 改变行内元素的垂直位置,无效生效 -->
    <!-- 行内元素的 margin-top 和 margin-bottom 不生效 -->
    <!-- 行内元素的 padding-top 和 padding-bottom 不生效 -->
    <span>span1</span>
    <span>span2</span>
</body>

</html>2
3
4
5
6
7
8
9
10
11
12
13
14
15
16
17
18
19
20
21
22
23
24
25
26
27
28
第八章:外轮廓(了解)
8.1 概述
outline表示元素的外轮廓,outline不占用空间,并且显示在border的外面。outline相关属性有:outline-width: 外轮廓的宽度。outline-style:取值跟 border 的样式一样,如:solid、dotted 等。outline-color:外轮廓的颜色。outline:outline-width、outline-style、outline-color的简写属性,跟 border 用法类似。
PS:在实际开发中,我们一般不会设置 outline 的样式,而是去除 a 、input 元素的 focus 轮廓效果。
8.2 应用示例
- 示例:
<!DOCTYPE html>
<html lang="en">
<head>
  <meta charset="UTF-8">
  <meta content="IE=edge" http-equiv="X-UA-Compatible">
  <meta content="width=device-width, initial-scale=1.0" name="viewport">
  <title>Title</title>
  <style>
    a, input {
      outline: none;
    }
  </style>
</head>
<body>
  <a href="#">百度一下</a>
  <input type="text">
</body>
</html>2
3
4
5
6
7
8
9
10
11
12
13
14
15
16
17
18
第九章:CSS 设置背景(⭐)
9.1 概述
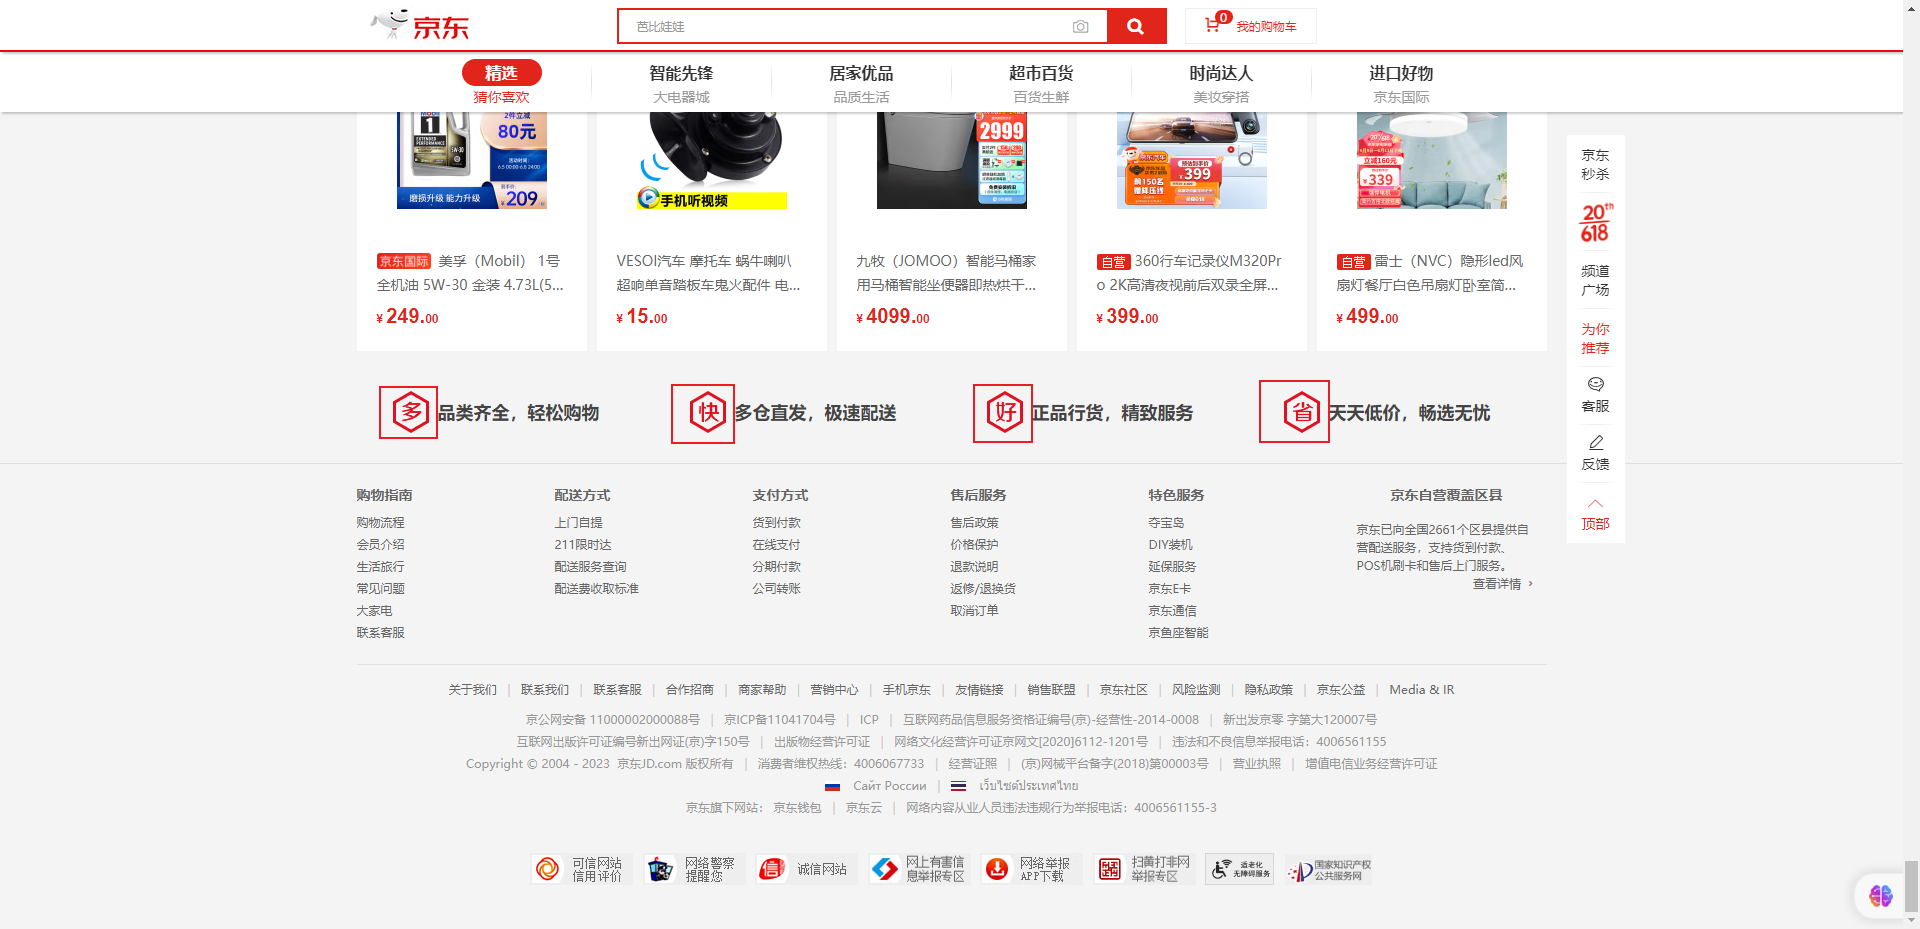
- 在实际开发中,为了让网页更加美观,我们经常会设置各种各样的背景:
9.2 背景颜色
- 属性名:
background-color。
- 属性值:颜色取值(关键字、rgb 表示法、rgba 表示法、十六进制……)。
PS:
- 背景颜色默认值是透明,rgba(0,0,0,0) 、transparent。
- 背景颜色不会影响盒子大小,并且还能看清盒子的大小和位置,一般在布局的时候会习惯的给盒子设置背景颜色。
- 示例:
<!DOCTYPE html>
<html lang="en">

<head>
  <meta charset="UTF-8">
  <meta content="IE=edge" http-equiv="X-UA-Compatible">
  <meta content="width=device-width, initial-scale=1.0" name="viewport">
  <title>Document</title>
  <style>
    div.box {
      width: 400px;
      height: 400px;
      /* background-color: pink; */
      /* background-color: #ccc; */
      /* 红绿蓝三原色,a 是透明度,0~1 */
      background-color: rgba(0, 0, 0, .5);
    }
  </style>
</head>

<body>
  <div class="box">div</div>
</body>

</html>2
3
4
5
6
7
8
9
10
11
12
13
14
15
16
17
18
19
20
21
22
23
24
25
9.3 背景图片
- 属性名:
background-image。
- 属性值:
background-image: url('图片的路径');。
PS:
- ① 背景图片中的 url 可以省略引号。
② 背景图片默认是在水平和垂直方向平铺的。
③ 背景图片仅仅是给盒子起到装饰效果,类似于背景颜色,是不能撑开盒子的。
④ 如果设置了背景图片之后;但是,元素没有具体的宽度和高度,背景图片是不会显示出来的。
⑤ 背景图片是盖在(不是覆盖)background-color 上面的。
⑥ 如果设置了多张背景图片,那么设置的第一张背景图片将显示在最上面,其它的背景图片将按照顺序层叠在下面。
- 示例:
<!DOCTYPE html>
<html lang="en">
<head>
  <meta charset="UTF-8">
  <meta content="IE=edge" http-equiv="X-UA-Compatible">
  <meta content="width=device-width, initial-scale=1.0" name="viewport">
  <title>Title</title>
  <style>
    .box {
      width: 500px;
      height: 500px;
      /* 设置背景颜色 */
      background-color: pink;
      /* 设置背景图片 */
      background-image: url(./images/1.jpg);
    }
  </style>
</head>
<body>
  <div class="box"></div>
</body>
</html>2
3
4
5
6
7
8
9
10
11
12
13
14
15
16
17
18
19
20
21
22
9.4 背景平铺
属性名:
background-repeat。属性值:
| 取值 | 效果 |
|---|---|
| repeat | (默认值)水平和垂直方向都平铺 |
| no-repeat | 不平铺 |
| repeat-x | 沿着水平方向(x轴)平铺 |
| repeat-y | 沿着垂直方向(y轴)平铺 |
- 补充:
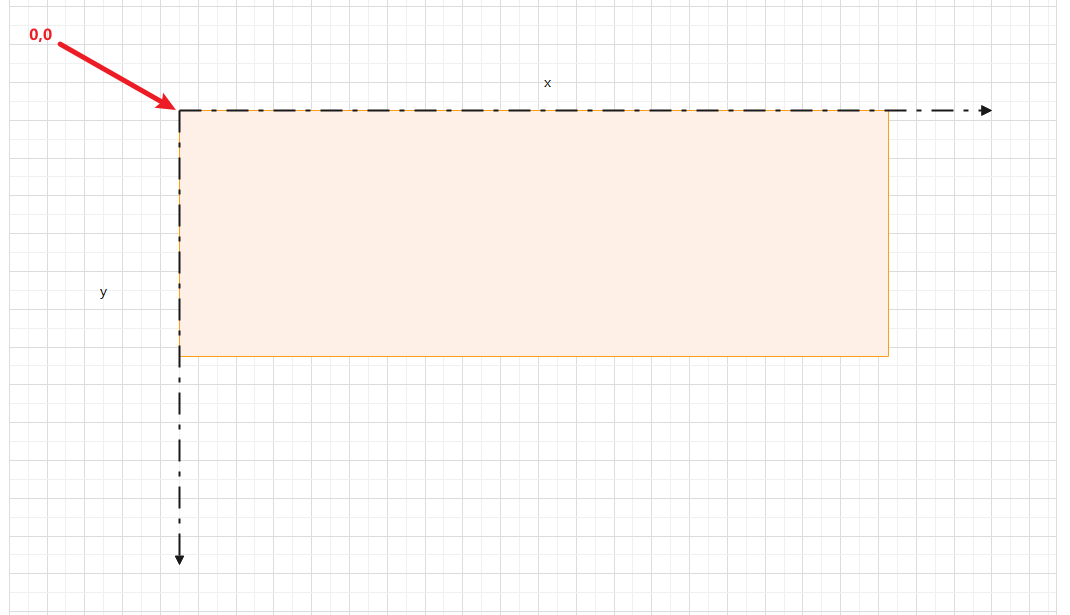
- 示例:
<!DOCTYPE html>
<html lang="en">

<head>
  <meta charset="UTF-8">
  <meta content="IE=edge" http-equiv="X-UA-Compatible">
  <meta content="width=device-width, initial-scale=1.0" name="viewport">
  <title>Document</title>
  <style>
    .box {
      width: 400px;
      height: 400px;
      background-color: pink;
      background-image: url(./image/1.jpg);
      /* 背景不平铺 */
      background-repeat: no-repeat;
    }
  </style>
</head>

<body>
  <div class="box">文字</div>
</body>

</html>2
3
4
5
6
7
8
9
10
11
12
13
14
15
16
17
18
19
20
21
22
23
24
25
9.5 背景图片尺寸
- 属性名:
background-size。
- 属性值:
| 取值 | 效果 |
|---|---|
| auto | 默认值, 以背景图本身大小显示。 |
| cover | 缩放背景图,以完全覆盖铺满元素,可能背景图片部分看不见(常用)。 |
| contain | 缩放背景图,宽度或者高度铺满元素,但是图片保持宽高比。 |
<percentage> | 百分比,相对于背景区(background positioning area) |
| length | 具体的大小,如:100px |
- 示例:
<!DOCTYPE html>
<html lang="en">
<head>
  <meta charset="UTF-8">
  <meta content="IE=edge" http-equiv="X-UA-Compatible">
  <meta content="width=device-width, initial-scale=1.0" name="viewport">
  <title>Title</title>
  <style>
    .box {
      width: 500px;
      height: 500px;
      /* 设置背景颜色 */
      background-color: pink;
      /* 设置背景图片 */
      background-image: url(./images/1.jpg);
      /* 设置背景不平铺 */
      background-repeat: no-repeat;
      /* 背景尺寸大小 */
      background-size: cover;
    }
  </style>
</head>
<body>
  <div class="box"></div>
</body>
</html>2
3
4
5
6
7
8
9
10
11
12
13
14
15
16
17
18
19
20
21
22
23
24
25
26
9.6 背景位置
- 属性名:
background-position。
- 属性值:
background-position:水平方向位置 垂直方向位置。
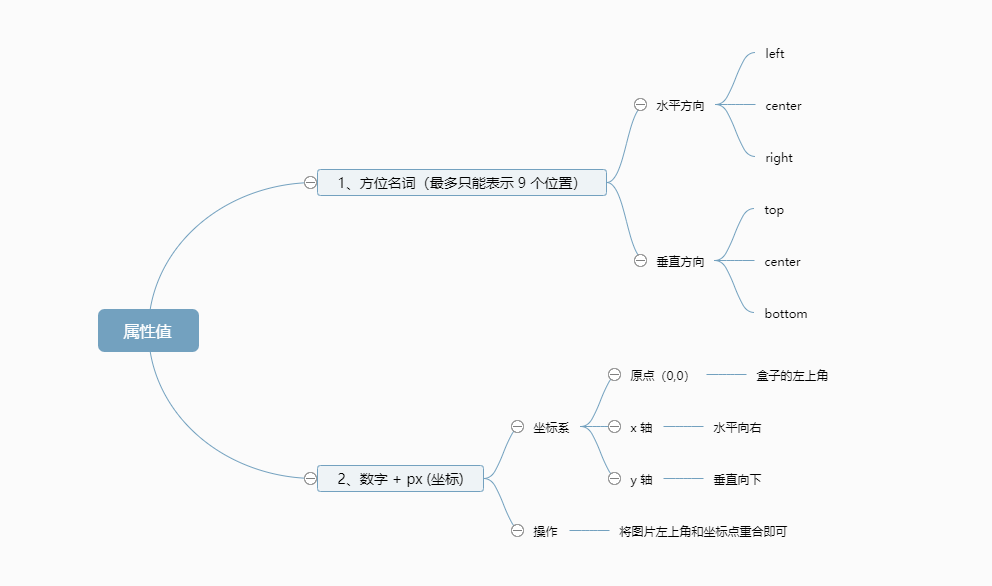
PS:
- 方位名字取值和坐标取值可以混合使用,第一个取值表示水平,第二个取值表示垂直。
- 如果只设置了一个方向,另一个方向默认就是
center。
- 示例:
<!DOCTYPE html>
<html lang="en">

<head>
  <meta charset="UTF-8">
  <meta content="IE=edge" http-equiv="X-UA-Compatible">
  <meta content="width=device-width, initial-scale=1.0" name="viewport">
  <title>Document</title>
  <style>
    .box {
      width: 400px;
      height: 400px;
      background-color: pink;
      background-image: url(./images/1.jpg);
      background-repeat: no-repeat;
      /* background-position: 水平方向 垂直方向; */
      background-position: center center;
    }
  </style>
</head>

<body>
  <div class="box">文字</div>
</body>

</html>2
3
4
5
6
7
8
9
10
11
12
13
14
15
16
17
18
19
20
21
22
23
24
25
26
9.7 背景(简写属性)
- background 是一系列背景相关属性的简写属性。
- 语法:
background: color image repeat position/size;PS:
- 属性的顺序是任意的,并且
background-size是可以省略的,如果不省略,/background-size必须在background-position的后面。- 一般,我们都会单独设置
background-size。
- 示例:
<!DOCTYPE html>
<html lang="en">

<head>
  <meta charset="UTF-8">
  <meta content="IE=edge" http-equiv="X-UA-Compatible">
  <meta content="width=device-width, initial-scale=1.0" name="viewport">
  <title>Document</title>
  <style>
    .box {
      width: 400px;
      height: 400px;
      background: pink url(./images/1.jpg) no-repeat center;
    }
  </style>
</head>

<body>
  <div class="box">文字</div>
</body>

</html>2
3
4
5
6
7
8
9
10
11
12
13
14
15
16
17
18
19
20
21
22
9.8 图片 VS 背景图片
- 背景图片(background-image)和图片(img)都能够实现显示图片的需求;那么,在开发中该如何选择?
| img | background-image | |
|---|---|---|
| 性质 | HTML 元素 | CSS 样式 |
| 图片是否占用空间 | √ | × |
| 浏览器右键是否能直接查看地址 | √ | × |
| 是否支持 CSS 精灵图 | × | √ |
| 是否更可能被搜索引擎收录 | √(结合 alt 属性) | × |
- 总结:
- img,作为网页内容的重要组成部分,如:广告图片、LOGO图片、文章配图、产品图片。
- background-image,可有可无。有,能让网页更加美观。无,也不影响用户获取完整的网页内容信息。